21 Spa Bathroom Ideas to Make Your Bathroom Feel 5-Star
Most bathrooms serve a function. A spa bathroom serves a purpose. The difference is whether you walk out of the room feeling better than when you walked in.
The average person spends about 30 minutes a day in the bathroom. Over a year, that’s more than 180 hours. What that room feels like matters significantly more than most people acknowledge when they’re staring at a contractor’s tile sample board trying to decide between two shades of grey.
These 21 spa bathroom ideas range from full renovation upgrades to changes you make this weekend without touching a single tile. All of them move your bathroom closer to the room you actually want to spend time in.
1. Install a Rainfall Shower Head
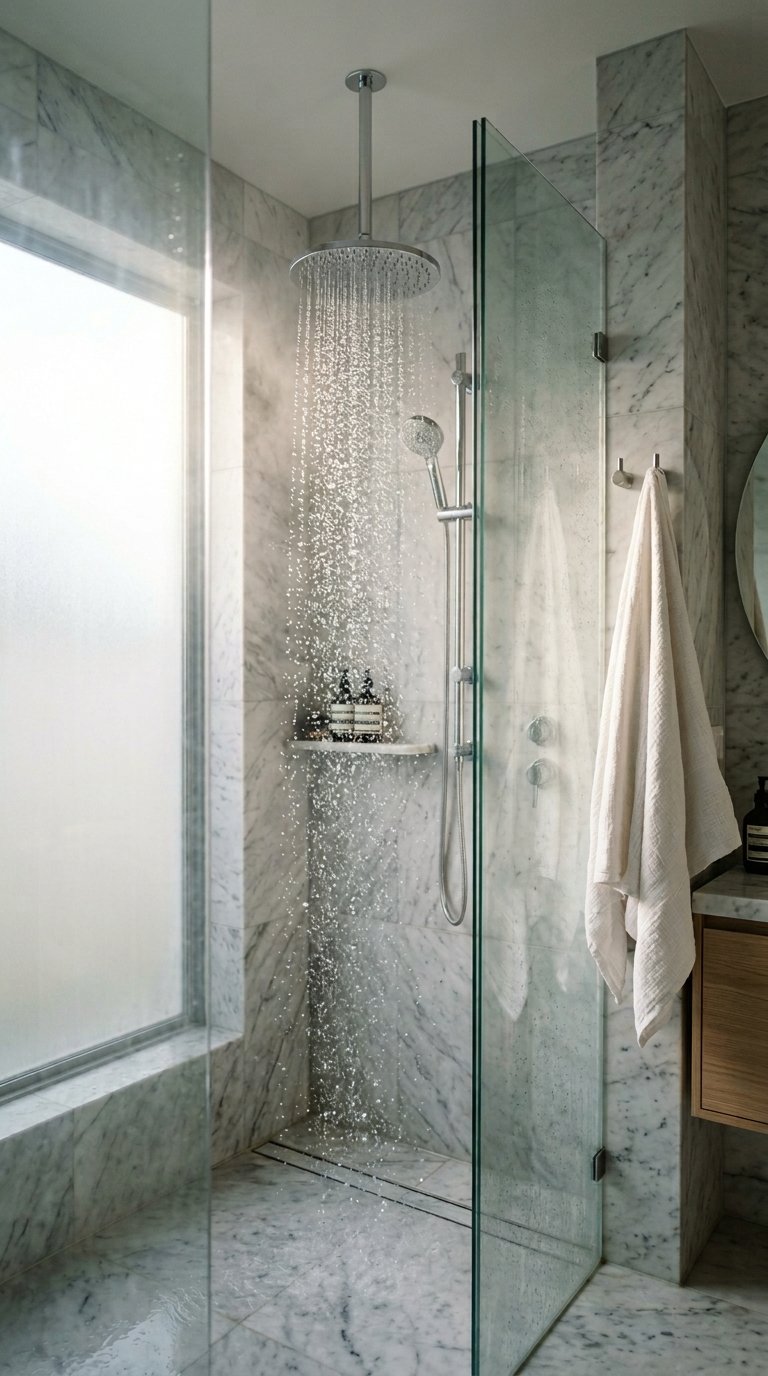
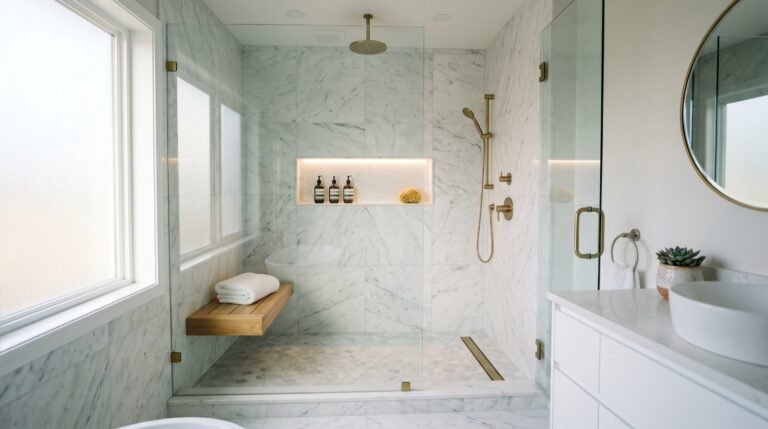
The single fastest way to make a shower feel spa-like is a rainfall shower head. The wide, even stream of water from above creates a fundamentally different showering experience than a standard wall-mounted head pointing at your torso.
Rainfall shower head options:
- Ceiling-mounted: Requires plumbing relocation, most immersive experience, permanent installation
- Arm-extension wall mount: Attaches to existing plumbing, no structural changes, most accessible option
- Dual system: Combines rainfall overhead with a handheld attachment for flexibility
- Adjustable pressure: Some models allow switching between rainfall and high-pressure modes
Budget $80 to $400 for a quality rainfall head. The cheap versions clog quickly and deliver uneven flow. Spend at the middle of the range and the experience is genuinely transformative. This is one upgrade you use every single day.
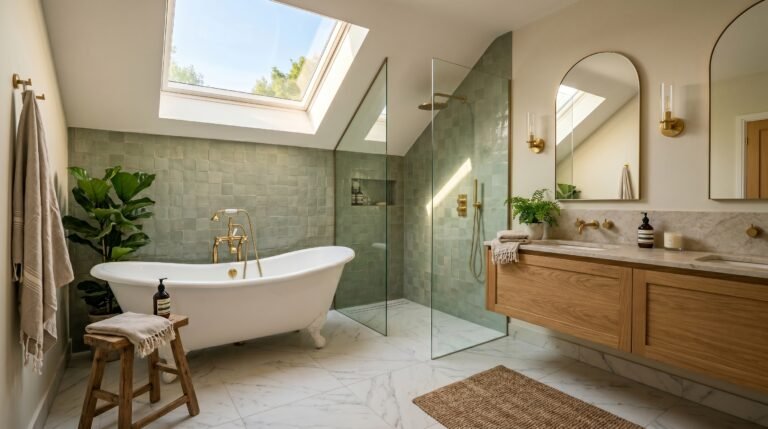
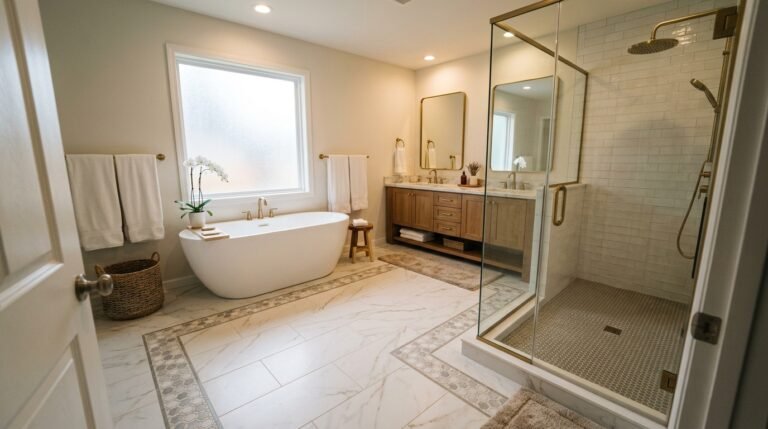
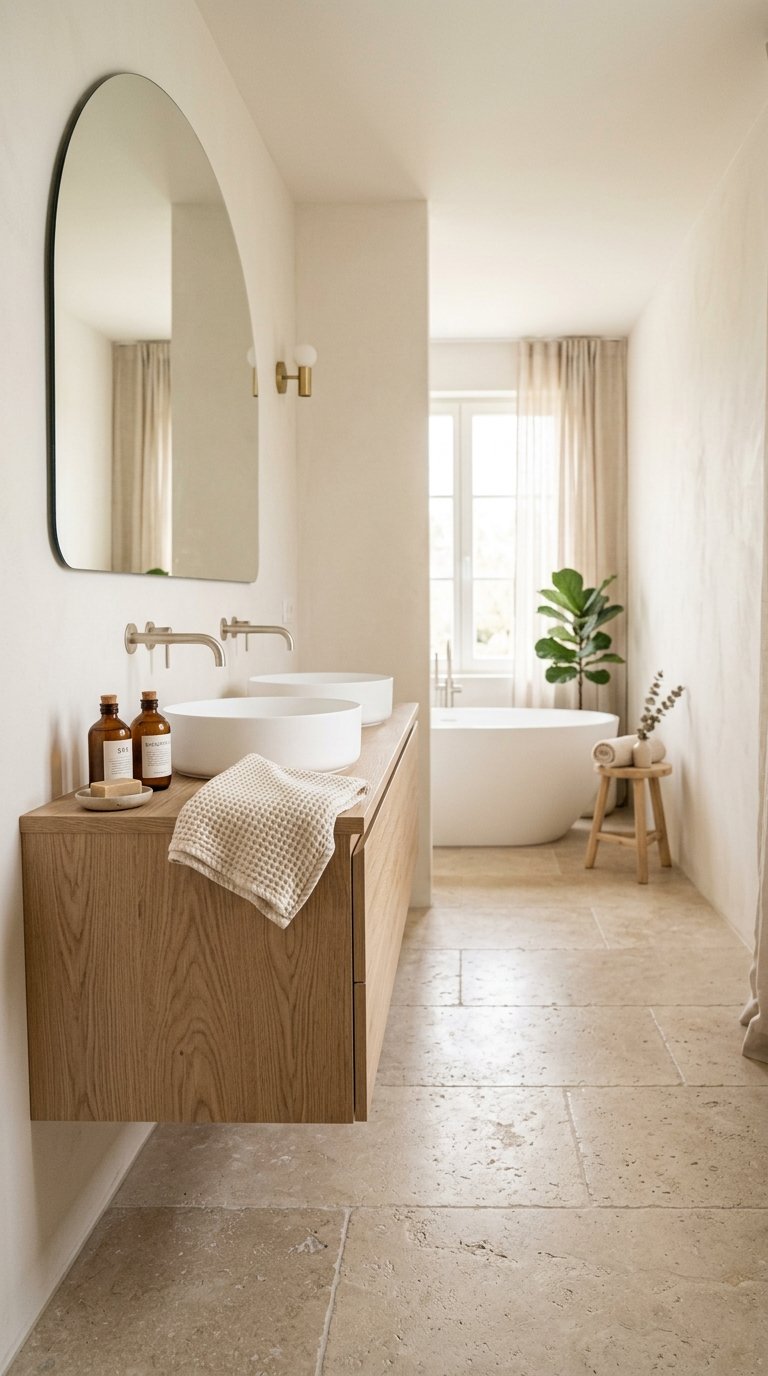
2. Add a Freestanding Soaking Tub
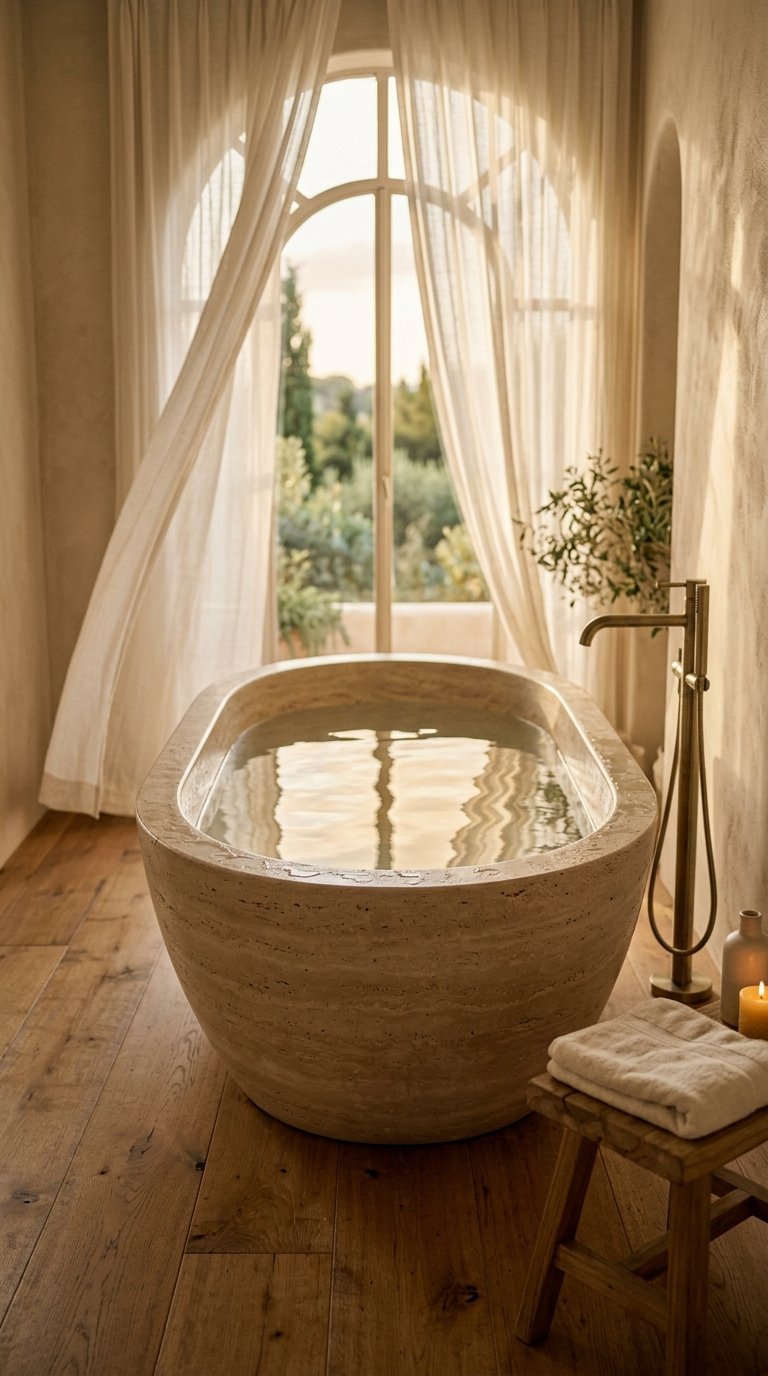
A freestanding soaking tub is the most recognizable spa bathroom element. It sits away from the walls, occupies the room as a piece of furniture, and invites long baths rather than quick rinses.
Freestanding tub materials compared:
- Acrylic: Lightest weight, retains heat reasonably well, most affordable at $500 to $2,000
- Cast iron: Heaviest, retains heat best, most durable, requires floor reinforcement in many cases, $1,500 to $5,000
- Stone resin: Excellent heat retention, heavy but not as heavy as cast iron, $1,000 to $3,500
- Copper: Exceptional heat retention, very distinctive aesthetic, $2,000 to $8,000
The tub needs floor space to breathe. Cramming a freestanding tub into a tight corner defeats the aesthetic entirely. A freestanding tub with at least 12 inches of clearance on all sides creates the visual presence it needs.
3. Install Heated Floors
Stepping onto a warm floor on a cold morning is one of the most genuinely luxurious small experiences available in a home. Radiant floor heating under bathroom tile costs less to install than most people expect and adds negligible ongoing energy cost.
Radiant floor heating options:
- Electric mat system: Easiest to install, works under tile, most common for bathroom retrofits
- Hydronic system: Hot water-based, more efficient for larger areas, higher installation cost
- Thermostat control: A programmable thermostat lets you set the floor to warm before you wake up
Installation cost runs between $500 and $2,000 for a standard bathroom electric mat system, including professional installation. The ongoing operating cost for a standard bathroom runs approximately $5 to $10 per month depending on usage and energy rates.
4. Use Natural Stone or Large-Format Tile
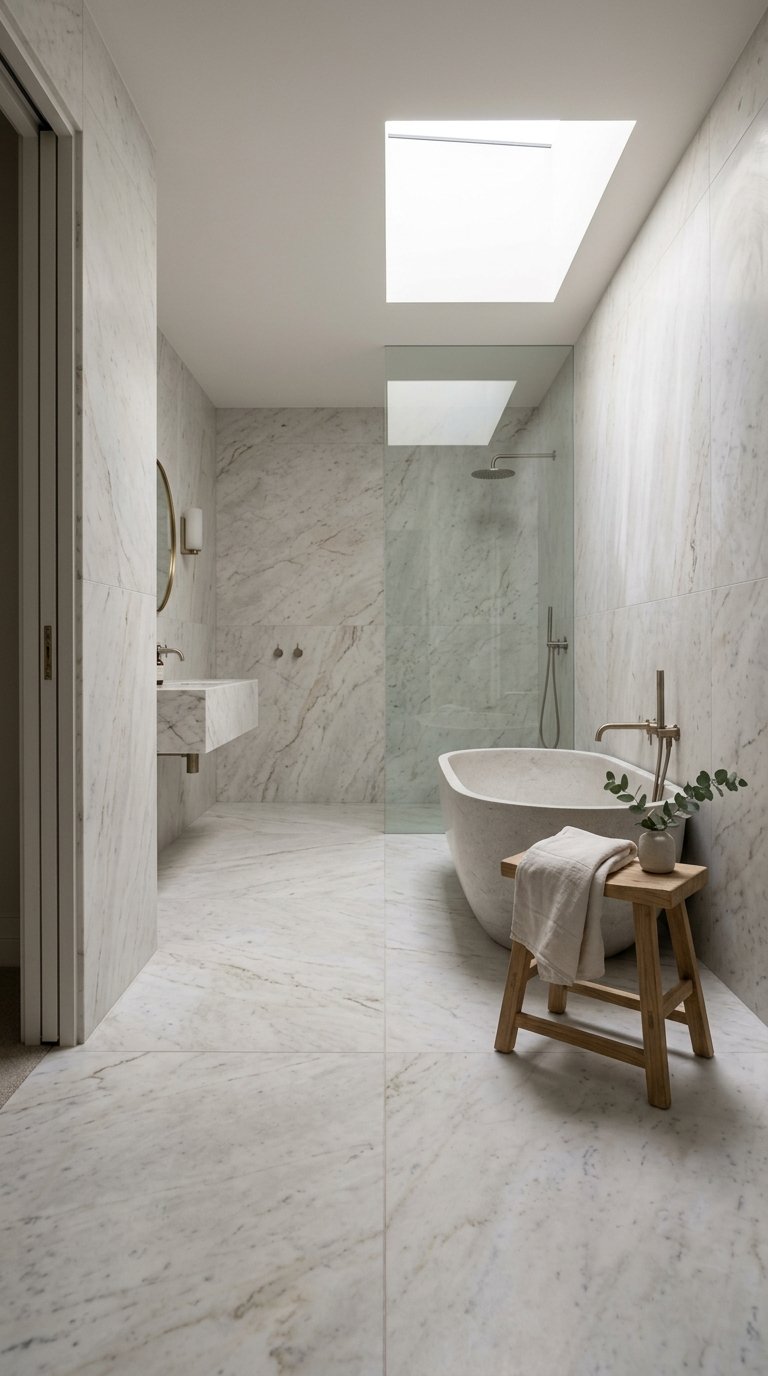
The tile you choose in a spa bathroom sets the material tone for every other element in the room. Natural stone and large-format tile both create the sense of quality and calm that cheap ceramic tile never delivers.
Tile options that create a spa atmosphere:
- Marble: Cool, veined, immediately luxurious but requires sealing and careful maintenance
- Travertine: Warmer than marble, natural pitting adds character, requires sealing
- Slate: Very durable, earthy and organic, slip-resistant
- Large-format porcelain: Fewer grout lines create a cleaner, more expansive look
- Limestone: Soft, matte, very spa-adjacent in character, requires regular sealing
Fewer grout lines equal a more spa-like appearance. Large-format tiles (24×24 inches or larger) reduce grout line frequency dramatically compared to standard 12×12 tiles. That visual simplicity is a significant part of what makes high-end spa bathrooms look so clean.
5. Add a Steam Shower
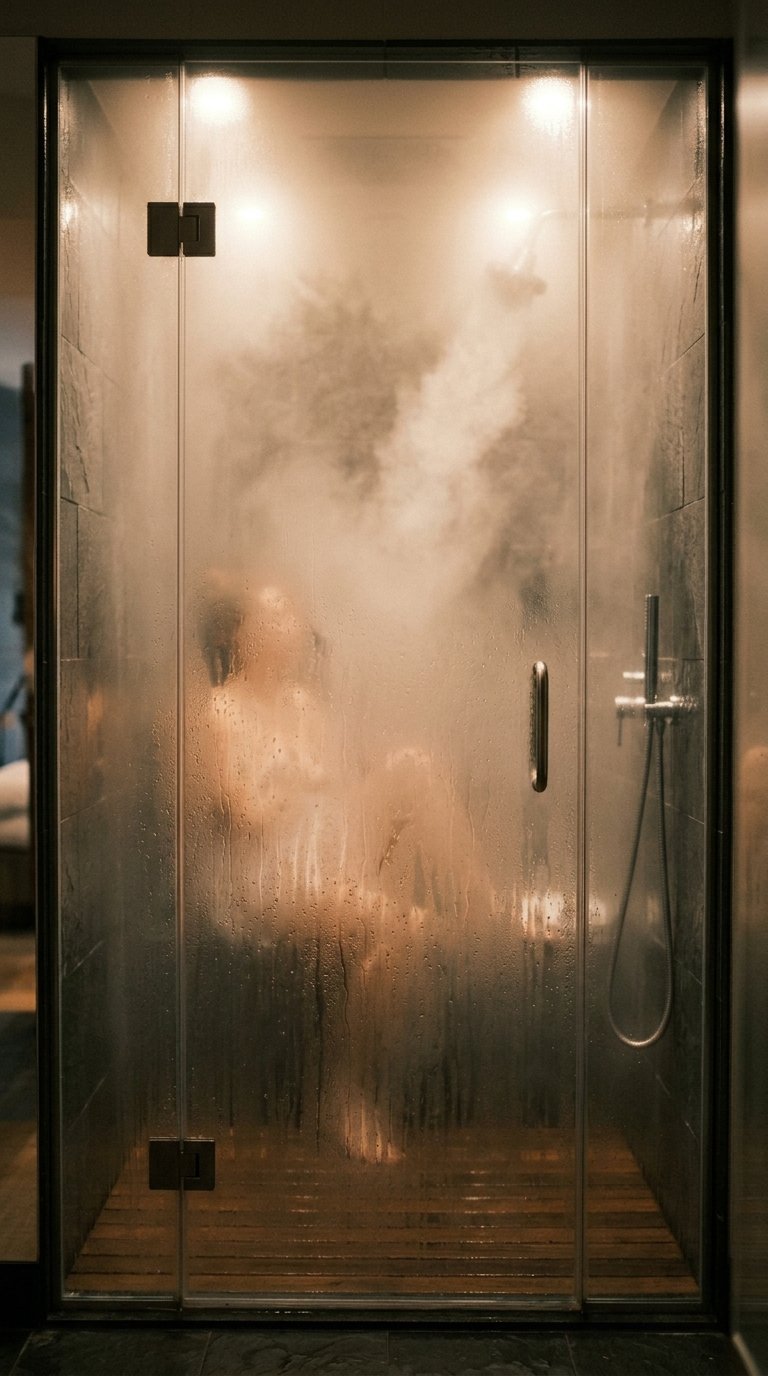
A steam shower converts a standard enclosed shower into a steam room. A steam generator connects to your existing water supply and produces steam that fills a sealed shower enclosure. The experience combines showering with steam therapy in one fixture.
Steam shower requirements:
- A fully sealed enclosure: Glass panels with proper sealing, no ventilation gaps
- A steam generator: Sized to the shower volume, typically installed in a nearby cabinet or closet
- A steam head: Small outlet that releases steam into the shower space
- Controls: Thermostat and timer for consistent temperature
- A sloped ceiling or pitched roof: Prevents condensed water from dripping onto bathers
Steam shower generators cost between $500 and $3,000 depending on shower volume and brand quality. Installation adds to that cost. The daily health benefits of steam (respiratory, skin, muscle recovery) make this one of the most functionally justified spa bathroom upgrades available.
6. Install a Heated Towel Rail
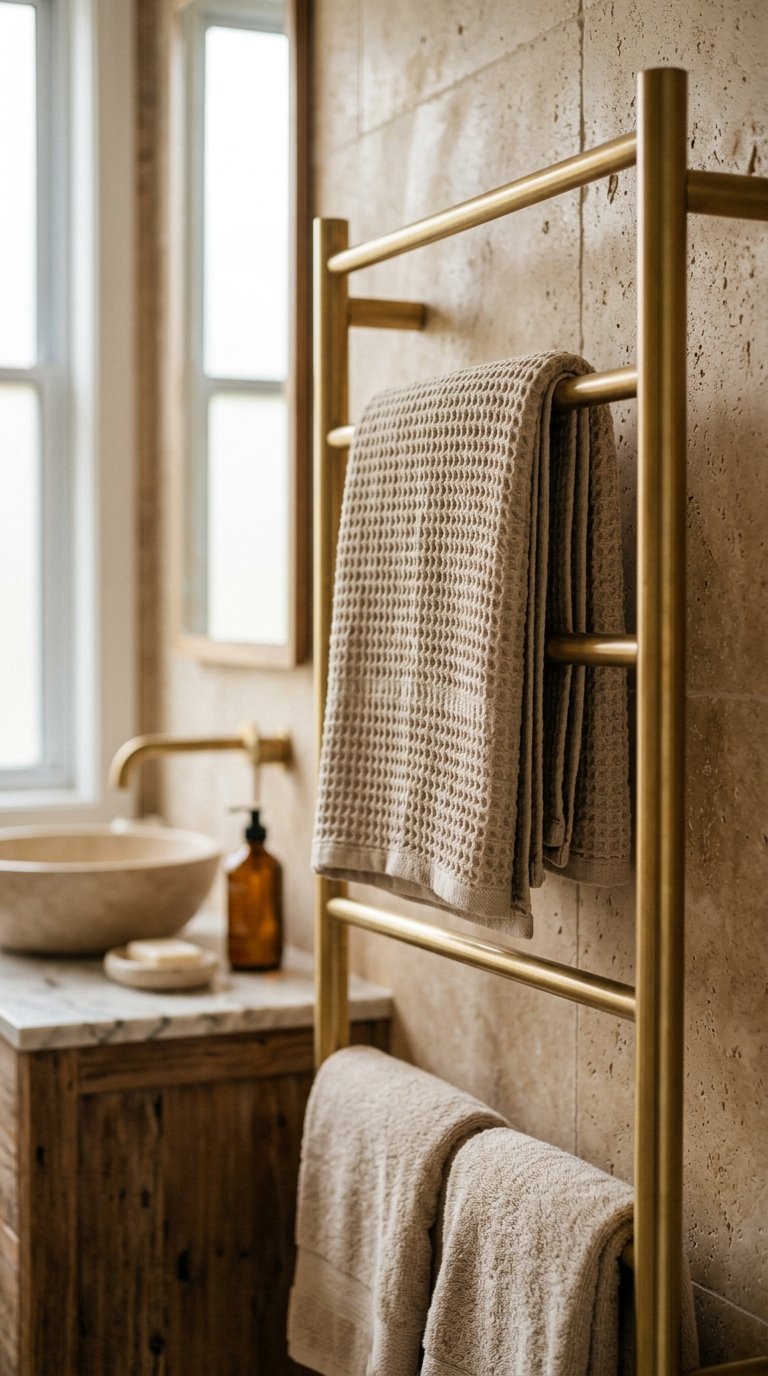
A heated towel rail keeps towels warm and dry between uses and delivers one of those small daily luxuries that makes a noticeable difference in how a bathroom feels. Wrapping yourself in a warm towel after a hot shower is a genuinely different experience than reaching for a cold one.
Heated towel rail options:
- Electric: Plugs into a standard outlet or hardwires, no plumbing connection required, most accessible installation
- Hydronic: Connects to the home’s hot water system, more energy efficient for continuous use
- Freestanding: No installation required, movable, lower output than wall-mounted versions
Match the finish to your faucet and other hardware. Matte black, brushed nickel, and brushed gold are the most current options. A chrome towel rail in a matte black bathroom looks like it came from a different project.
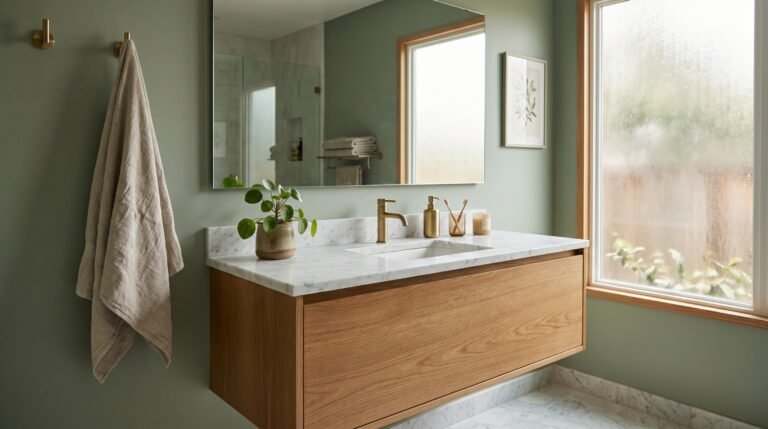
7. Create a Double Vanity
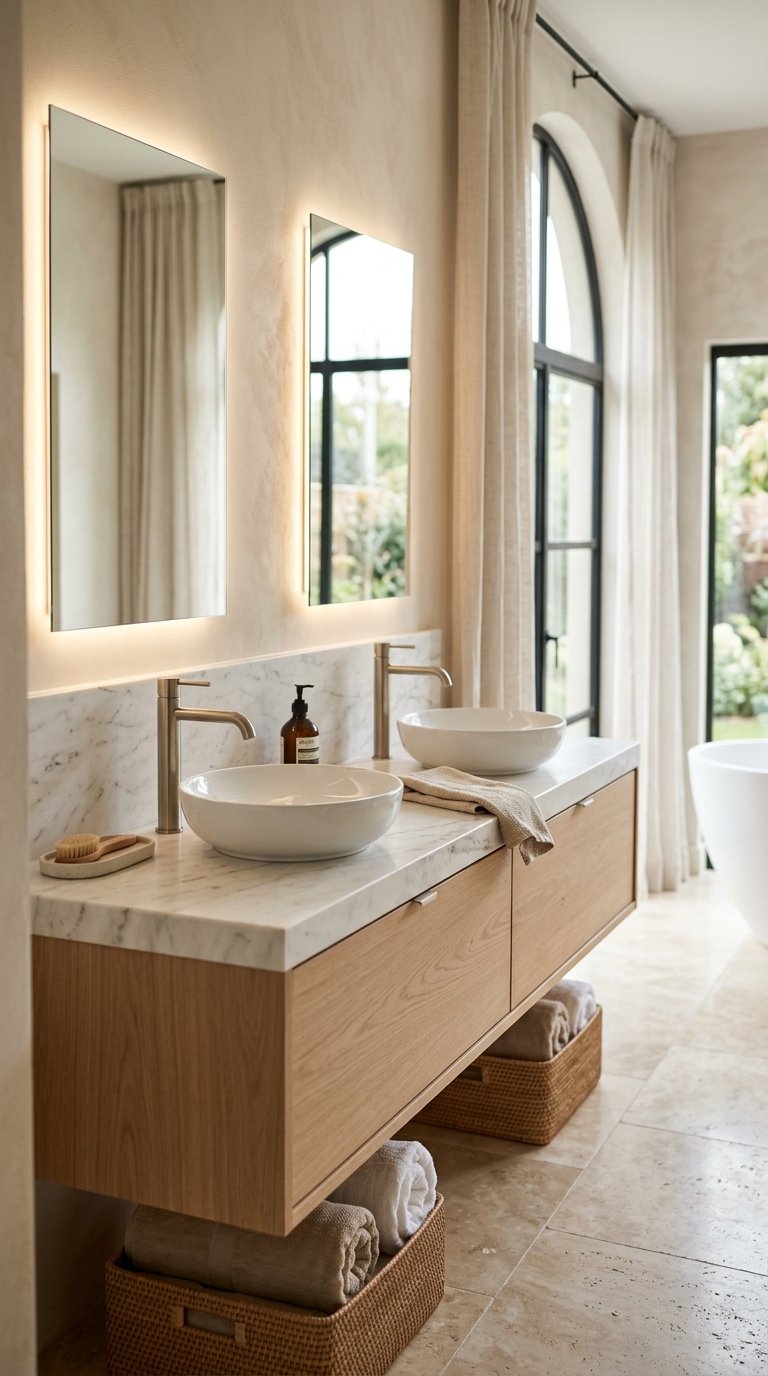
A double vanity gives each person their own sink, mirror, and counter space. In a shared master bathroom, it removes the single largest source of morning bathroom conflict, which is a more genuine contribution to daily wellbeing than most architectural features.
Double vanity considerations:
- Minimum width: 60 inches for a comfortable double vanity with adequate counter space per person
- Mirror options: Two individual mirrors or one large mirror spanning the full vanity width
- Storage: Each side should have its own drawers or cabinets below
- Lighting: Side-mounted sconces between or flanking the mirrors provide the most flattering light for both users
A floating double vanity creates visual floor space that makes a bathroom feel larger. The gap between the vanity bottom and the floor is one of the most effective small-bathroom-enlarging tricks available.
8. Add a Bench or Seating in the Shower
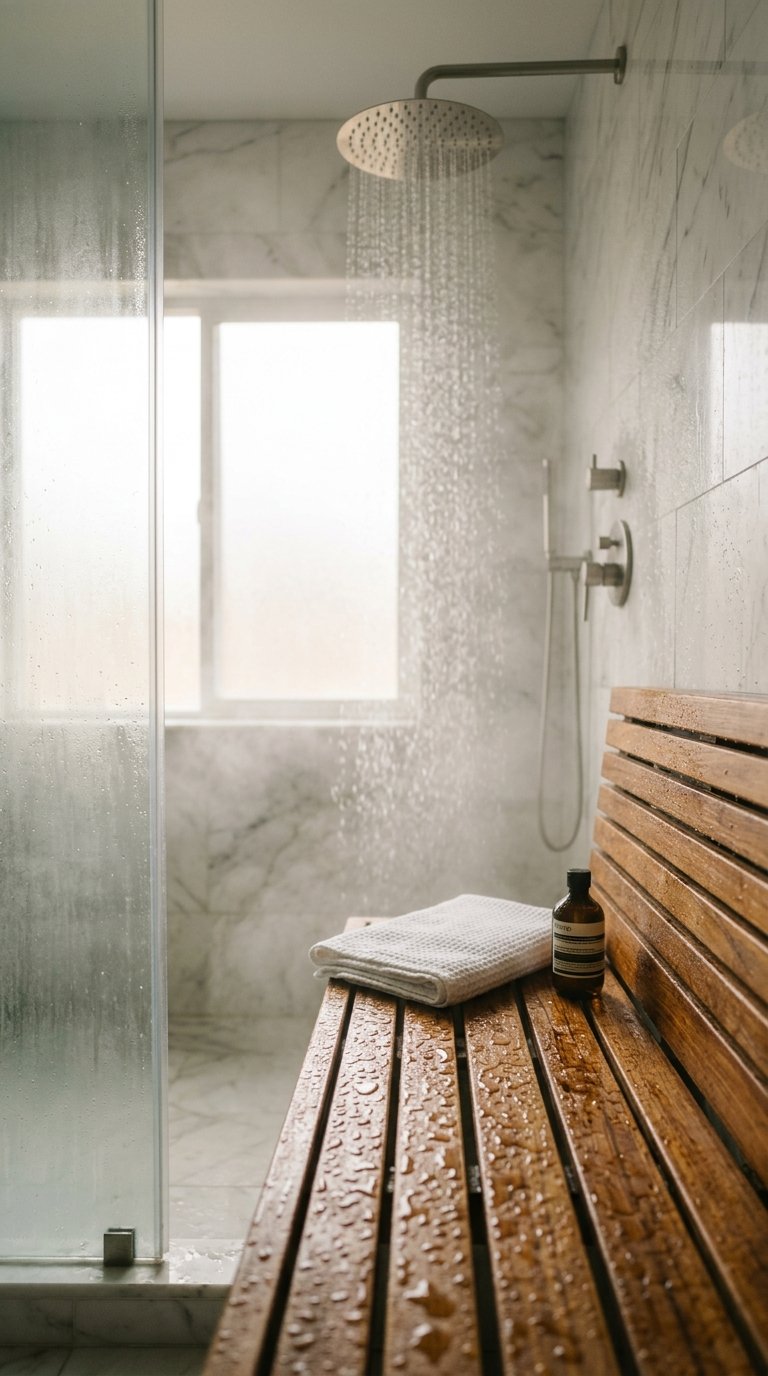
A shower bench changes how you use the shower. It provides a surface for foot washing, a place to sit when you need it, and a platform for products and accessories that keeps them off the shower floor.
Shower bench options:
- Built-in tiled bench: Permanent, integrated, matches the shower aesthetic exactly
- Teak wood bench: Warm, natural, handles moisture very well, movable
- Stone slab bench: Heavy, permanent-feeling, very spa-like in character
- Fold-down wall-mounted bench: Space-saving, practical, works in smaller showers
A teak bench is the fastest spa upgrade you add to an existing shower without renovation. It costs between $80 and $250, installs in seconds, and changes how the shower feels and functions immediately.
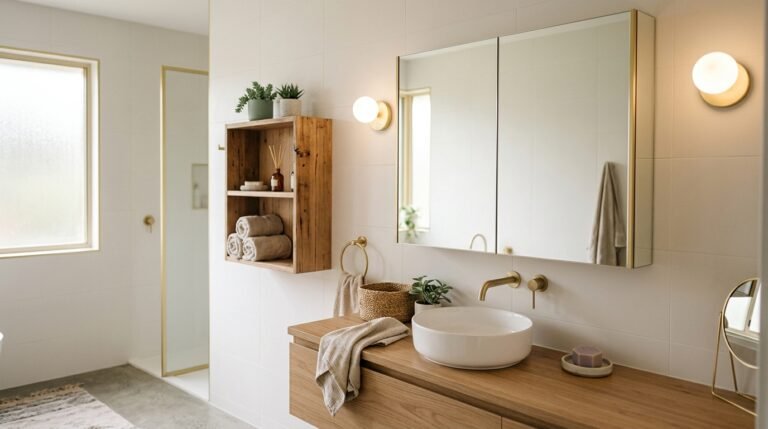
9. Install Wall Niches in the Shower
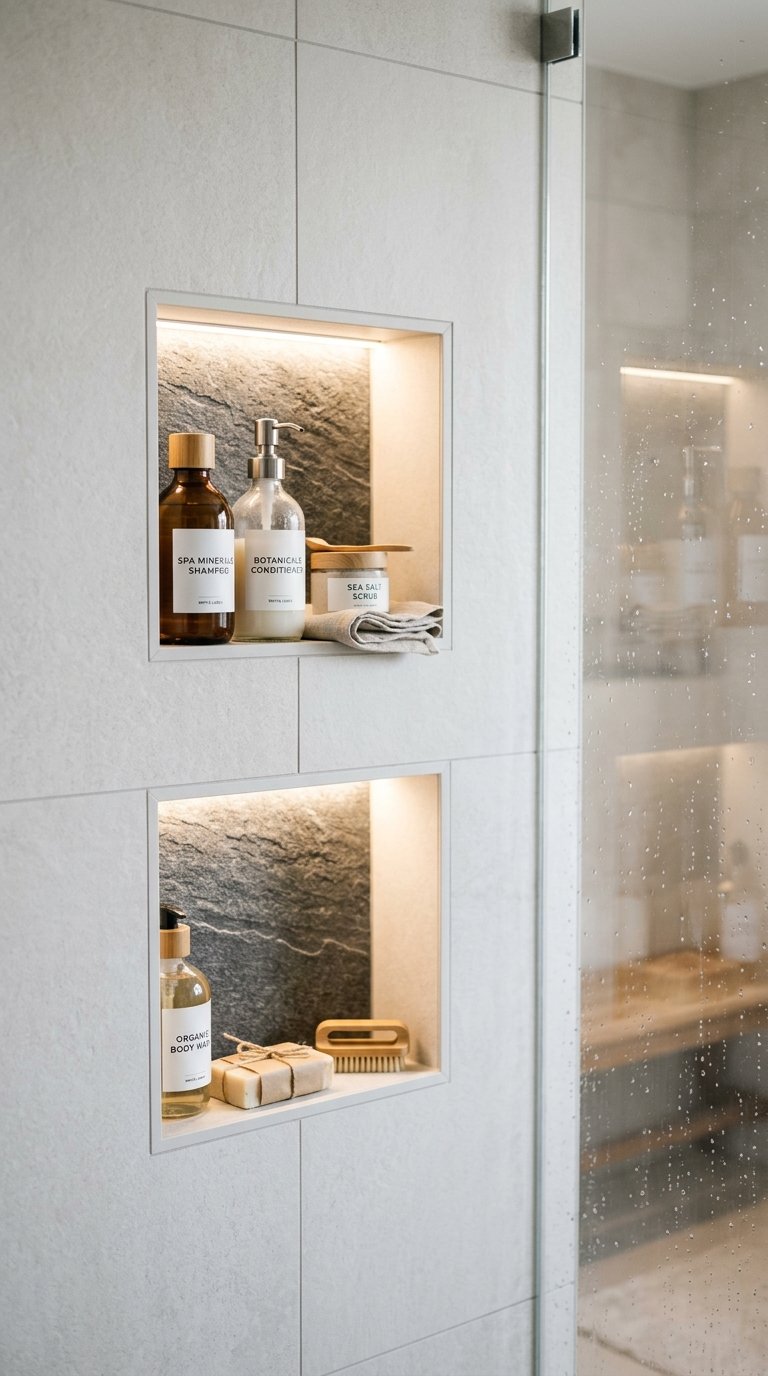
Wall niches built into the shower provide recessed storage for products without shelves protruding into the shower space. They keep bottles organized, visible, and accessible while maintaining the clean, uncluttered look that defines spa-style showers.
Wall niche details worth knowing:
- Size: 12×24 inches is the standard single niche size; a double niche runs 24×24 inches
- Tile: The niche interior should be tiled in a contrasting or complementary material to the main shower tile
- Placement: Build niches between studs in a wall that doesn’t share exterior exposure to minimize moisture risk
- Height: Install at arm height from the shower floor, typically 48 to 54 inches from the floor
Multiple small niches at different heights work better than one large niche because they allow product organization by category: shampoo in one, body wash in another, razors in a third.
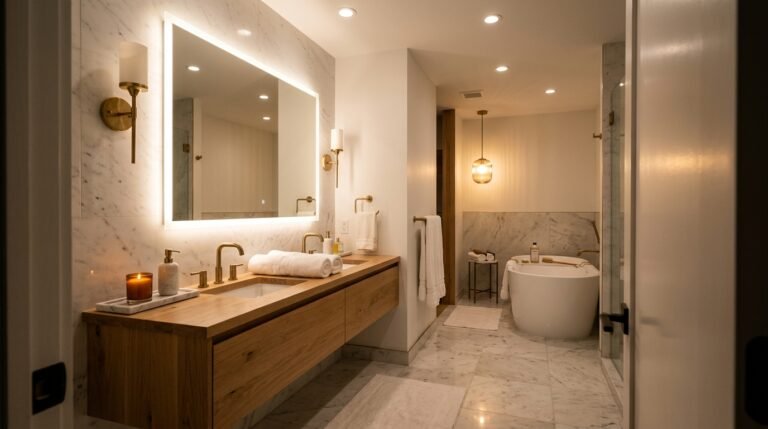
10. Use Dimmable Lighting Throughout
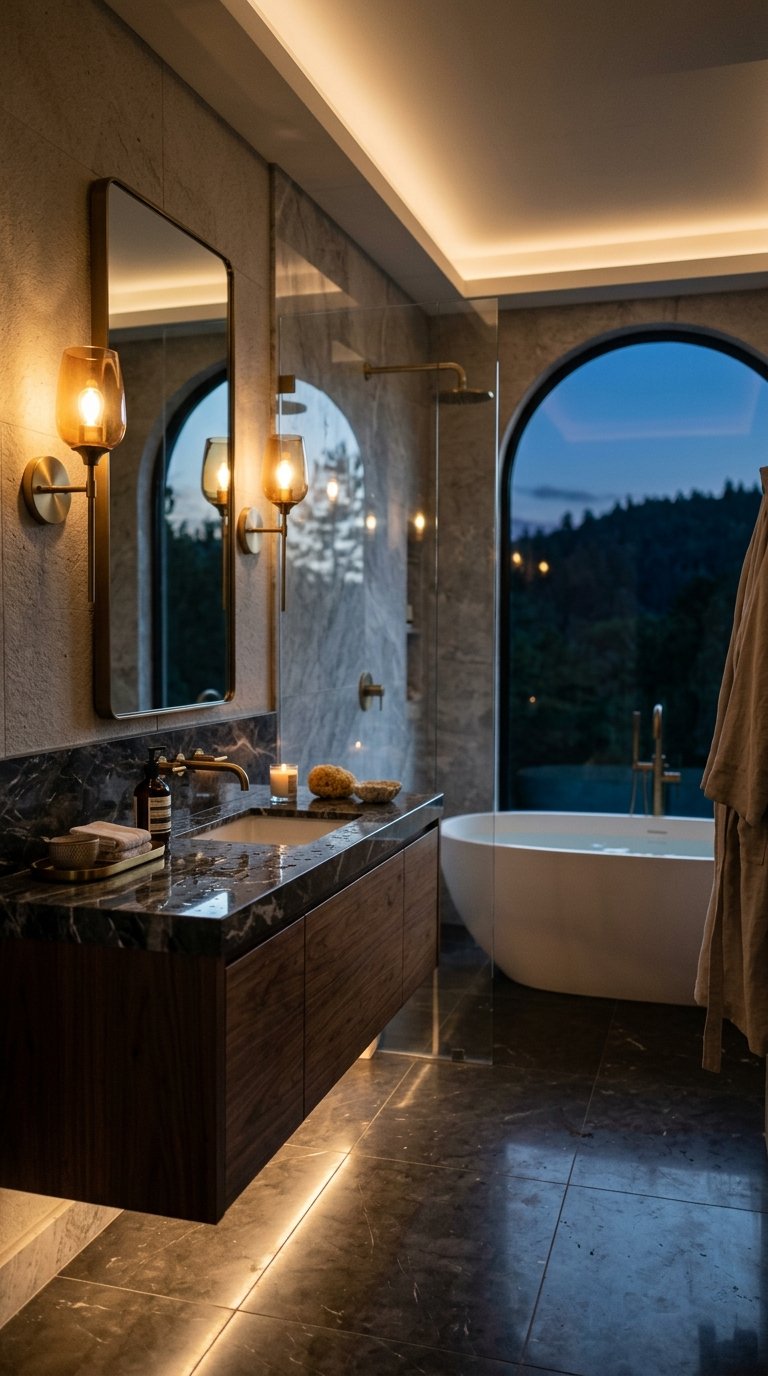
Lighting in most bathrooms serves only one purpose: maximum visibility. A spa bathroom needs lighting that serves two purposes: bright for grooming and dim for bathing. Dimmable fixtures throughout the bathroom make this shift possible without a second thought.
Dimmable lighting setup for a spa bathroom:
- Overhead recessed lights on a dimmer switch: Primary ambient light, adjustable for mood
- Vanity sconces on a separate dimmer: Grooming-specific light, can stay bright while overhead dims
- LED strip lighting under the vanity or behind the mirror: Soft accent light for evening
- Waterproof recessed lights inside the shower: Shower-specific illumination
Warm white bulbs at 2700K throughout the bathroom create skin-flattering light that cool white bulbs never achieve. This is a simple bulb swap that costs nothing beyond the bulbs themselves.
11. Add a Live Edge Wood Accent
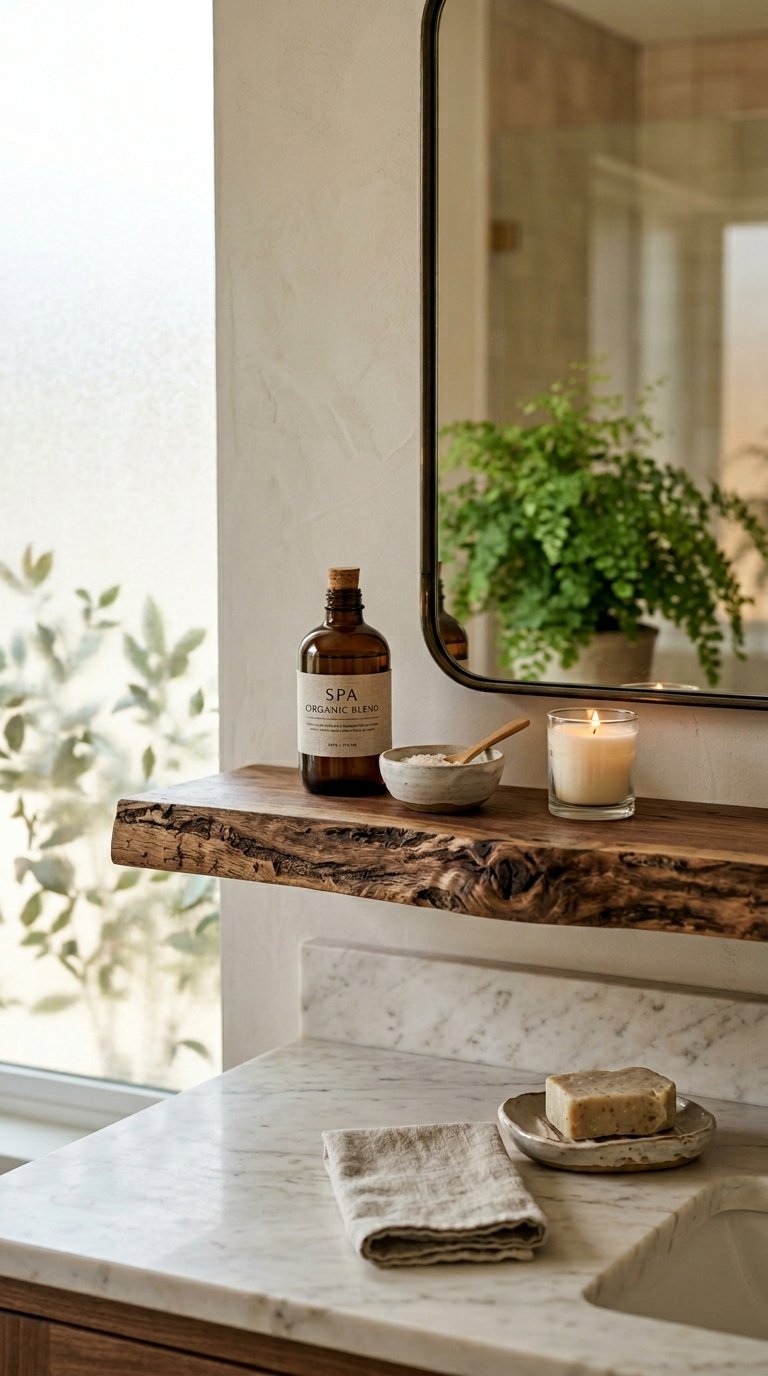
Natural wood in a spa bathroom adds warmth that tile and stone alone cannot provide. A live edge wood element: a shelf, a bench top, or a vanity counter, introduces organic irregularity into a space that tends toward symmetry and hard surfaces.
Natural wood applications in a spa bathroom:
- Live edge floating shelf: Above the toilet or beside the vanity for display and storage
- Teak shower bench or mat: On the shower floor or as a bench surface
- Wood vanity countertop: Requires proper sealing and waterproofing but creates extraordinary warmth
- Wooden mirror frame: The simplest entry point, adds natural texture at eye level
Any wood used in a bathroom needs proper sealing to handle moisture and humidity. Teak requires the least maintenance of any bathroom wood because its natural oil content resists moisture inherently.
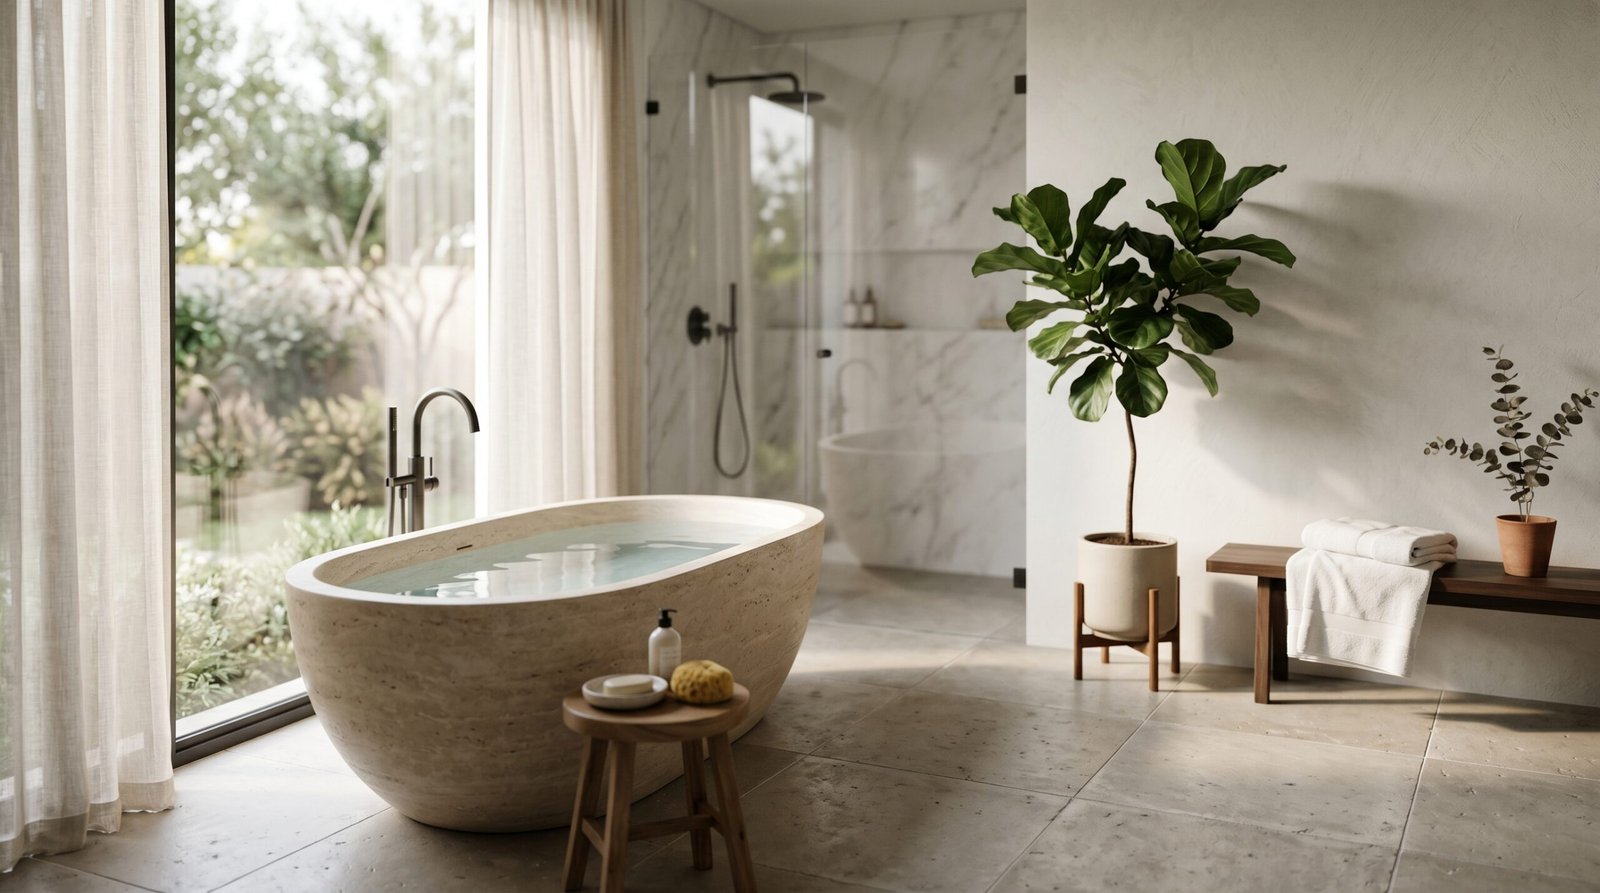
12. Install a Deep Soaking Bathtub
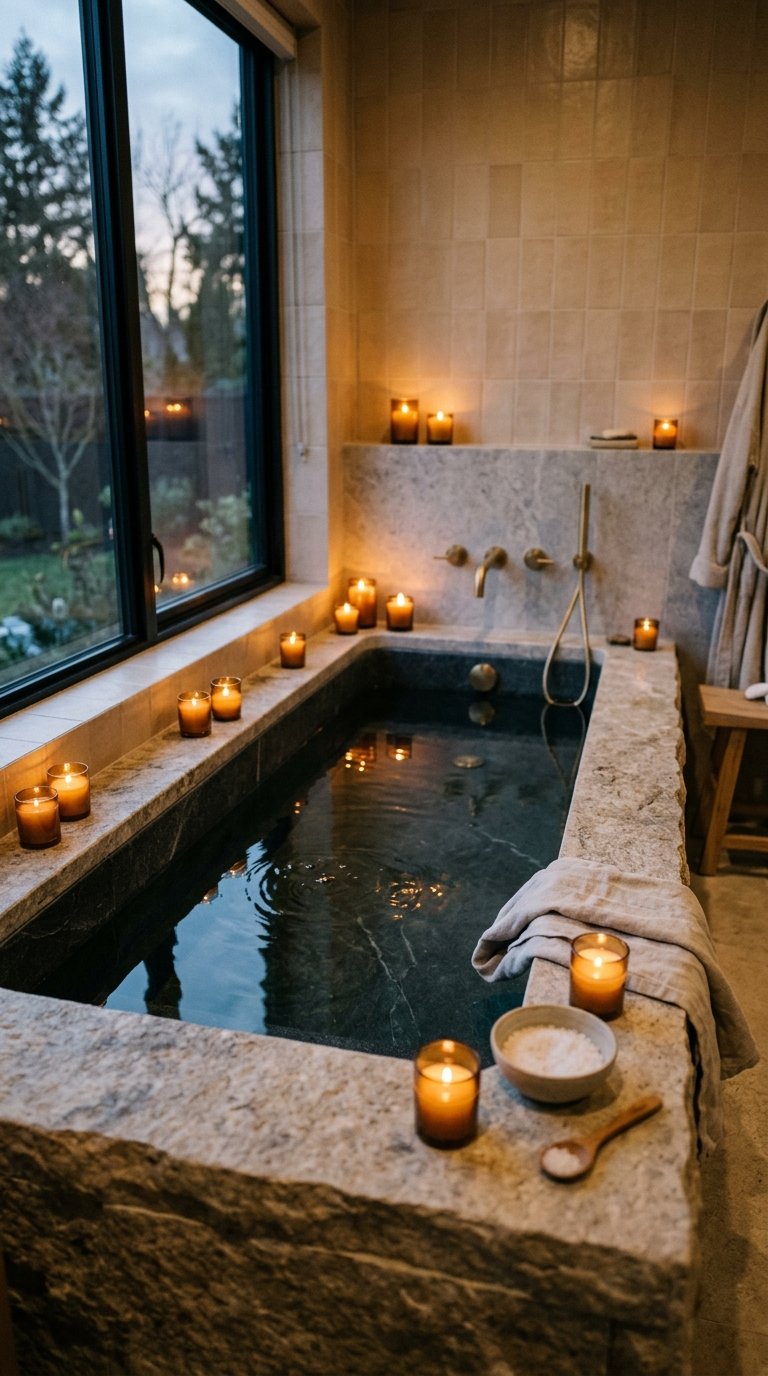
If a freestanding tub isn’t possible in your space, a built-in deep soaking tub delivers much of the same experience in a smaller footprint. The key difference from a standard bathtub is depth: soaking tubs drop 14 to 20 inches below overflow level, allowing full body submersion.
Deep soaking tub options:
- Japanese soaking tub: Square or circular, very deep, smaller footprint than Western tubs
- Built-in alcove soaking tub: Fits the standard three-wall alcove tub space but deeper
- Drop-in soaking tub: Sits inside a deck or surround structure, works in larger bathrooms
- Walk-in soaking tub: Includes a door for easy entry, practical option for accessibility needs
Water temperature retention matters more in a soaking tub than in a standard bath. Cast iron and stone resin both retain heat significantly longer than acrylic. If you plan to soak for 30 to 45 minutes, material choice affects the experience directly.
13. Bring in Plants
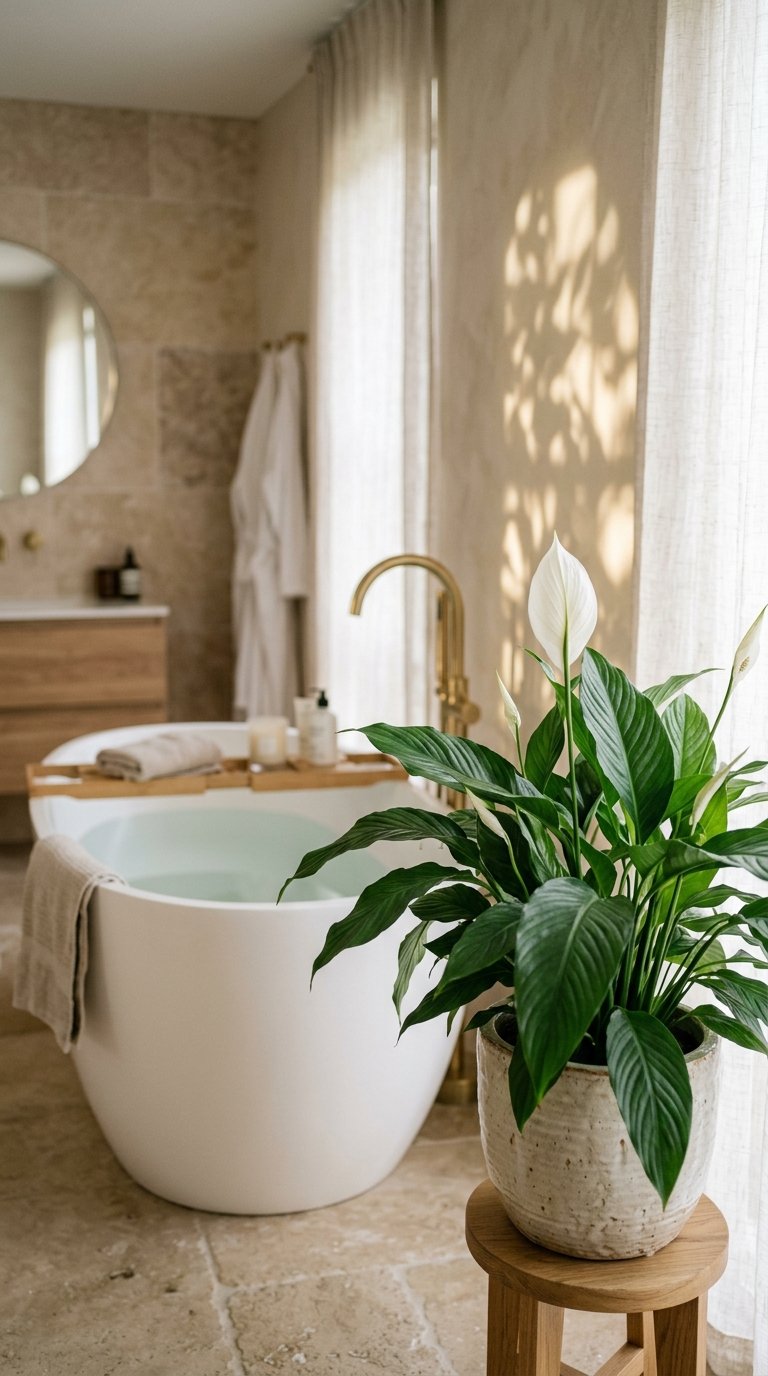
Plants in a spa bathroom do something that no fixture or tile choice replicates: they add genuine living presence to the space. The combination of warmth, humidity, and indirect light in most bathrooms suits several plant species very well.
Best plants for a spa bathroom:
- Peace lily: Handles low light and humidity exceptionally well, produces white flowers regularly
- Orchid: Thrives in bathroom humidity with indirect light, elegant and long-blooming
- Pothos: Tolerates low light, trails beautifully from high shelves
- Bamboo: Grows in water alone, very spa-adjacent aesthetic
- Bird of paradise: Needs a bright bathroom, large and architectural in form
One statement plant in a quality pot does more for a spa bathroom than five small plants scattered across the counter. Scale the plant to the room. A large bathroom needs a large plant. A small bathroom needs a compact but considered plant.
14. Use a Neutral, Nature-Inspired Color Palette
Spa bathrooms share a color philosophy: neutral, nature-derived, and low-contrast. The color palette creates calm before any other element contributes.
Colors that create a spa atmosphere:
- Warm white: The most forgiving and versatile spa bathroom base
- Warm greige: Grey with enough warmth to avoid coldness, pairs with everything
- Sage or eucalyptus green: Organic, calming, references the outdoors
- Warm sand or clay: Earthy and enveloping, works particularly well with stone tile
- Charcoal: Darker option that creates a more dramatic spa atmosphere
Avoid high-contrast color combinations in a spa bathroom. A black and white bathroom can be beautiful but it creates visual tension that works against the calm you’re building. Low contrast within a neutral palette maintains the relaxed atmosphere from the moment you enter.
15. Install a Towel Warming Drawer
A towel warming drawer is a discreet appliance that installs under a vanity or beside the bathtub and keeps towels and robes warm at all times. It delivers the same experience as a heated towel rail but with the option to store and warm multiple items simultaneously.
Towel warming drawer features to look for:
- Temperature range: 100 to 200 degrees Fahrenheit covers all practical uses
- Timer: Set it to have towels warm before your typical shower time
- Capacity: Most units hold two large bath towels or one robe comfortably
- Installation: Most models require a standard electrical outlet behind the drawer location
A towel warming drawer costs between $200 and $600. It’s not a renovation necessity but it delivers daily luxury that justifies its price across years of use. FYI, this is one of those upgrades guests always mention when they visit.
16. Add a Spa-Quality Sound System
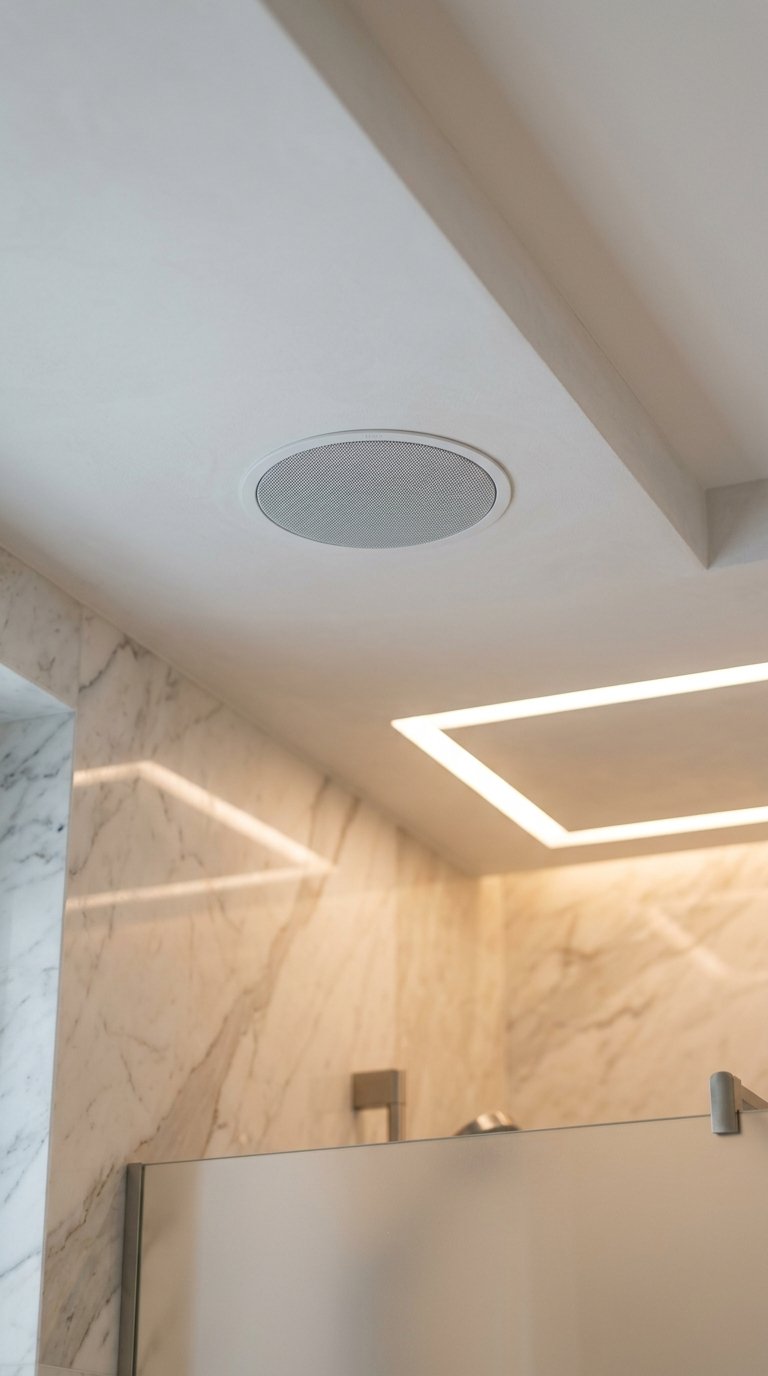
Sound transforms the bathroom experience in the same way that music transforms a meal. A waterproof bathroom speaker system lets you play whatever supports your mood: calming music for a long bath, energizing music for a morning shower.
Bathroom audio options:
- Bluetooth waterproof speaker: No installation, portable, affordable at $30 to $150
- In-ceiling waterproof speakers: Integrated, invisible, requires installation, $200 to $800 per speaker
- Mirror with integrated speaker: Combines mirror and audio in one fixture
- Smart speaker in waterproof housing: Voice-controlled, plays streaming services
The in-ceiling waterproof speaker system is the best long-term option for a spa bathroom renovation. The sound quality is superior to any portable speaker and the lack of visible hardware maintains the clean aesthetic. Budget the speakers and installation into the renovation scope from the beginning.
17. Create a Dedicated Bathtub Surround
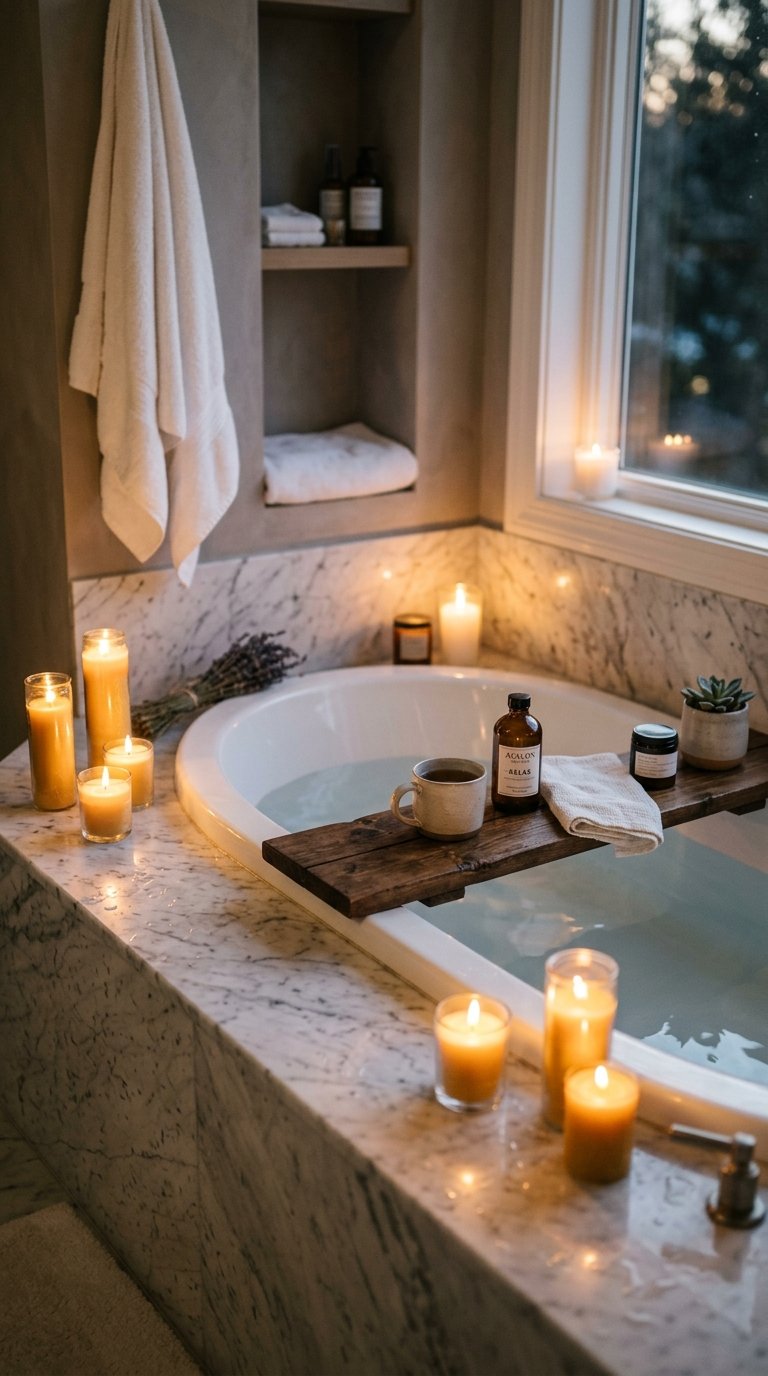
A bathtub surround elevates the soaking experience by creating a dedicated zone around the tub with surfaces, storage, and lighting designed specifically for bath time. It turns the tub from a fixture into a destination.
Bathtub surround elements:
- A tiled deck: Provides a surface for candles, a glass, a book, or bath products
- A niche in the surround wall: For product storage within arm’s reach
- Recessed lighting above: Warm and dimmable overhead light specific to the tub zone
- A small ledge for a tray: A removable bath tray that spans the tub adds a reading or drink surface directly over the water
A marble or stone tile surrounded with a matching tray creates the most cohesive and luxurious bathtub zone. The investment in the surround tile pays its visual dividends every time the tub is used.
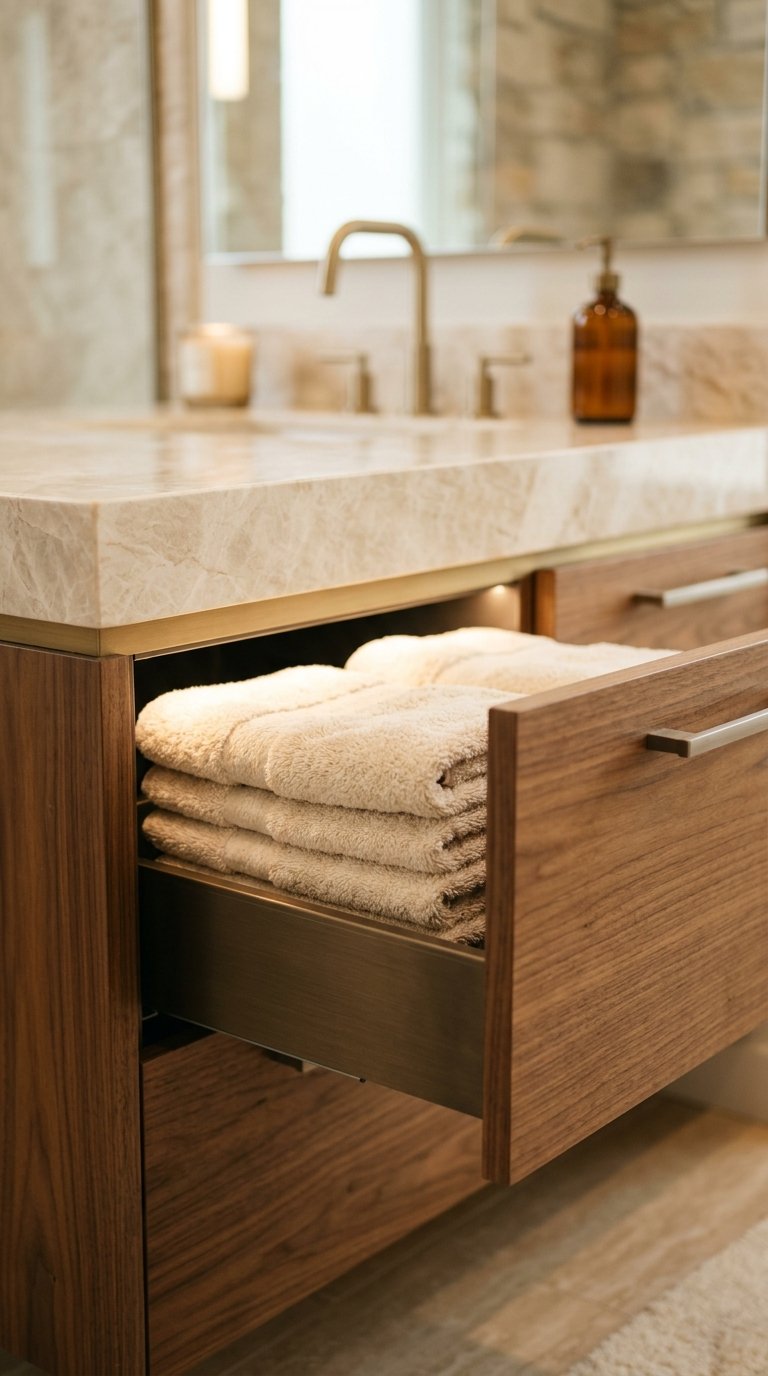
18. Use Spa-Quality Textiles Throughout
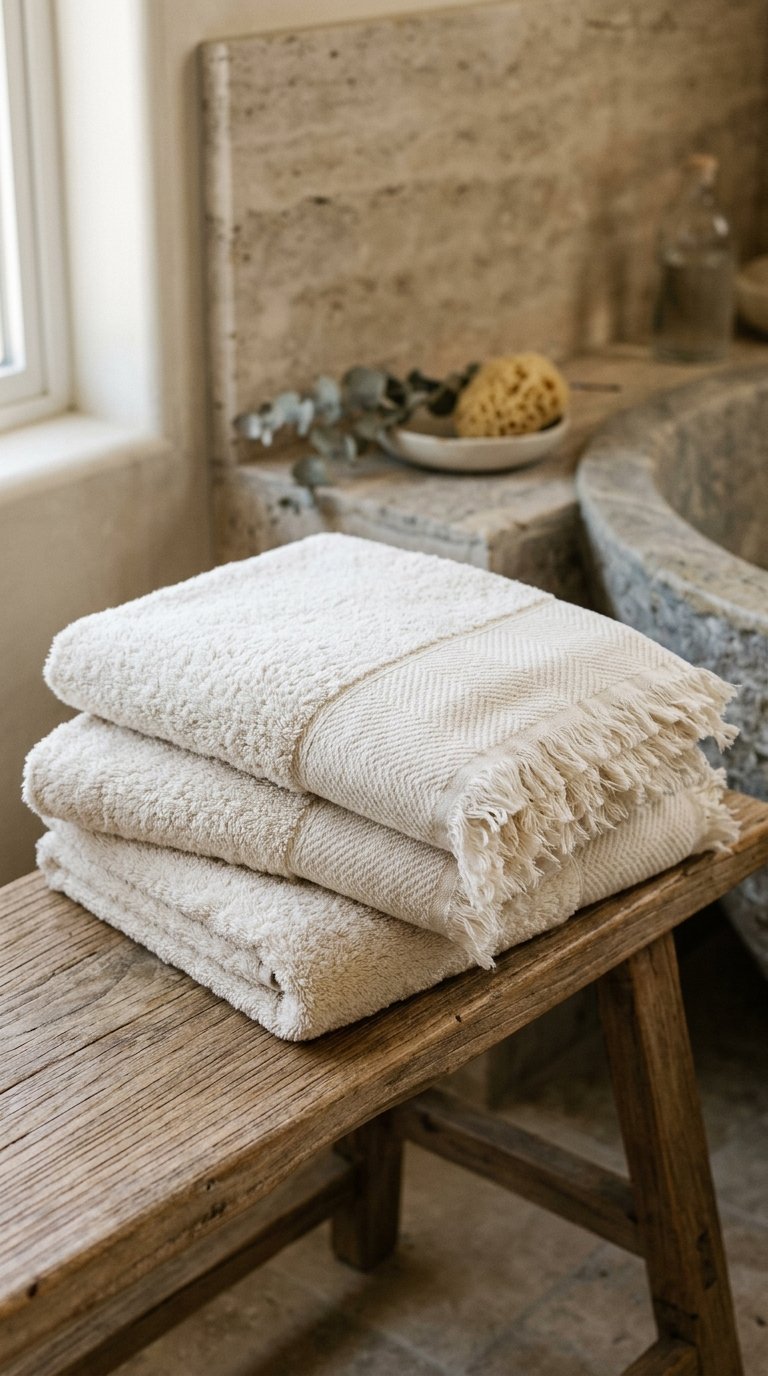
The towels, bath mat, and robe in your bathroom are the items you touch every day. Upgrading them to genuinely high-quality textiles delivers an immediate tactile improvement that no renovation produces.
Textile specifications worth knowing:
- Turkish cotton towels: Long-fiber cotton, gets softer with each wash, dries quickly
- Egyptian cotton towels: Heaviest and most absorbent, stays soft for years
- Waffle-weave towels: Lightweight, dries quickly, more textural than standard terry
- Linen bath mat: Dries faster than cotton, very durable, improves with age
Buy fewer, better towels. A set of four genuinely high-quality towels costs more than a set of eight mediocre ones but delivers a better experience every single day and lasts significantly longer. The math over five years favors quality.
19. Install a Fog-Free Mirror

A standard bathroom mirror fogs immediately after a hot shower. A fog-free mirror maintains clarity throughout and after showering because a heated pad behind the mirror surface keeps it above the dew point.
Fog-free mirror options:
- Built-in heated mirror: The most effective option, connects to the bathroom’s electrical system
- Mirror with demister pad: An aftermarket pad attached to the back of any mirror, plugs into an outlet
- Smart mirror with heating and LED lighting: Integrates lighting, anti-fog, and sometimes digital display functions
An anti-fog mirror costs between $150 and $600 depending on size and features. The daily convenience of a clear mirror immediately after a shower justifies the cost quickly for anyone who showers before work. 🙂
20. Add Aromatherapy Elements
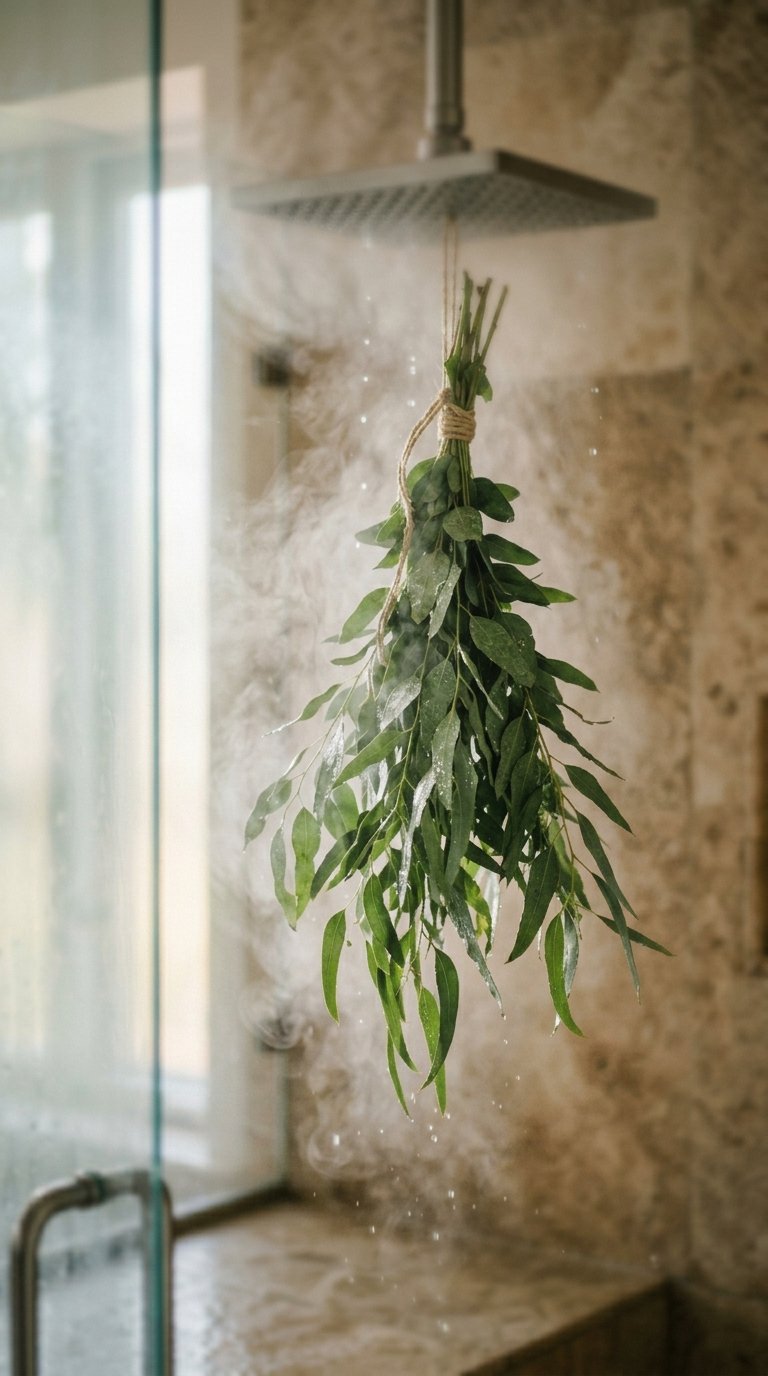
Scent is the most direct and immediate pathway to a shifted mental state. A spa bathroom that smells like eucalyptus, cedar, or sandalwood activates a sense of calm before any other element has a chance to register.
Aromatherapy delivery methods for a spa bathroom:
- Eucalyptus bundle in the shower: Steam activates the natural oils with every shower
- Reed diffuser: Continuous, passive scent delivery, no supervision required
- Electric essential oil diffuser: Active diffusion, adjustable intensity
- Scented bath salts: Activated at bath time, fills the room during soaking
- Candles in flameless LED versions: Safe for unattended bathroom use, available in quality scents
Layer two scent sources at most. A shower eucalyptus bundle and a reed diffuser together create a consistent scent profile. Three or more scent sources compete rather than complement each other.
21. Declutter and Edit Ruthlessly

This is the most important item on the list and the only one that costs nothing. Spa bathrooms look the way they do because every surface contains only what belongs there. No expired products. No random objects. No aspirational items that never get used.
A spa bathroom edit includes:
- Remove everything from every surface and the under-sink storage
- Discard expired products without guilt
- Group remaining items by category and store daily-use items within reach, occasional-use items in drawers or cabinets
- Return only what belongs on the counter: The items you use every single day, edited to look intentional
- Add one decorative element per surface: a plant, a candle, a small tray
The counter should have more empty space than filled space. Three items on a marble counter look like a spa. Ten items on the same counter look like a CVS checkout. The edit is what separates one from the other. IMO this single step transforms a bathroom more than any product purchase.
Final Thoughts
A spa bathroom is not about how much you spend. It’s about removing friction and adding sensory quality to a room you use every day.
The most effective spa bathrooms share three qualities: they’re calm to look at, comfortable to be in, and completely free of clutter. You achieve all three through editing decisions as much as through purchase decisions.
Pick five ideas from this list that address your current bathroom’s biggest gaps. Fix the lighting, upgrade the shower experience, bring in one plant, improve the textiles, and clear every surface to only what belongs there.
Your bathroom should feel like a reward for the day you had, not like another problem to manage before bed.