21 Master Bathroom Ideas to Create Your Perfect Retreat
Your master bathroom should be the best room in your home. You start and end every day in it. Most master bathrooms fall short because they prioritize square footage over smart design, or spend the budget in the wrong places. A well-designed master bathroom does not require a massive renovation. It requires the right decisions.
These 21 ideas cover every element of a master bathroom worth getting right.
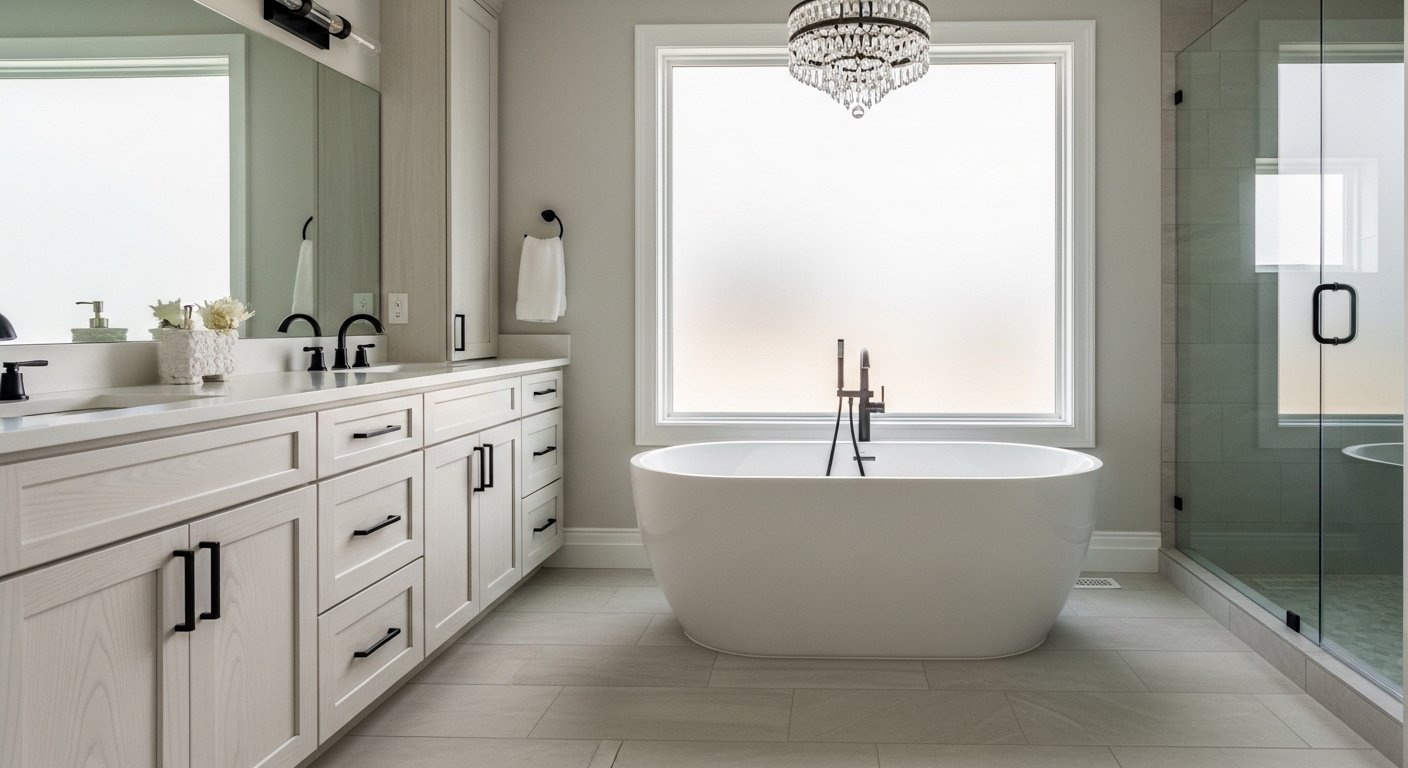
1. Install a Freestanding Bathtub
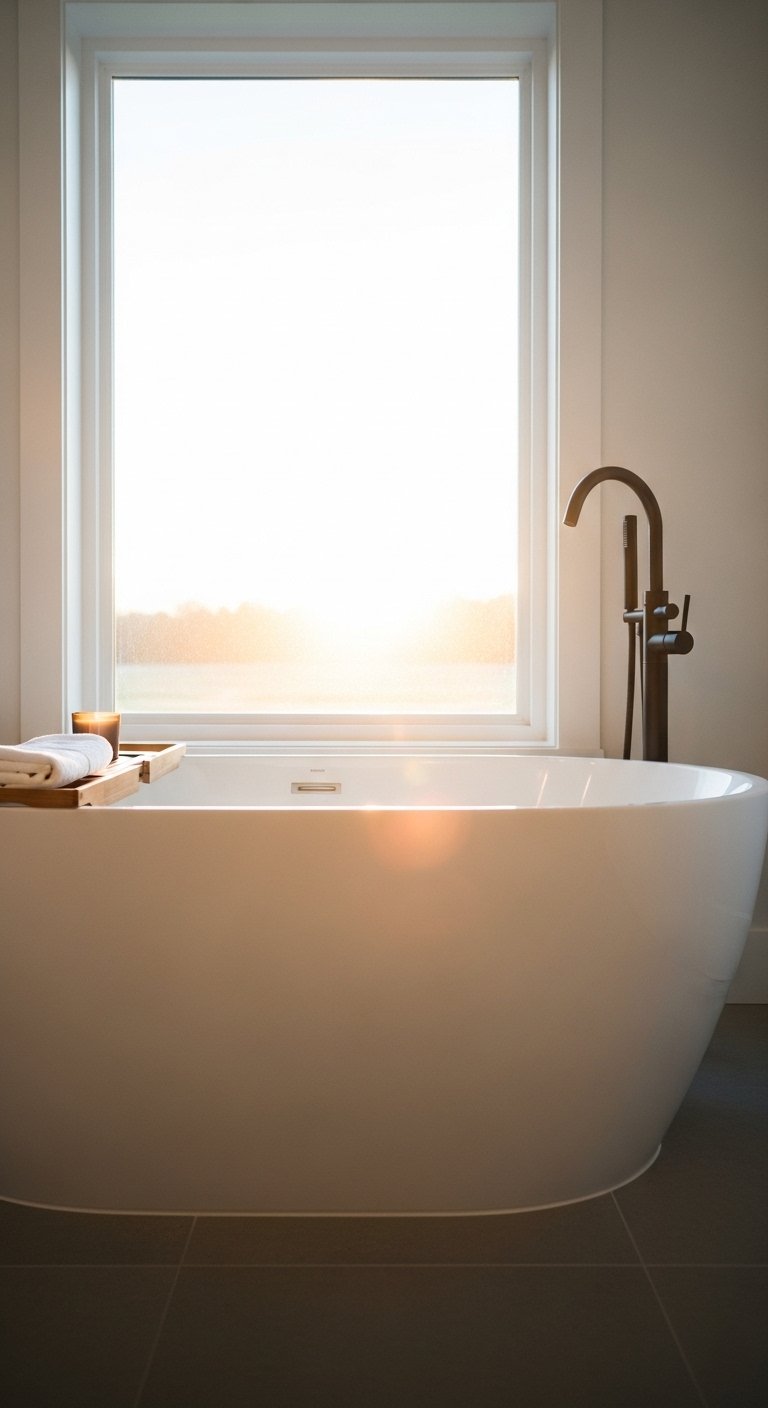
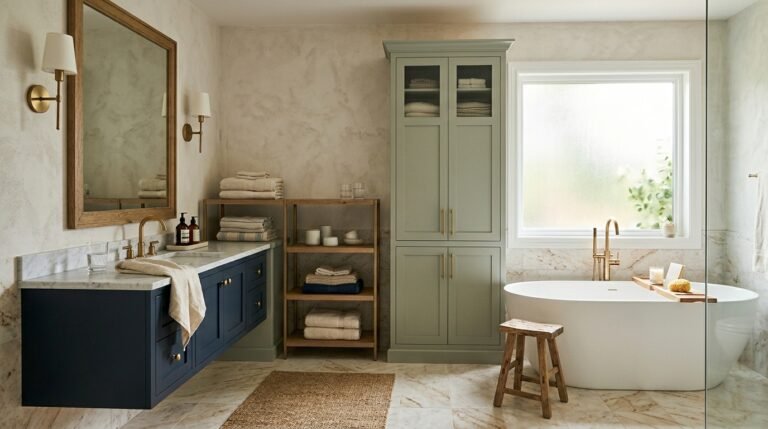
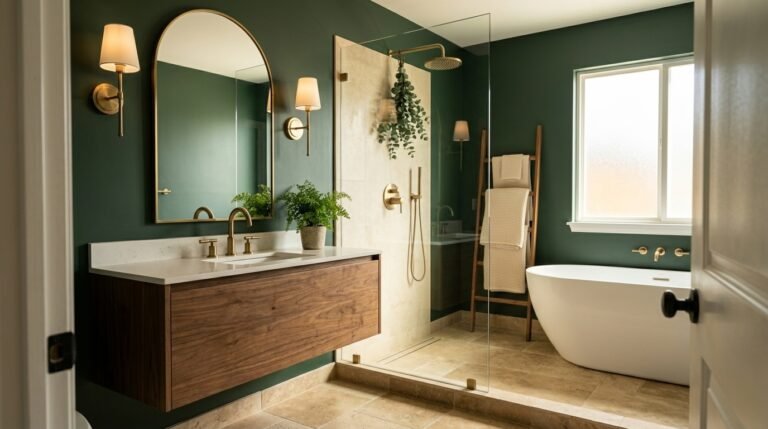
A freestanding bathtub turns any master bathroom into a room worth spending time in. It sits away from the wall as a standalone piece, creates an immediate focal point, and signals that the bathroom exists for more than just function.
Position it in front of a window, centered on a feature wall, or at the end of a long bathroom opposite the entry door. All three positions work. The key is giving the tub enough clear floor space on all sides. A minimum of 24 inches of clearance around the tub prevents the space from feeling crowded.
Best freestanding tub styles:
- Oval soaking tub in matte white: suits modern and transitional bathrooms
- Slipper tub with raised back: suits traditional and classic spaces
- Stone resin tub in grey or black: suits contemporary and luxury bathrooms
2. Build a Walk-In Shower with No Door
A doorless walk-in shower removes the visual barrier that a glass door or curtain creates. The shower becomes part of the room instead of a separate enclosed zone. The result is a bathroom that feels significantly larger without adding a single square foot.
The design requires a proper wet zone layout. Position the showerhead away from the open entry side so water spray stays contained. A linear drain running across the shower entry handles water runoff without requiring a raised threshold.
Doorless shower requirements:
- Minimum shower width of 36 inches, ideally 42 inches or more
- Showerhead positioned on the wall opposite the entry
- Linear drain at the shower entry threshold
- Non-slip floor tile inside the shower zone
3. Use Large Format Floor Tiles
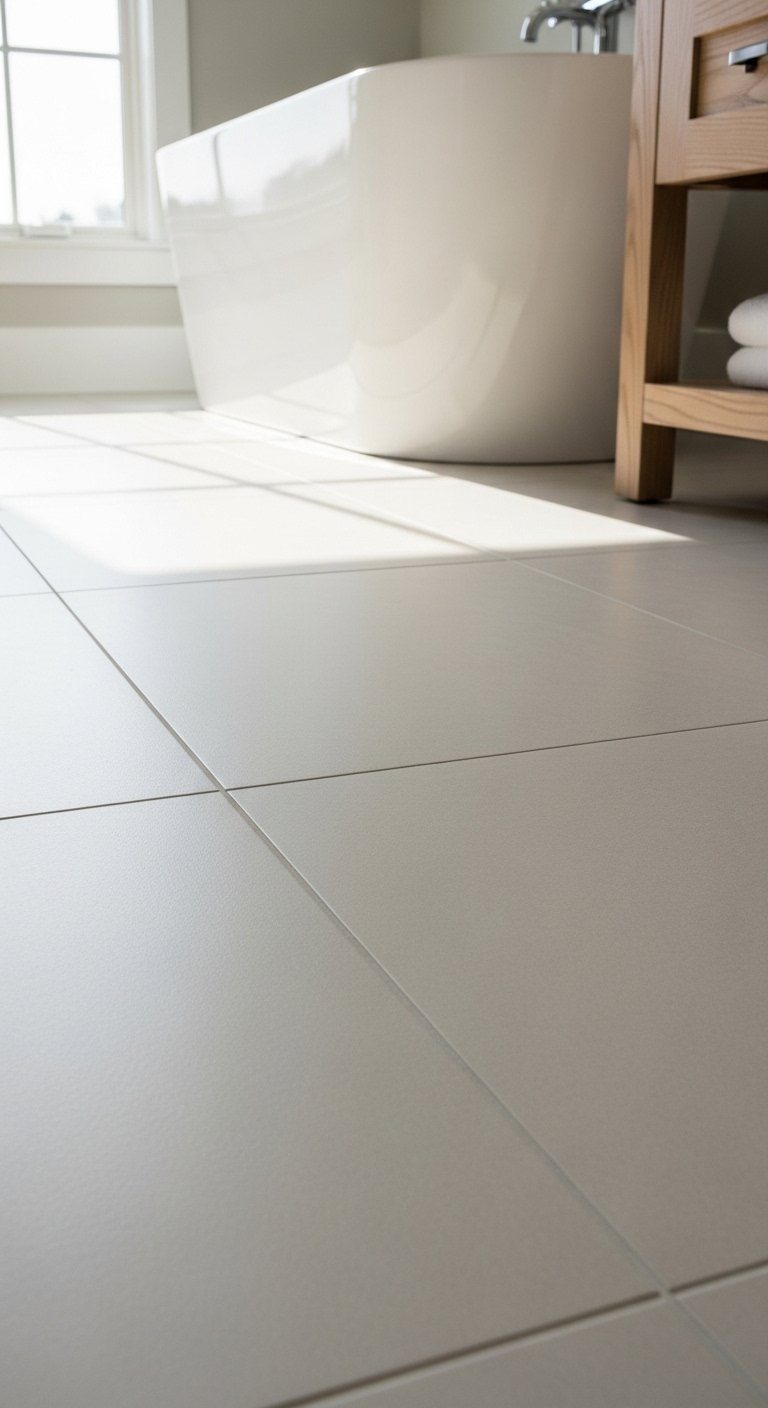
Large format floor tiles in 24×24 or 24×48 inch sizes make a master bathroom floor feel expansive and continuous. Fewer grout lines mean fewer visual interruptions across the floor surface. The eye reads the floor as one unbroken plane rather than a grid of smaller pieces.
Choose a rectified tile for large format applications. Rectified tiles have precisely cut edges that allow for minimal grout joints. A 1/16 inch grout joint on a 24×48 tile creates a near-seamless floor surface.
Best large format tile materials:
- Porcelain: durable, low maintenance, available in stone looks
- Marble: luxurious, requires sealing, suits high-end bathrooms
- Limestone: warm tone, natural variation, requires sealing annually
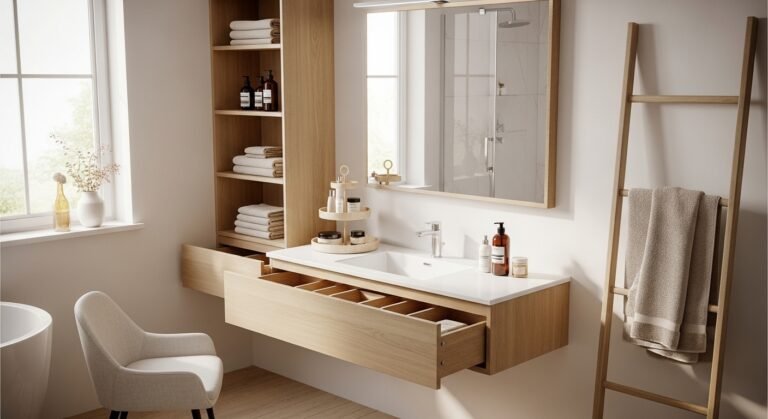
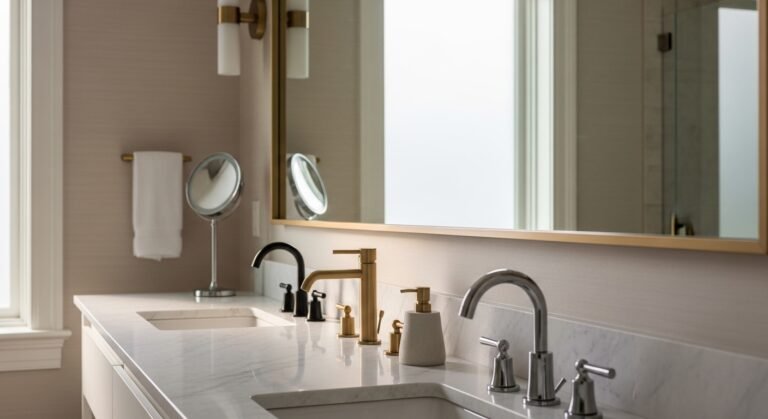
4. Add a Double Vanity
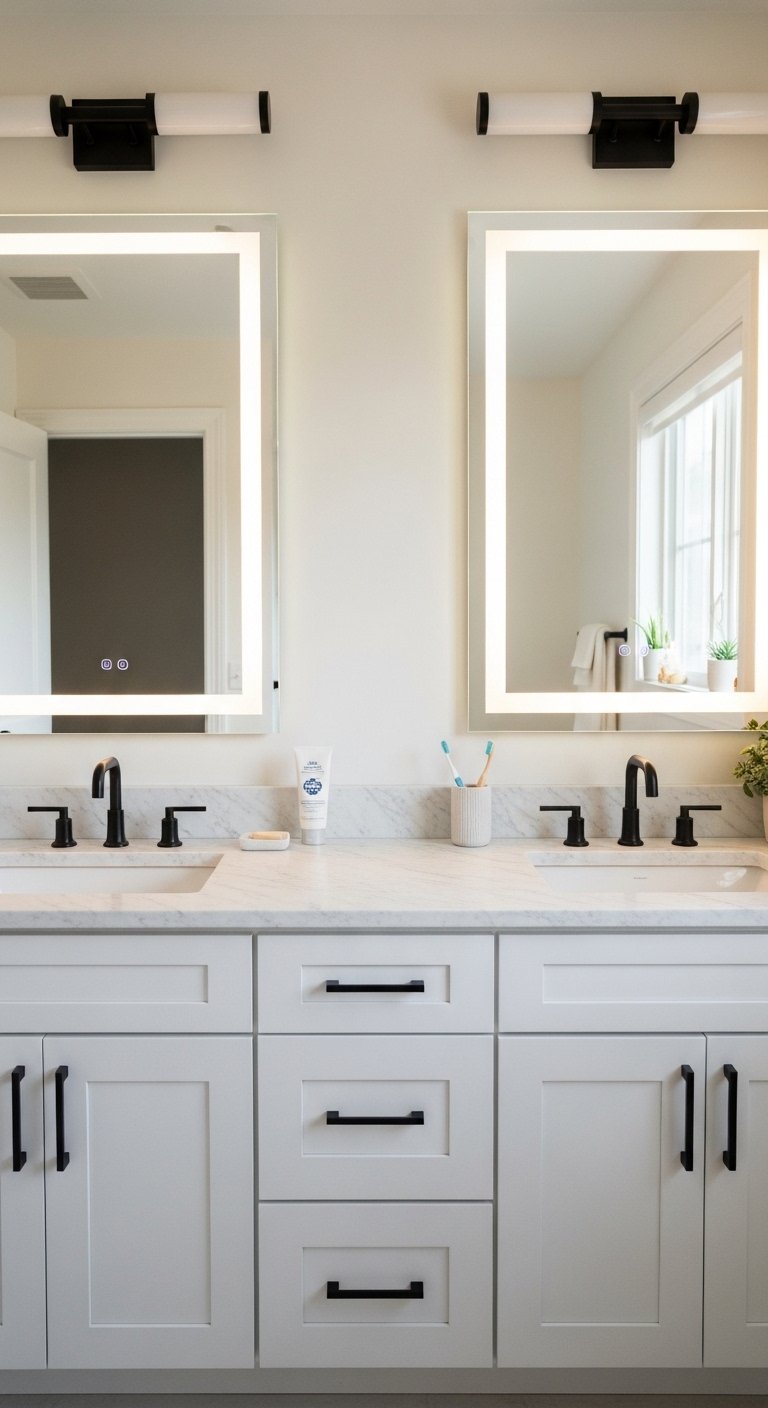
A double vanity gives two people their own defined sink, storage, and mirror space. It eliminates the daily negotiation over counter space that a single vanity creates. In a master bathroom, a double vanity is not a luxury. It is the correct specification for two people sharing the space.
The standard double vanity runs 60 to 72 inches wide. In a bathroom where space allows, go to 72 inches. The extra width gives each person genuine elbow room rather than two sinks crammed together with minimal counter space between them.
Double vanity configuration:
- 72 inches wide minimum for genuine comfort
- Two undermount sinks with 6 inches of counter space on each outer edge
- Separate drawer towers on each outer side for individual storage
- Two mirrors or one wide mirror spanning the full vanity width
5. Install Heated Floors
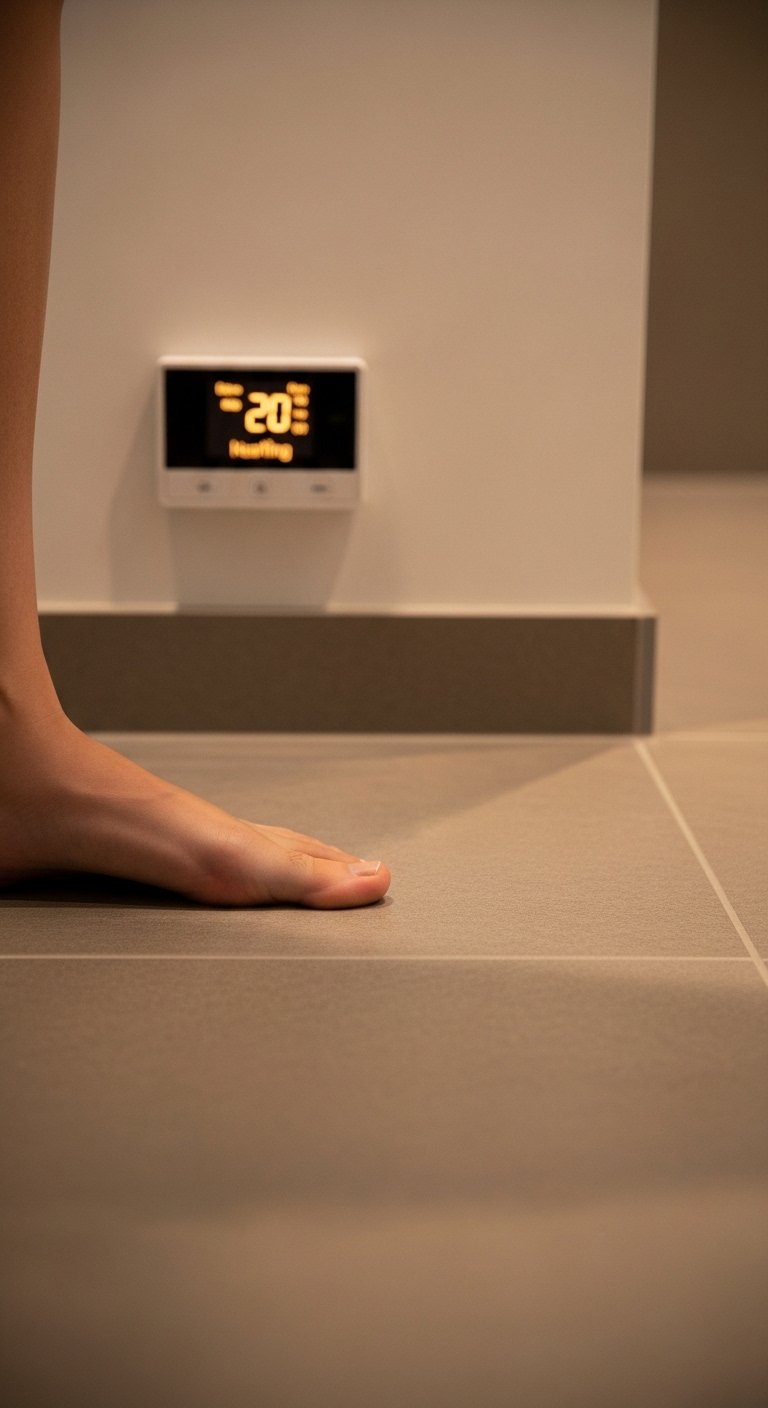
Heated bathroom floors eliminate the shock of stepping onto cold tile first thing in the morning. Electric radiant heating installs directly under tile and connects to a programmable thermostat. You set it to warm up before your alarm goes off. The floor feels warm the moment your feet hit it.
Electric radiant floor heating costs between $10 and $20 per square foot installed in a master bathroom. For an average 80 square foot master bathroom floor, the total installation cost runs $800 to $1,600. The daily operating cost is minimal. FYI, this is consistently rated as one of the highest satisfaction upgrades in bathroom remodels.
Installation requirements:
- Electric radiant mat installed under tile during flooring installation
- Programmable thermostat mounted on the wall
- Dedicated electrical circuit from the panel
- Compatible with porcelain, ceramic, marble, and stone tile
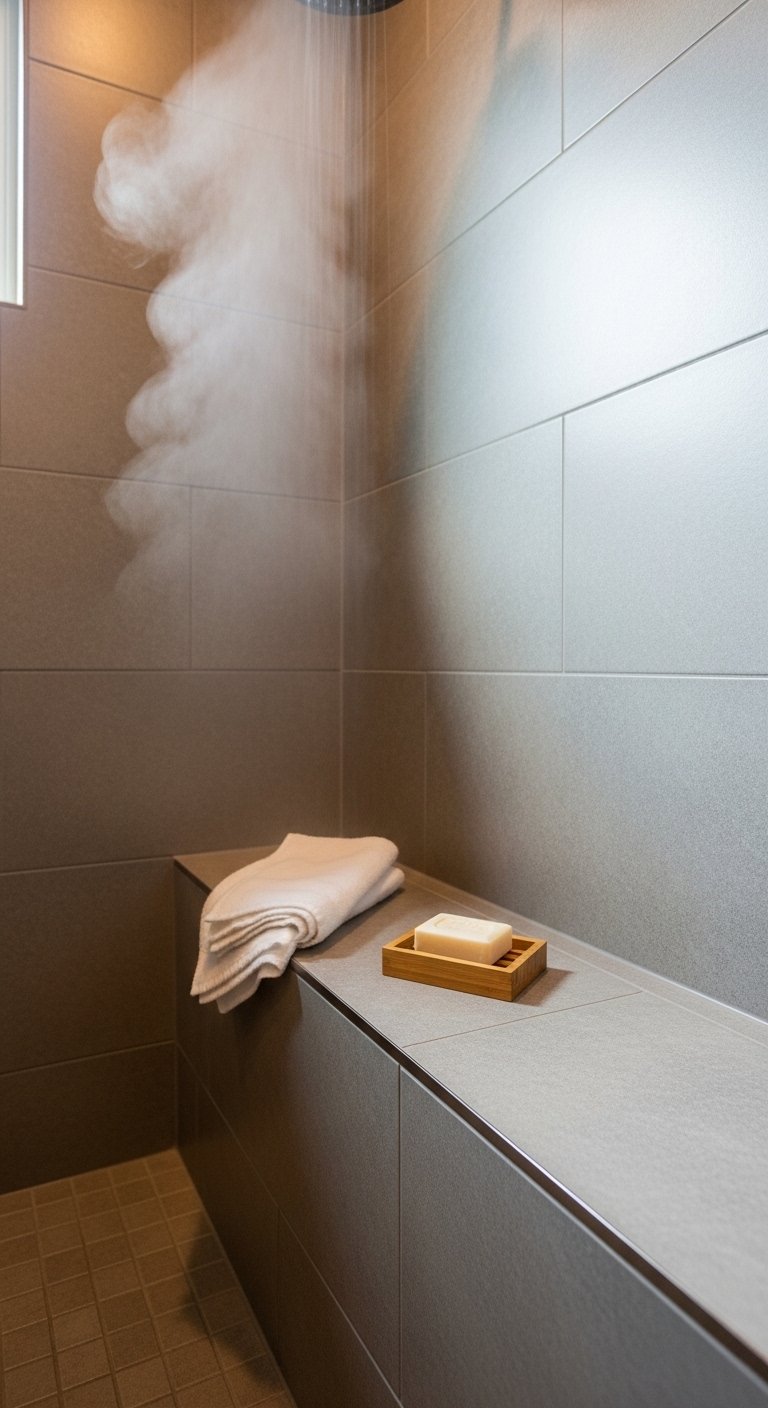
6. Add a Steam Shower
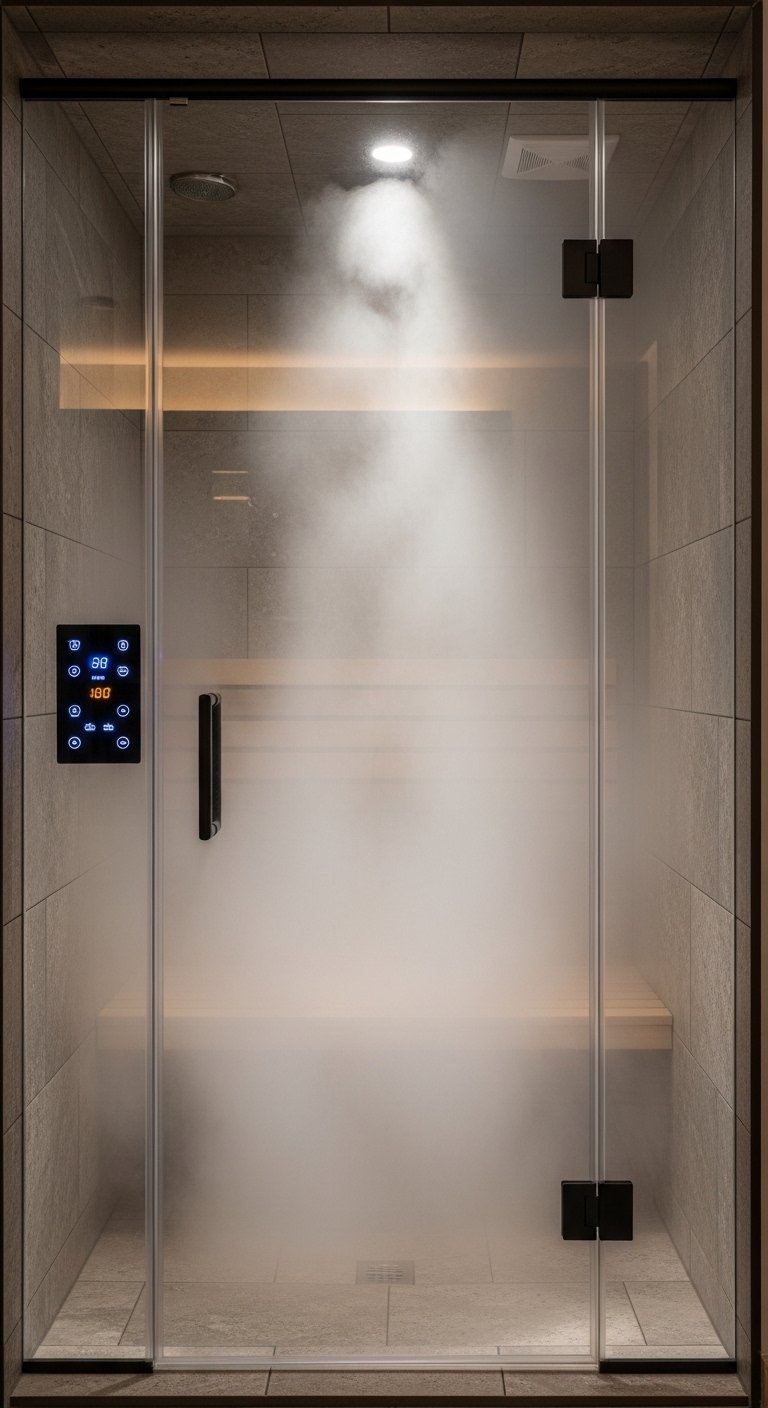
A steam shower converts your existing shower into a personal steam room. A steam generator connects to the shower enclosure and produces steam at a temperature between 110 and 115 degrees Fahrenheit. A sealed glass enclosure traps the steam inside.
The generator mounts in a nearby cabinet or under the vanity. It connects to the cold water supply and a dedicated electrical circuit. Modern steam generators include digital controls for temperature, duration, and even aromatherapy. The entire system fits into most existing shower enclosures without structural changes.
Steam shower requirements:
- Fully sealed shower enclosure with door
- Steam generator sized to the shower volume
- Sloped ceiling inside the shower to prevent condensation dripping
- Digital control panel inside the shower
- Dedicated 240V electrical circuit
7. Choose a Wall-Hung Vanity
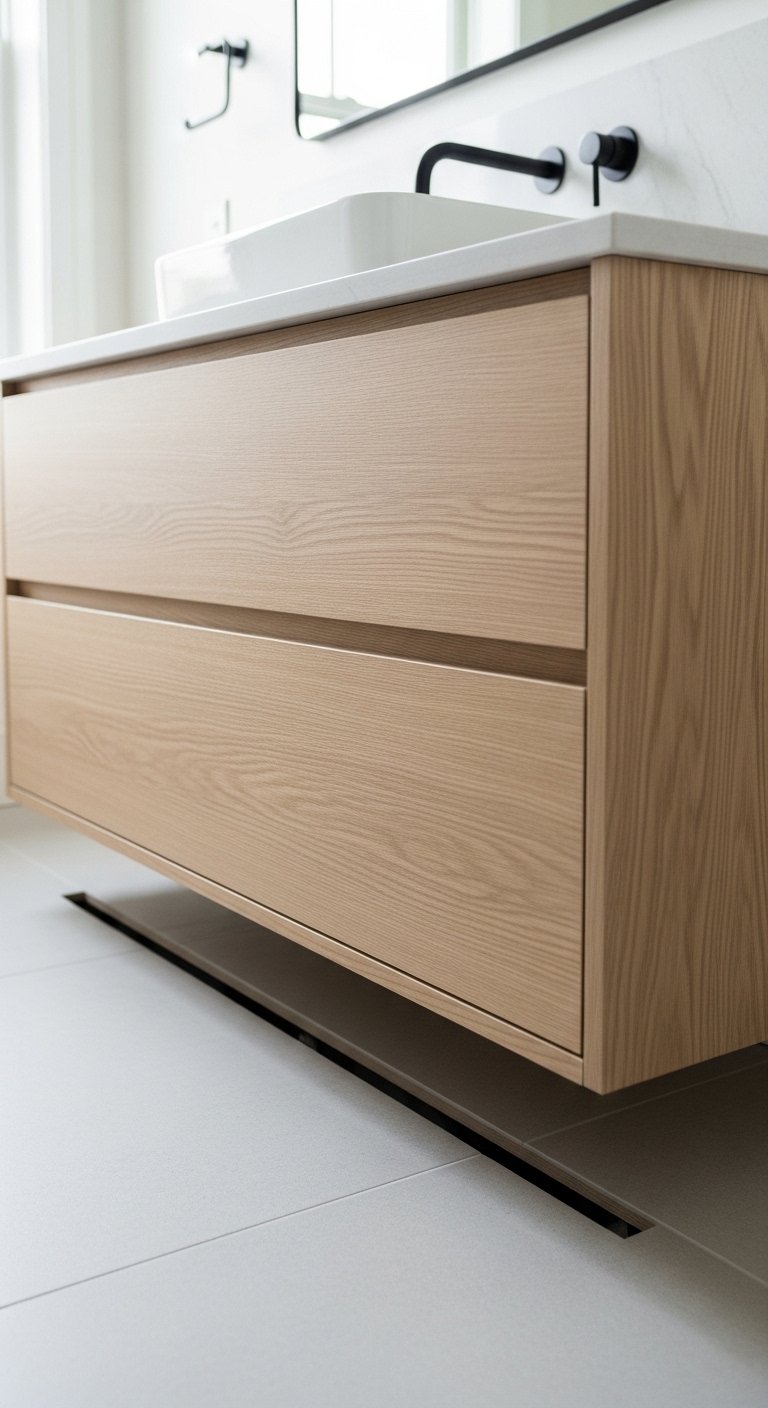
A wall-hung vanity mounts directly to the wall with no legs touching the floor. The gap between the vanity base and the floor creates a visual line that makes the bathroom feel taller and wider. It also makes cleaning the floor significantly easier.
Wall-hung vanities require solid blocking inside the wall at the mounting height. If you plan a wall-hung vanity in a renovation, add the blocking before the walls close. Retrofitting blocking into an existing wall requires opening the drywall.
Wall-hung vanity heights:
- Standard: 32 to 34 inches from floor to counter
- Comfort height: 36 inches from floor to counter
- Choose based on the primary user’s height for daily comfort
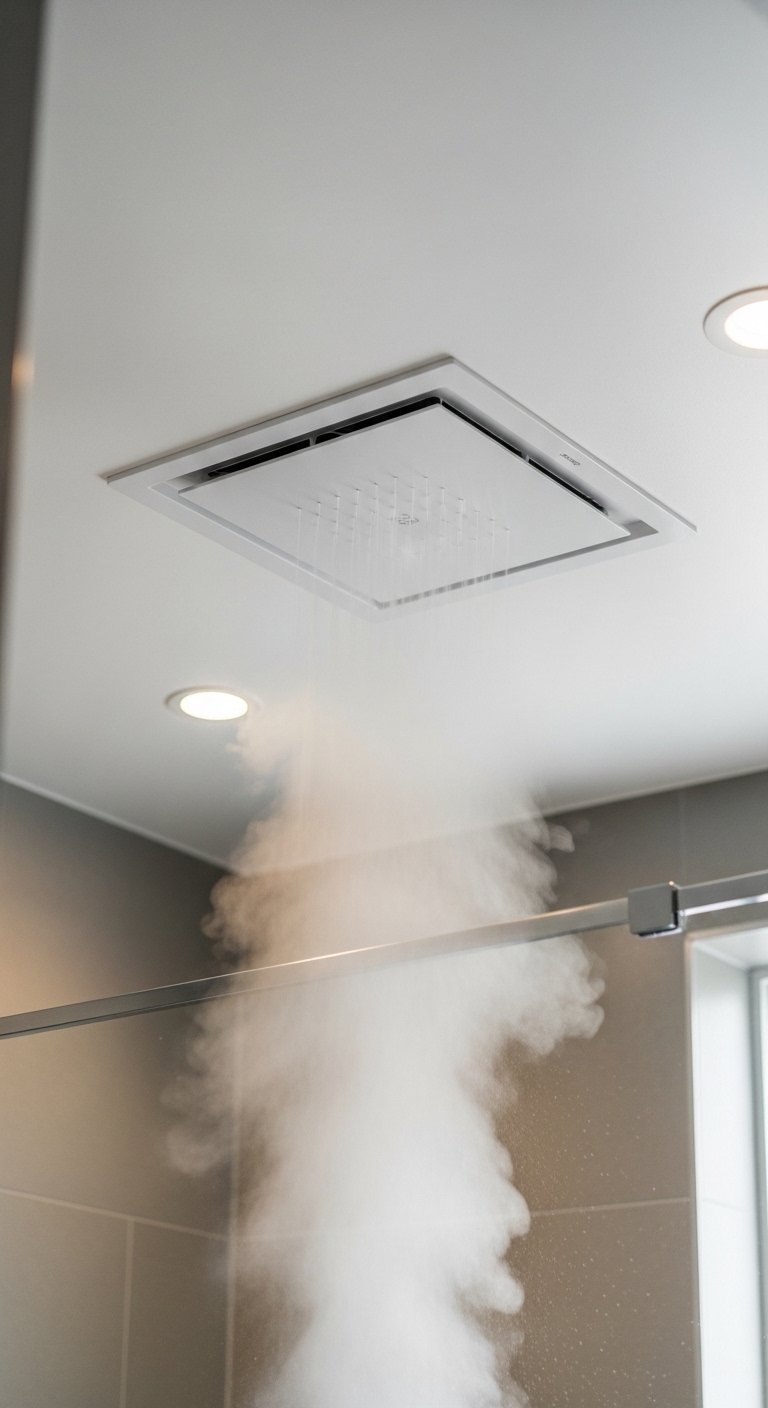
8. Install a Rainfall Showerhead
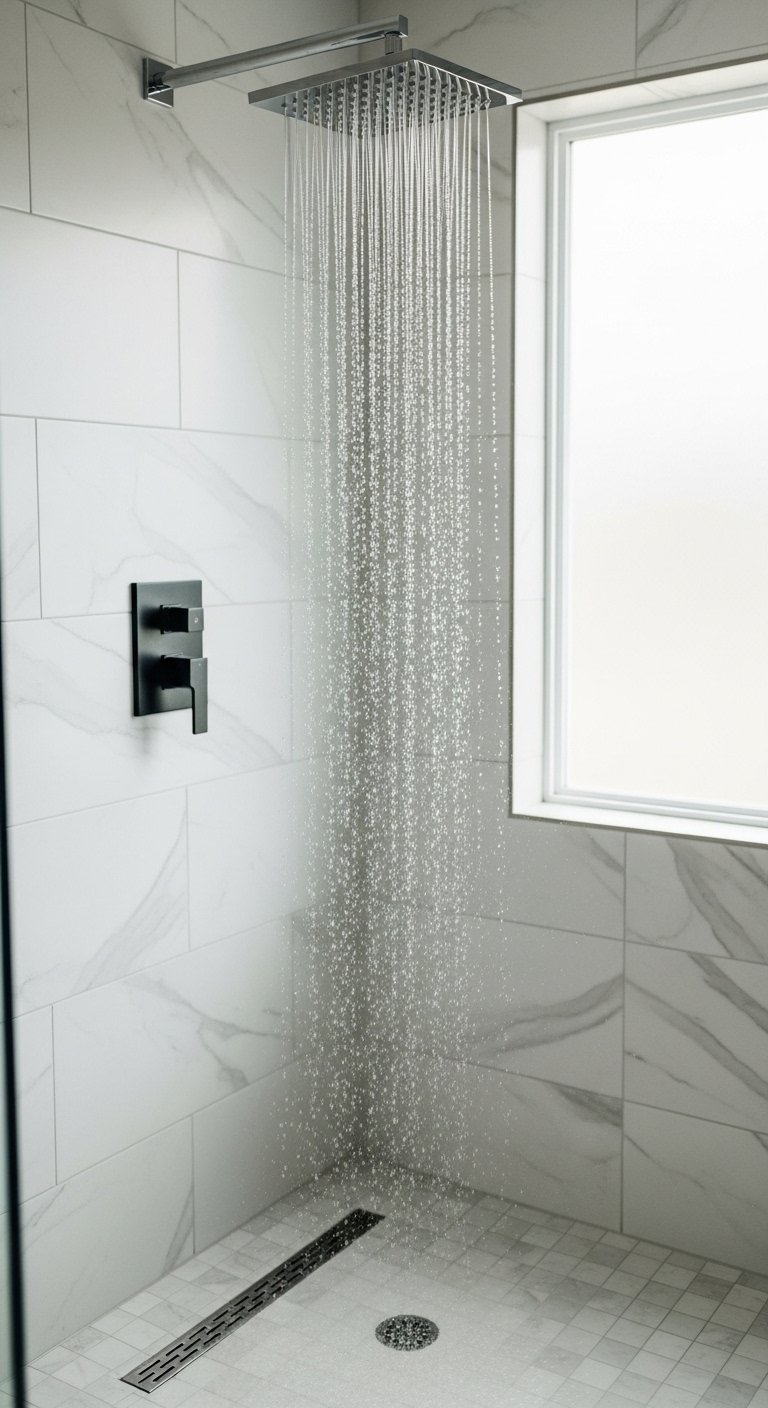
A rainfall showerhead mounts overhead and delivers water in a wide, vertical downpour rather than a directed stream. The experience is genuinely different from a standard showerhead. Water falls across the full shoulder width rather than hitting one side of the body.
Ceiling-mounted rainfall heads require a supply line run through the ceiling. Wall-mounted versions on an extended arm deliver a similar effect without ceiling work. For a master bathroom renovation, the ceiling-mounted version is worth the additional installation cost.
Rainfall showerhead sizing:
- 8 inches: entry level, covers the head and upper body
- 12 inches: the most common size, good full-body coverage
- 16 to 20 inches: full coverage, suits large shower enclosures
9. Add a Separate Water Closet
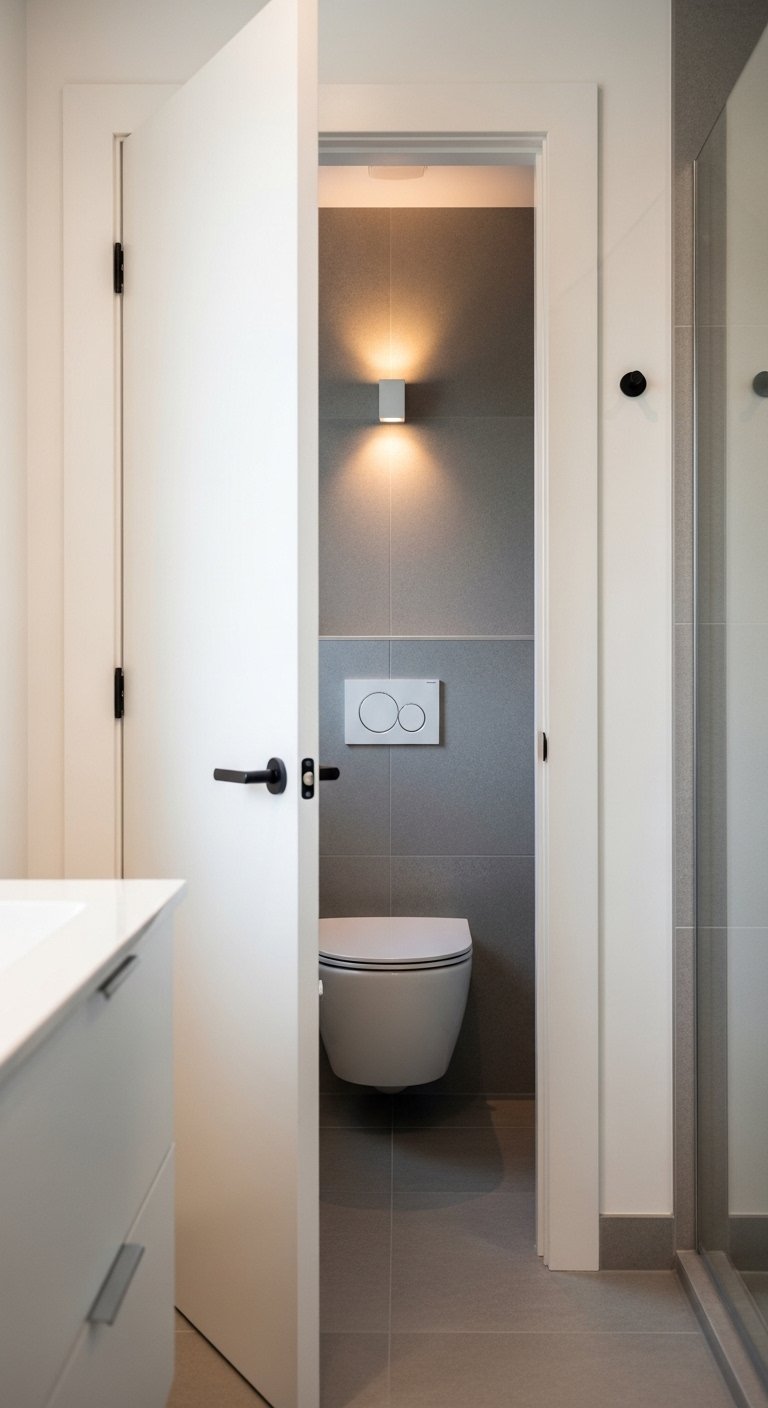
A water closet is a small enclosed room within the master bathroom that houses only the toilet. It separates the toilet from the rest of the bathroom with a door or a partial wall. One person uses the toilet privately while the other uses the vanity or shower without interruption.
This requires enough bathroom square footage to carve out a 36 by 66 inch minimum space for the water closet. In a master bathroom under 80 square feet, a water closet is difficult to justify. In bathrooms over 100 square feet, it is a worthwhile use of space.
Minimum water closet dimensions:
- 36 inches wide by 66 inches deep
- Door swings outward to preserve interior space
- Ventilation fan required inside the enclosure
- Small wall-mounted light fixture inside
10. Use Marble or Stone Tile on Feature Walls

A marble or natural stone feature wall in a master bathroom adds texture, warmth, and genuine luxury to the space. The shower back wall, the wall behind the freestanding tub, or the vanity back wall are the three strongest positions for a feature wall tile application.
Marble requires sealing on installation and annually thereafter. Porcelain tiles with a marble look require no sealing and deliver a similar visual effect at lower cost and maintenance. For a genuine stone look without maintenance, large format porcelain marble-effect tiles are the practical choice.
Best feature wall tile options:
- Calacatta marble: white with warm gold veining, requires sealing
- Carrara marble: white with grey veining, classic, requires sealing
- Porcelain marble effect: no sealing, consistent pattern, lower cost
- Travertine: warm beige tones, requires sealing, suits warm color palettes
11. Add Underlit Floating Shelves
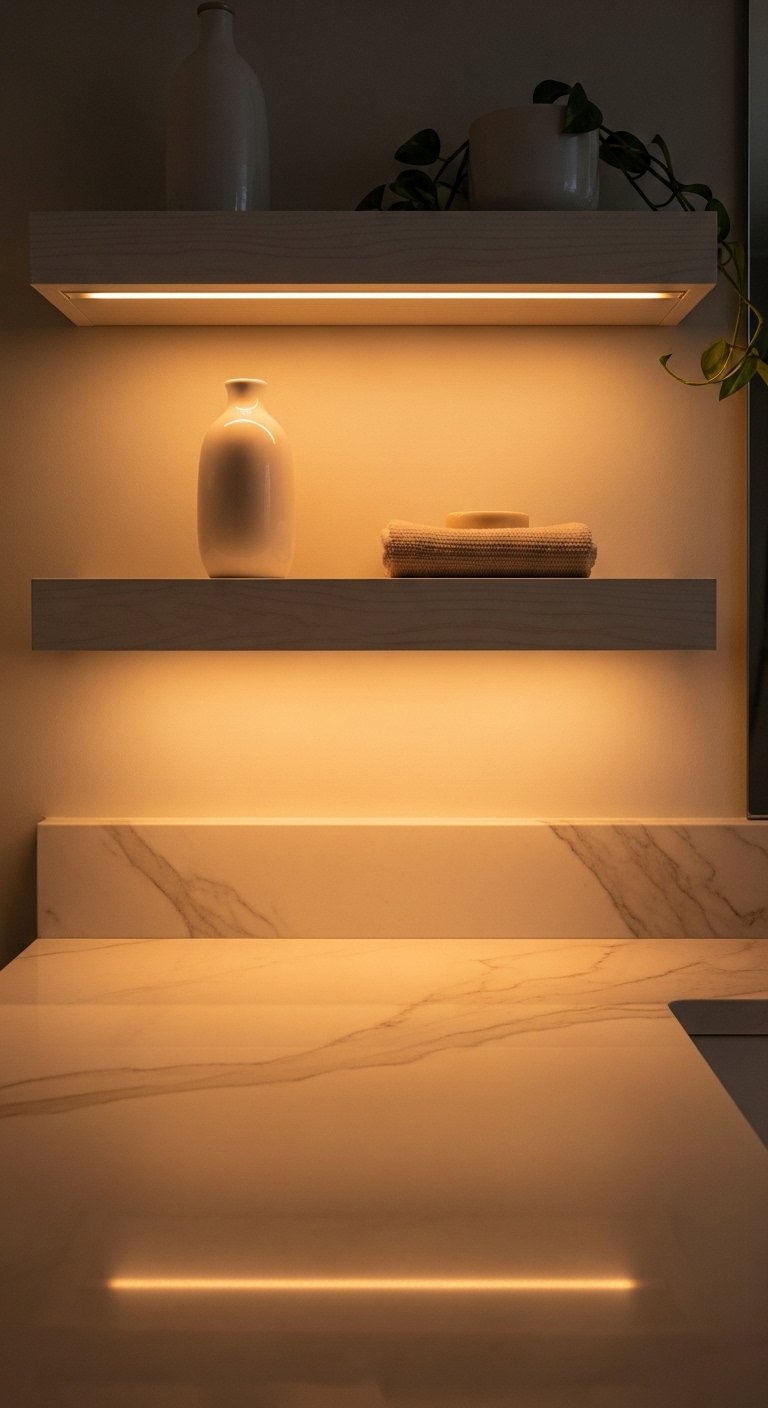
Floating shelves with LED lighting underneath create a warm glow across the vanity counter below. The light reflects off the counter surface and adds ambient illumination to the vanity zone without requiring additional fixtures.
Mount the shelves 18 to 24 inches above the counter surface. Install warm white LED strip lighting on the underside of each shelf, recessed behind a small lip to hide the strip itself. The result is a clean, diffused glow rather than a visible light source.
Shelf materials that work:
- White oak: warm, natural, suits transitional and modern bathrooms
- Marble slab shelf: luxurious, heavy, requires strong wall anchoring
- White painted MDF: clean, affordable, suits any style
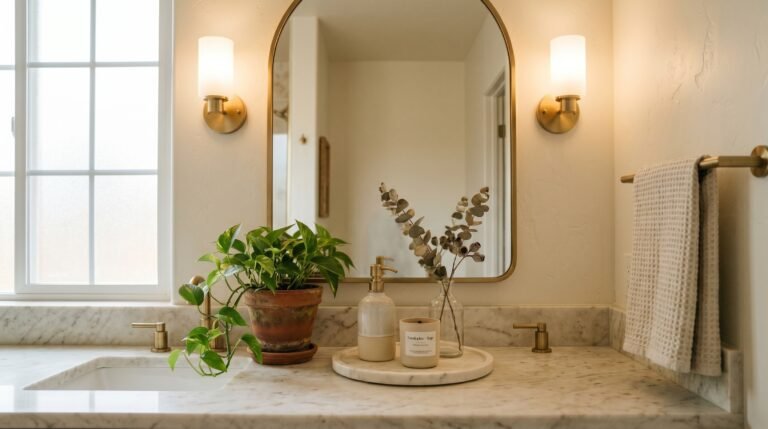
12. Install a Backlit Mirror
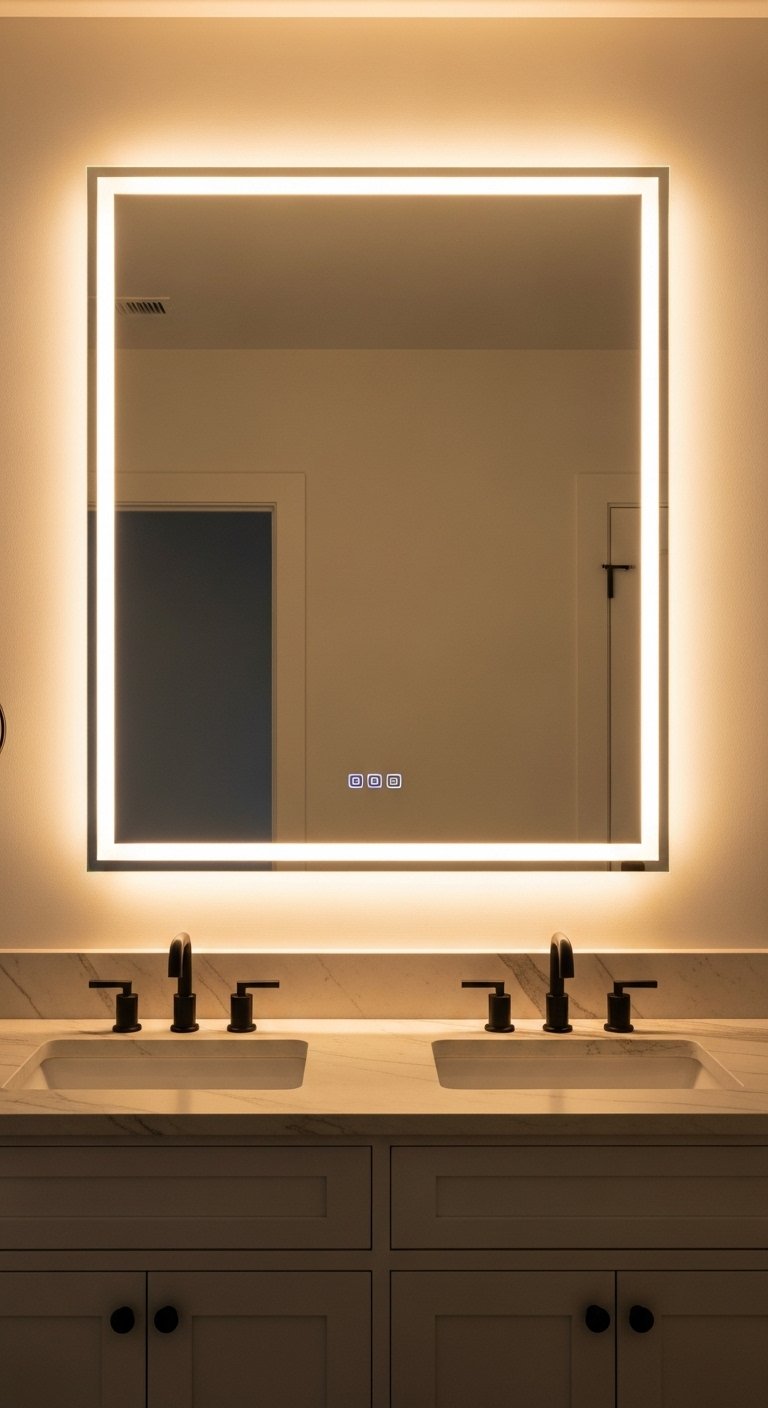
A backlit mirror places LED lighting behind the mirror perimeter, casting a soft halo of light onto the wall behind the mirror. It reduces harsh shadows on the face better than overhead lighting alone and adds a premium visual quality to the vanity wall.
Most backlit mirrors include dimmable settings and color temperature controls. Set the color temperature to 3000K for warm evening light and 5000K for accurate daytime grooming light. The anti-fog function available in premium models keeps the mirror clear immediately after a hot shower.
Features worth paying for:
- Dimmable LED with color temperature control
- Anti-fog heating element behind the glass
- Touch controls on the mirror surface
- Minimum CRI of 90 for accurate color rendering
13. Add a Towel Warming Drawer
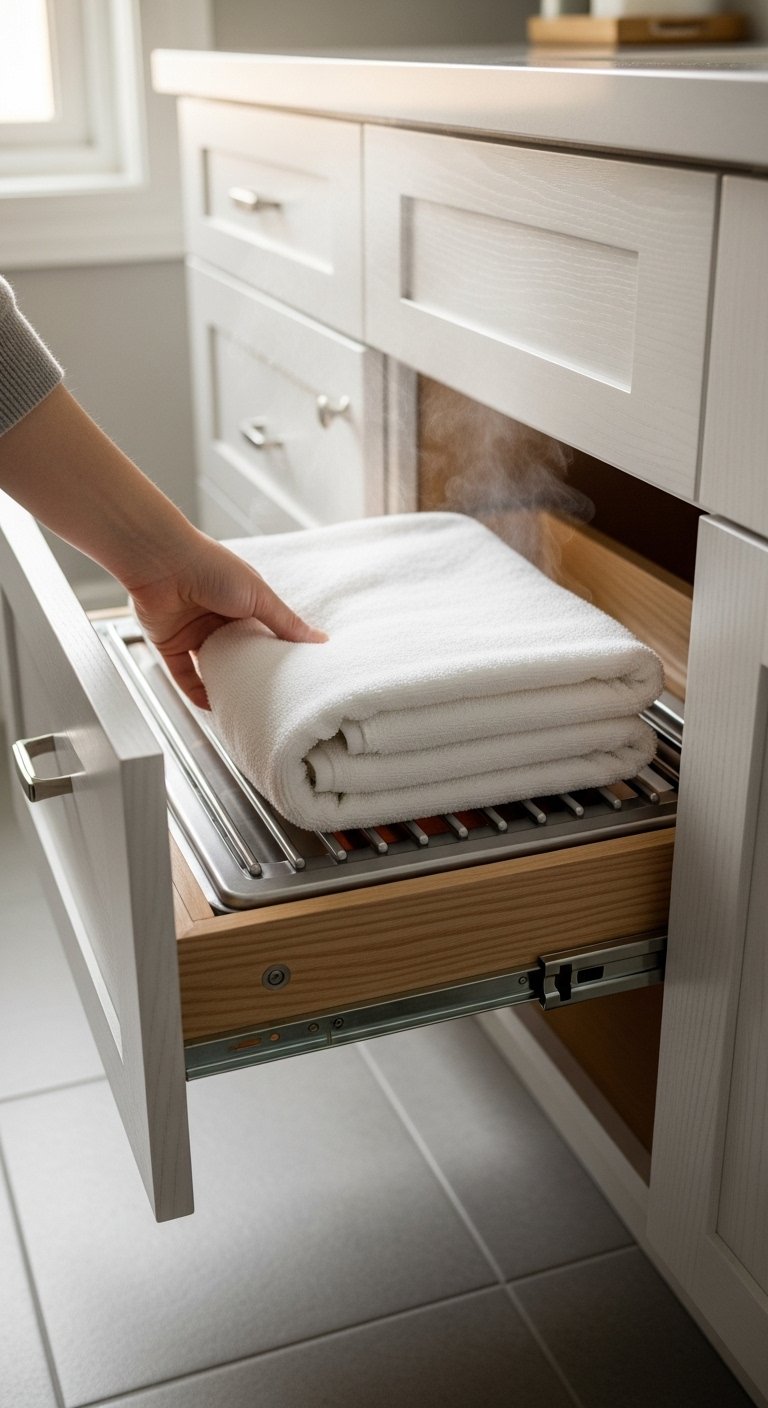
A towel warming drawer installs under the vanity counter and heats towels to a warm temperature while you shower. You pull a warm towel the moment you step out. It is one of those upgrades that sounds indulgent until you use it daily.
Warming drawers run on a standard 120V outlet. They heat to between 85 and 125 degrees Fahrenheit depending on the setting. A full-size towel reaches warm temperature in 10 to 15 minutes. Set it to turn on automatically with the heated floor thermostat for a fully timed morning routine.
Top towel warming drawer brands: Warmrails, Amba, and Mr. Steam all produce reliable under-counter warming drawer options across different price points.
14. Use a Niche in the Shower Wall
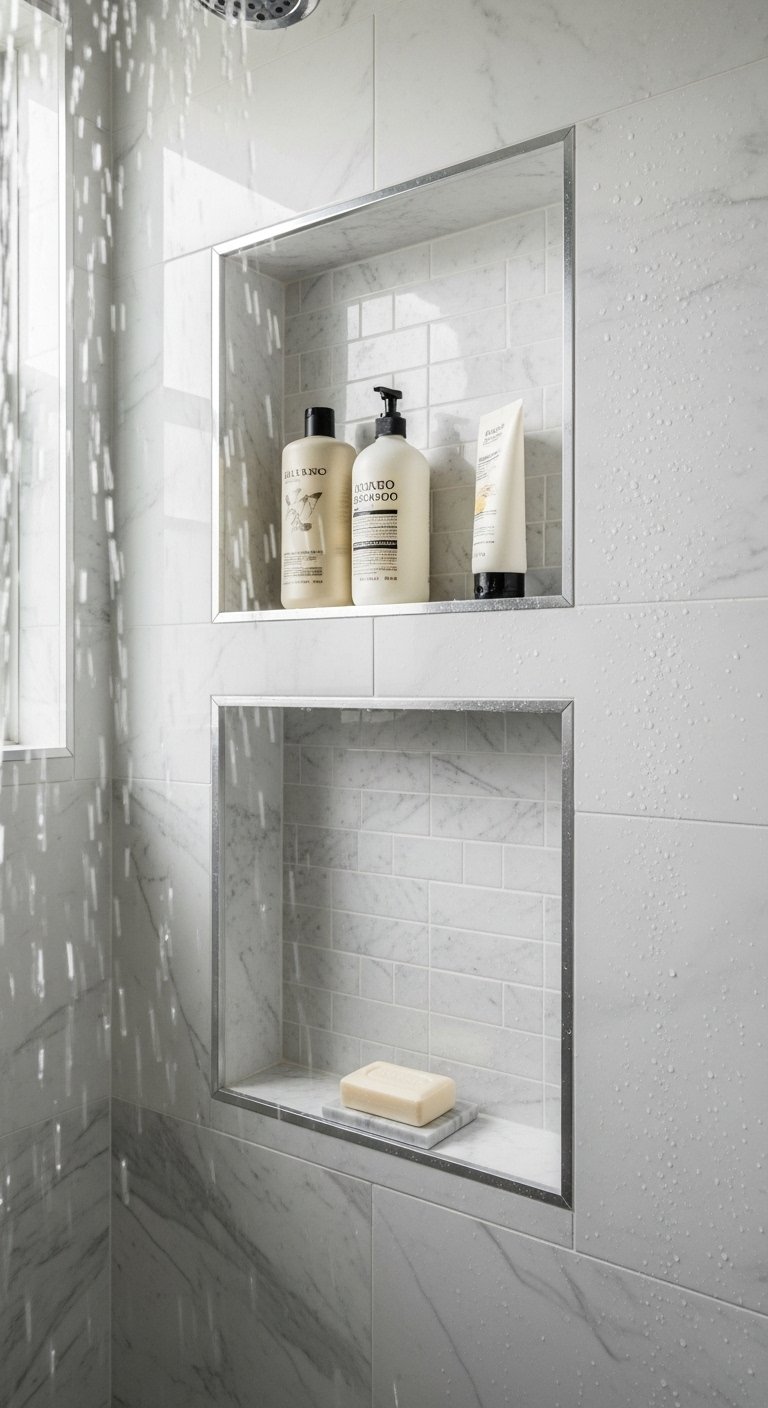
A recessed shower niche built into the shower wall holds shampoo, conditioner, and soap without requiring a shelf or caddy hanging from the showerhead. It sits flush with the tile surface, collects no soap scum on exposed edges, and looks intentional and finished.
Build the niche between wall studs. Standard stud spacing of 16 inches on center gives a niche width of approximately 12 inches. A double niche stacked vertically gives more storage without requiring additional width.
Shower niche specifications:
- Width: 12 to 16 inches between studs
- Height: 12 inches per shelf section
- Depth: 3.5 inches into the wall cavity
- Tile to match or contrast with shower wall tile
- Slight forward slope on the niche floor for drainage
15. Add a Bench in the Shower
A shower bench serves multiple practical functions. It holds items during showering, provides a seat for shaving legs or washing feet, and offers a resting point in a steam shower. In a master bathroom, a built-in shower bench in tile or stone looks far more considered than a freestanding teak version.
Build the bench along the side wall of the shower opposite the showerhead. Standard bench height sits at 17 to 19 inches from the floor. A depth of 15 inches provides a usable seat without consuming excessive shower floor space.
Built-in bench materials:
- Tiled bench: matches shower tile, fully waterproof, most common
- Natural stone slab: single piece, luxurious, requires sealing
- Teak wood: warm, natural, requires periodic oiling
16. Install a Chandelier or Statement Light Fixture
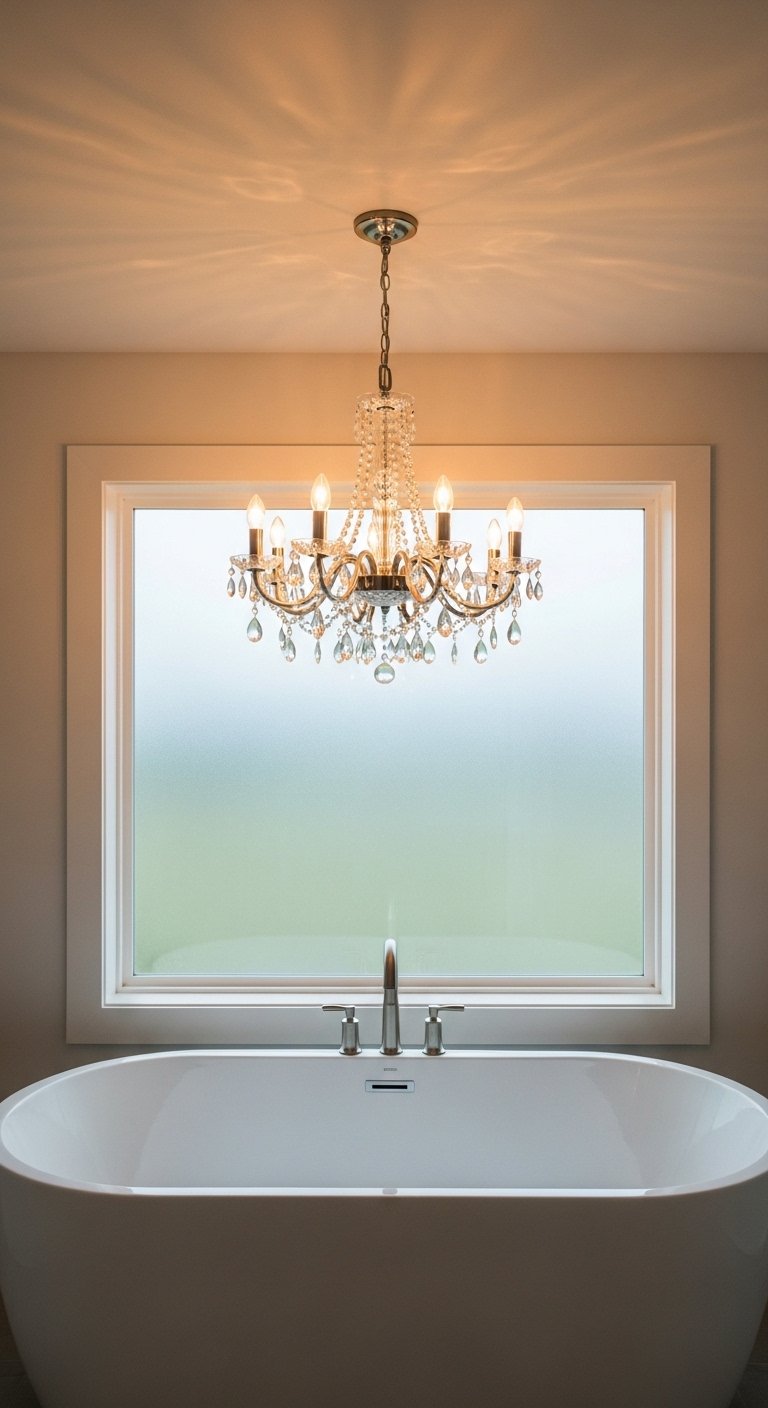
A chandelier or statement pendant in a master bathroom elevates the room from functional to considered. Position it above the freestanding tub or centered in the room as the primary light source. The fixture scale matters. A fixture that is too small looks accidental. Go larger than feels comfortable and it reads as intentional.
Choose a fixture rated for damp locations at minimum. Bathrooms with a shower or tub nearby require a damp-rated or wet-rated fixture depending on proximity to water sources. IMO, a crystal or glass chandelier above a freestanding tub creates the single strongest visual moment in a master bathroom.
Fixture placement:
- Above freestanding tub: center the fixture over the tub length
- Centered in room: hang at a height of 7 feet from floor to fixture bottom
- Above double vanity: use two pendants rather than one centered fixture
17. Add a Makeup Vanity Area
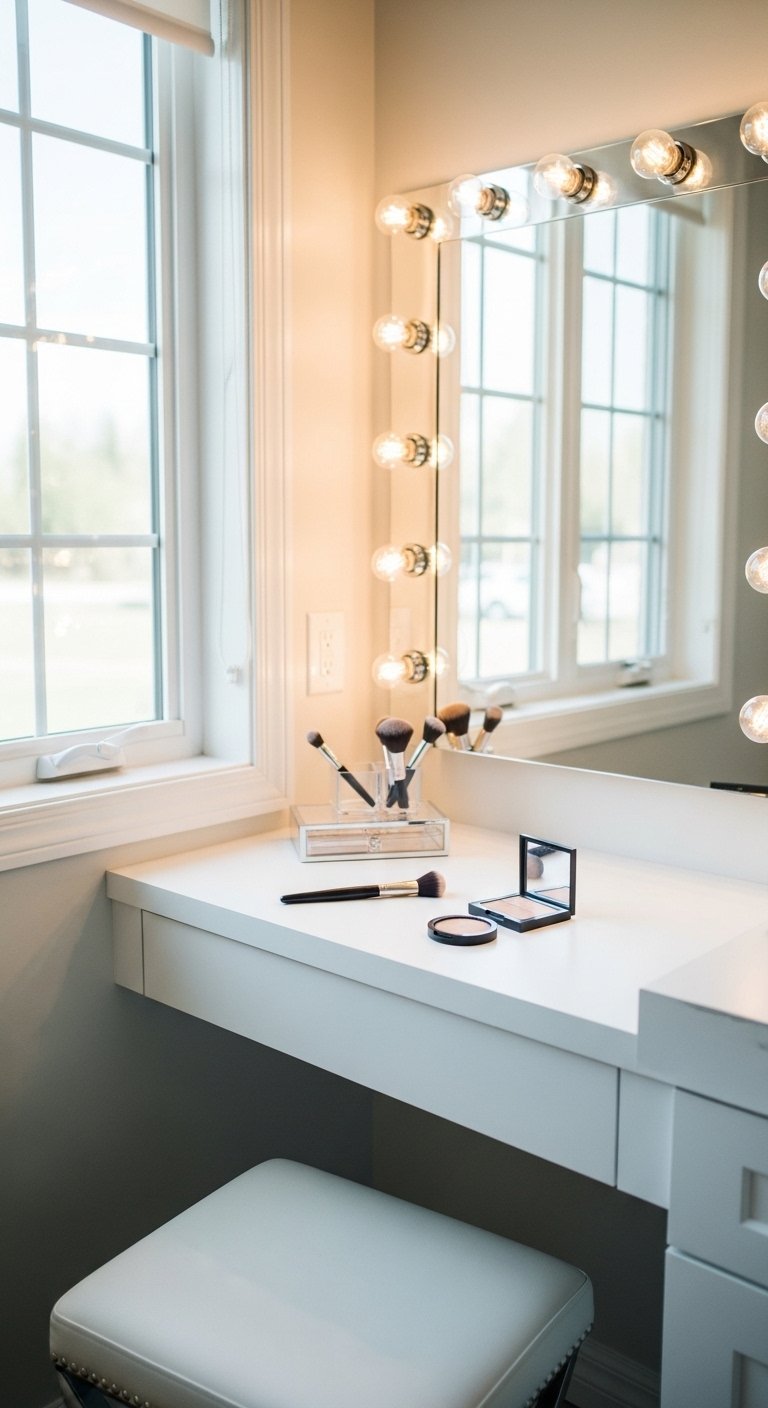
A dedicated makeup vanity area separate from the main bathroom vanity gives one person a defined space for detailed grooming without monopolizing the shared sink. A small table or built-in desk with a mirror, a task light, and drawer storage handles everything a makeup routine requires.
Position it beside a window for natural daylight, which gives the most accurate light for makeup application. A Hollywood-style mirror with bulb lighting around the perimeter delivers even, shadow-free illumination when natural light is not available.
Makeup vanity essentials:
- Table or built-in desk surface at 30 inches height
- Mirror sized to show the full face with 6 inches of surround
- Task lighting at 3000K to 4000K color temperature
- Drawer storage for makeup, tools, and skincare products
18. Use Black Fixtures Throughout
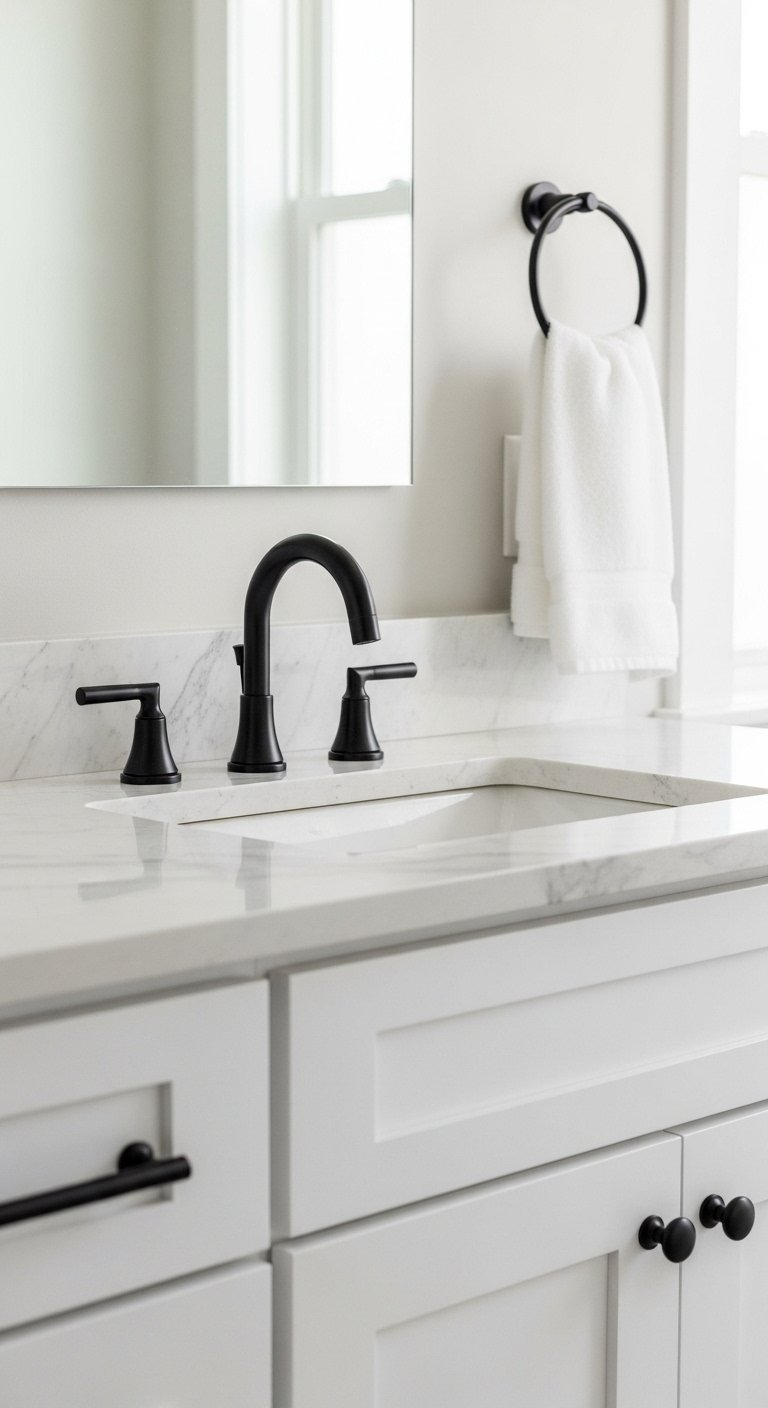
Matte black fixtures, faucets, showerheads, towel bars, toilet paper holders, and cabinet hardware create a cohesive, considered look across the entire master bathroom. The consistency of one finish across every metal element ties the room together.
Black fixtures work against white, grey, beige, and warm wood surfaces. They create sharp contrast against light backgrounds and a more subtle statement against darker surfaces. Choose matte over gloss black. Gloss black shows water spots and fingerprints constantly.
Black fixture checklist:
- Faucets at vanity and tub
- Showerhead and shower controls
- Towel bars and rings
- Toilet paper holder
- Cabinet hardware on vanity
- Mirror frame if applicable
19. Add Natural Elements
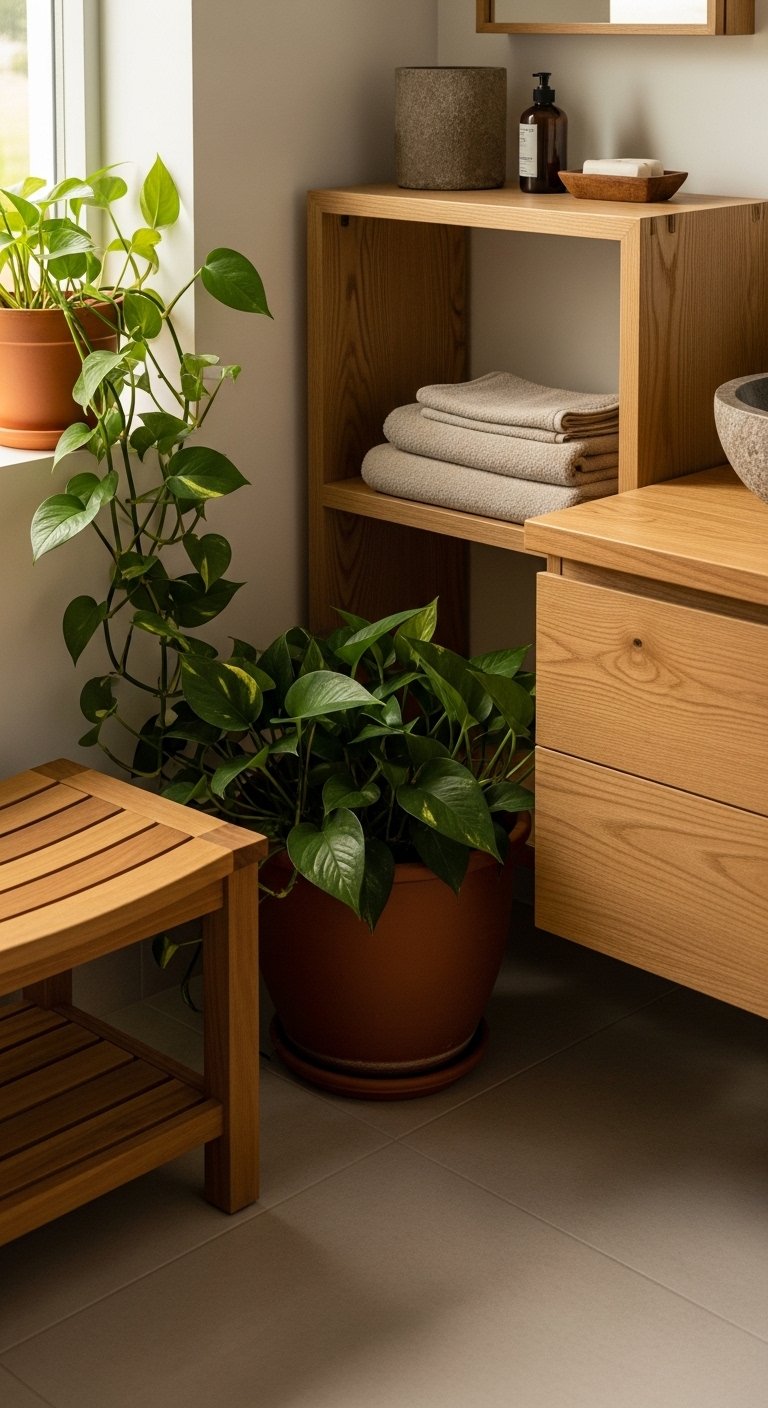
Natural elements, wood, stone, plants, and natural fiber textiles, prevent a master bathroom from feeling cold or clinical. A wood accent wall, a stone vessel sink, a large plant in a corner, and linen towels all add warmth and texture that tile and white surfaces alone cannot deliver.
Choose moisture-tolerant materials. Teak and white oak handle bathroom humidity well. Pine and MDF do not. Plants that tolerate low light and high humidity include pothos, peace lily, and snake plants. All three thrive in a master bathroom environment without constant attention.
Natural elements by category:
- Wood: teak shower bench, white oak vanity, wood-look tile
- Stone: marble countertop, travertine floor, stone vessel sink
- Plants: pothos, peace lily, snake plant, Boston fern
- Textiles: linen towels, cotton bath mat, natural fiber basket
20. Install Proper Ventilation
A master bathroom without proper ventilation accumulates moisture that damages walls, grows mold behind tile, and warps cabinetry within years. A ventilation fan sized correctly for the bathroom square footage removes humidity before it settles.
The standard measurement is 1 CFM per square foot of bathroom area. An 80 square foot master bathroom requires a fan rated at minimum 80 CFM. For bathrooms with a steam shower or soaking tub, increase that to 1.5 CFM per square foot. Run the fan for 20 minutes after every shower.
Fan selection guide:
- 50 to 80 CFM: bathrooms under 65 square feet
- 80 to 110 CFM: bathrooms 65 to 100 square feet
- 110 to 150 CFM: bathrooms over 100 square feet or with steam shower
- Noise rating: choose a fan rated at 1.5 sones or below for quiet operation
21. Add a Window in the Shower
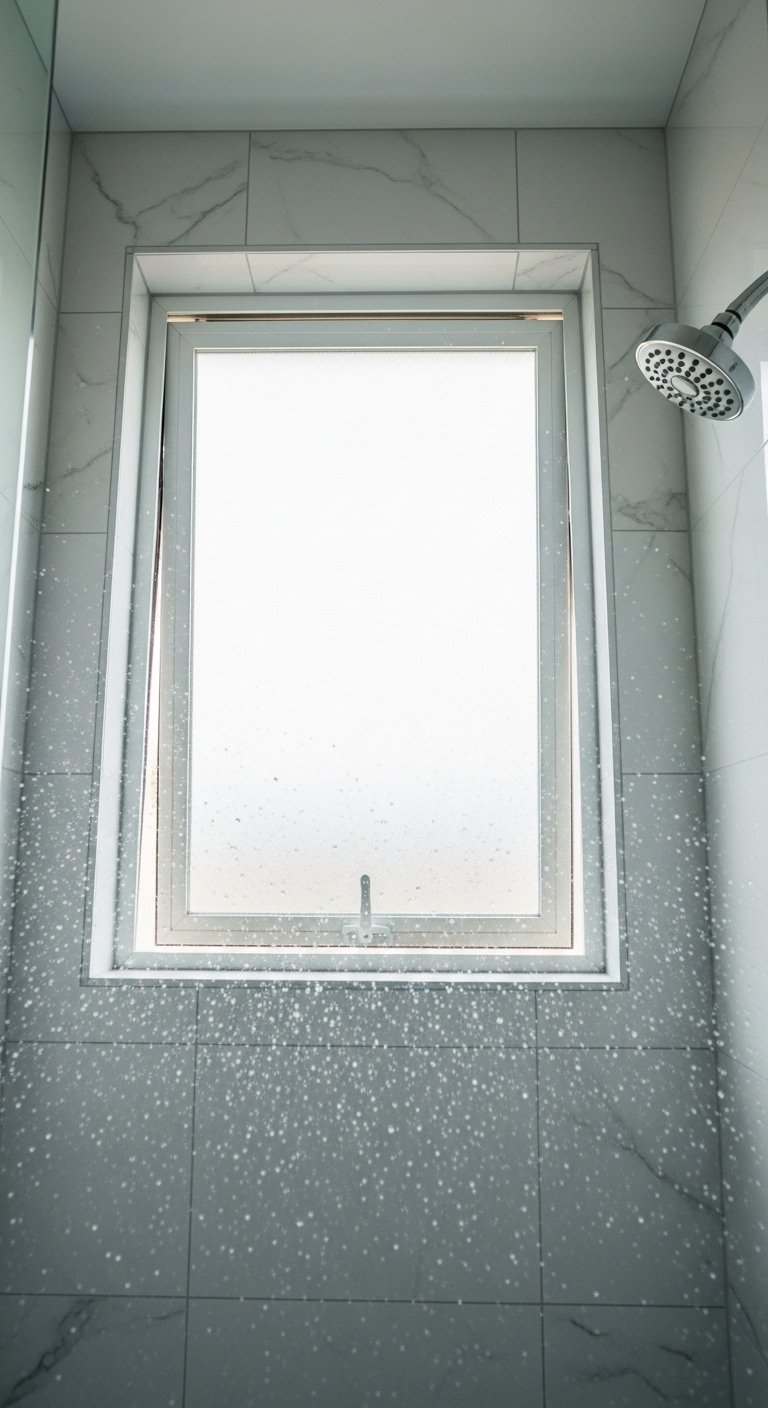
A window inside the shower enclosure brings natural light directly into the shower zone. It makes the shower feel open and connected to the outside without compromising privacy when you use frosted or obscure glass.
Position the window high on the shower wall to maximize privacy while still delivering daylight. A clerestory window at ceiling height works in bathrooms adjacent to an exterior wall. For ground floor bathrooms, frosted glass at any height maintains full privacy while still delivering light.
Window options for shower enclosures:
- Frosted casement window: opens for ventilation, full privacy
- Fixed frosted window: light only, no ventilation, lower cost
- Glass block: maximum privacy, good light diffusion, permanent
Final Thoughts
A master bathroom remodel rewards decisions made in the right order. Start with layout and plumbing positions. Then choose tile and surfaces. Then fixtures and fittings. Then lighting. Accessories come last.
Every idea on this list solves a specific problem or adds a specific value. You do not need all 21. Identify what your current bathroom lacks most, whether that is storage, light, luxury, or function, and start with the ideas that address those gaps directly.
The best master bathroom is the one you look forward to walking into every morning. Build toward that.