25 Kitchen Island Ideas That Make Your Kitchen Work Better
A kitchen island sounds simple. A surface in the middle of your kitchen. How complicated can it be?
Very. Ask anyone who bought the wrong size, picked the wrong style, or installed one in a kitchen that didn’t have room for it. A kitchen island done right transforms how you cook, eat, and use your kitchen. Done wrong, it blocks every walkway and becomes an expensive obstacle course.
I’ve spent more time than I’d like to admit researching kitchen islands, talking to designers, and looking at what actually works in real kitchens. Here are 25 ideas that hold up in practice.
1. Size Your Island to Your Kitchen First
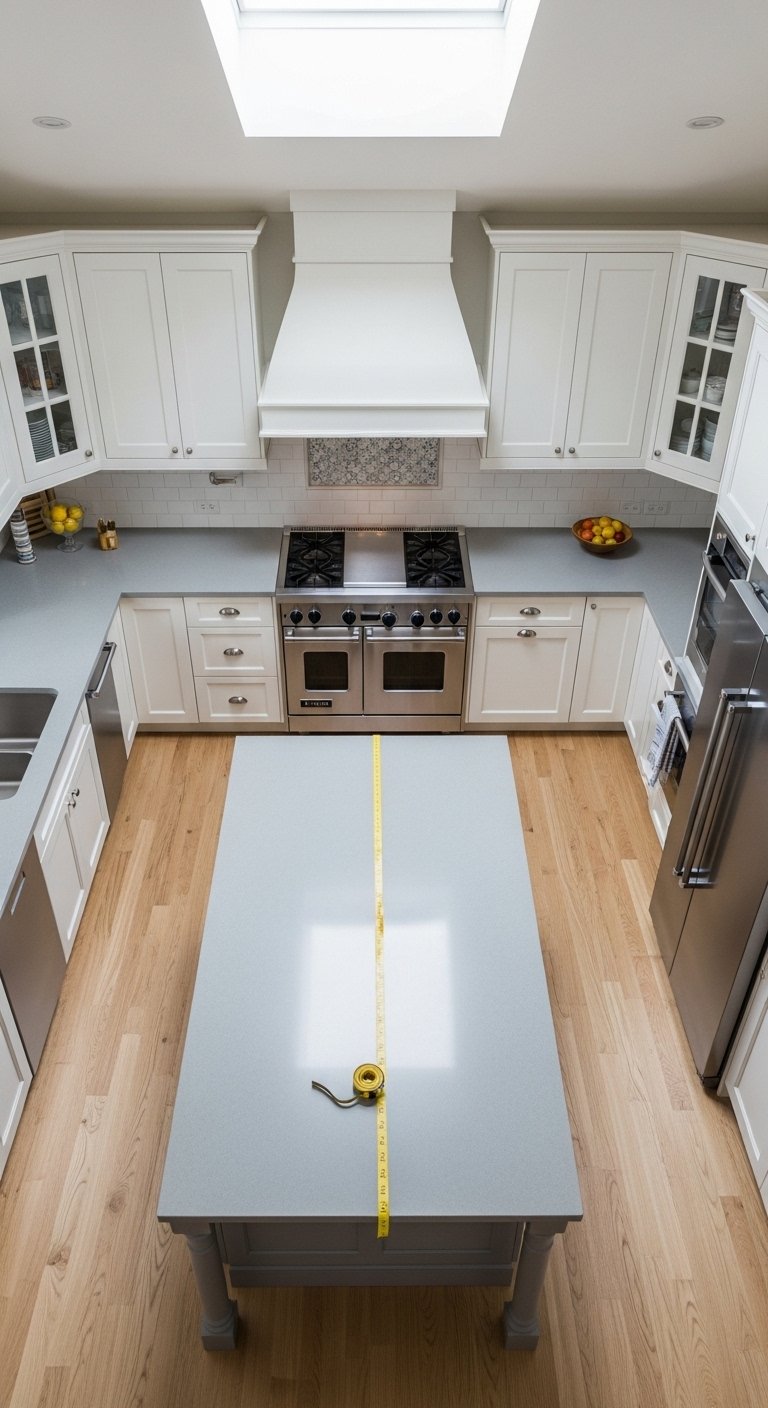
Before you think about style, think about space.
The standard rule: you need at least 42 inches of clearance on all sides of an island in a single-cook kitchen. For two cooks, go 48 inches minimum. Anything less and you’re constantly moving around each other.
Quick sizing guide:
- Small kitchen (under 150 sq ft): Skip a permanent island, use a rolling cart instead.
- Medium kitchen (150 to 250 sq ft): An island up to 4 feet long works well.
- Large kitchen (250+ sq ft): You have room for a full 6-foot or longer island.
Measure twice. Buy once. This advice exists for a reason.
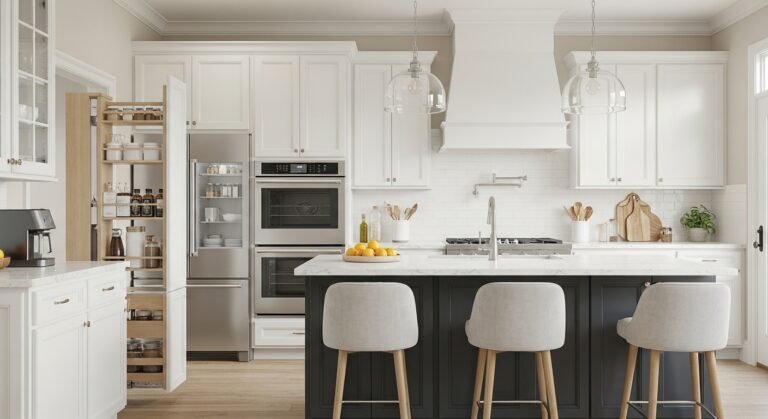
2. Add Seating to One Side
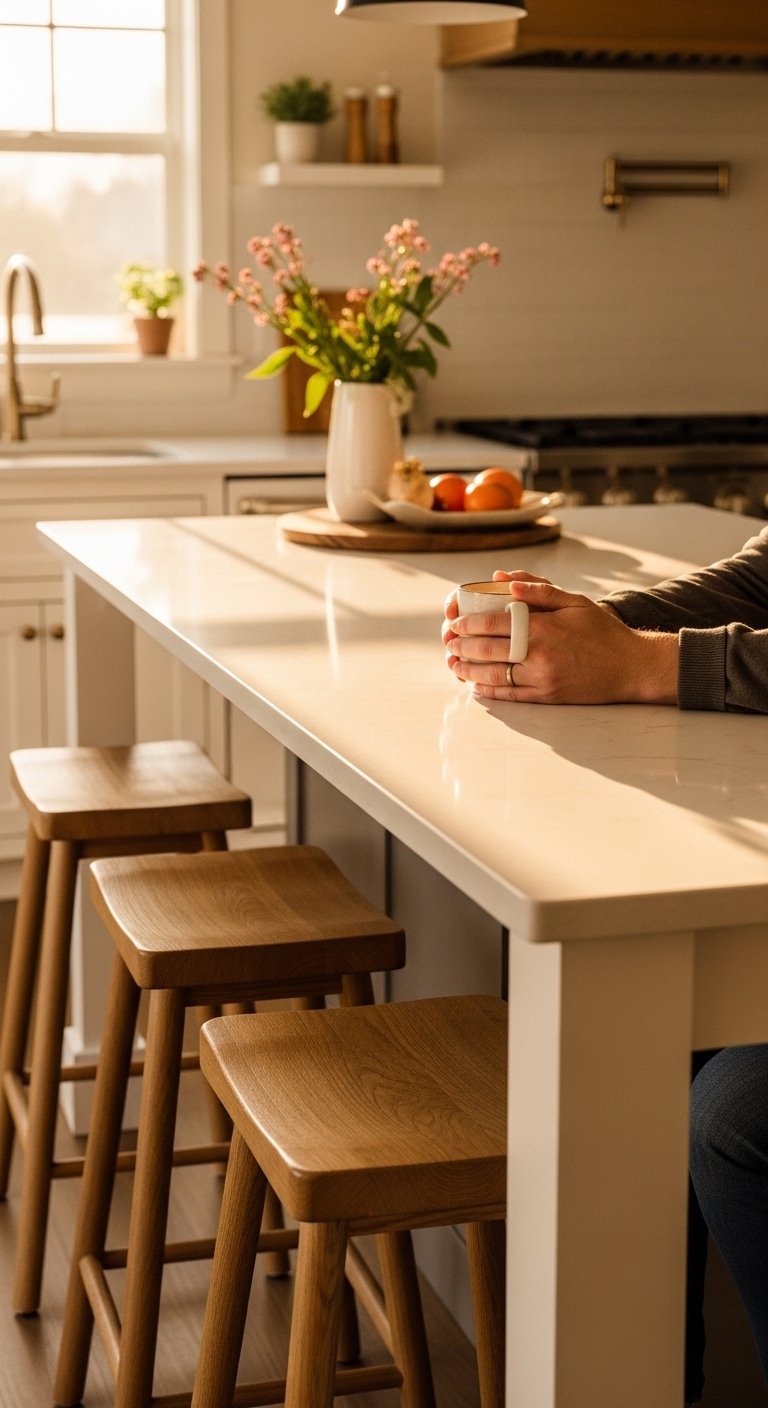
An island with seating does two jobs at once. It gives you prep space and eliminates the need for a separate breakfast table.
The standard counter height is 36 inches, which works with 24 to 26-inch counter stools. If you raise the island to bar height at 42 inches, use 28 to 30-inch bar stools.
What to keep in mind:
- Allow 24 inches of width per seated person.
- Leave at least 12 inches of knee space below the overhang.
- Backless stools tuck under cleanly and take up less visual space.
This is one of the most practical upgrades you can make in a kitchen. The island becomes your morning coffee spot, homework station, and dinner prep zone simultaneously.
3. Use a Waterfall Edge Countertop
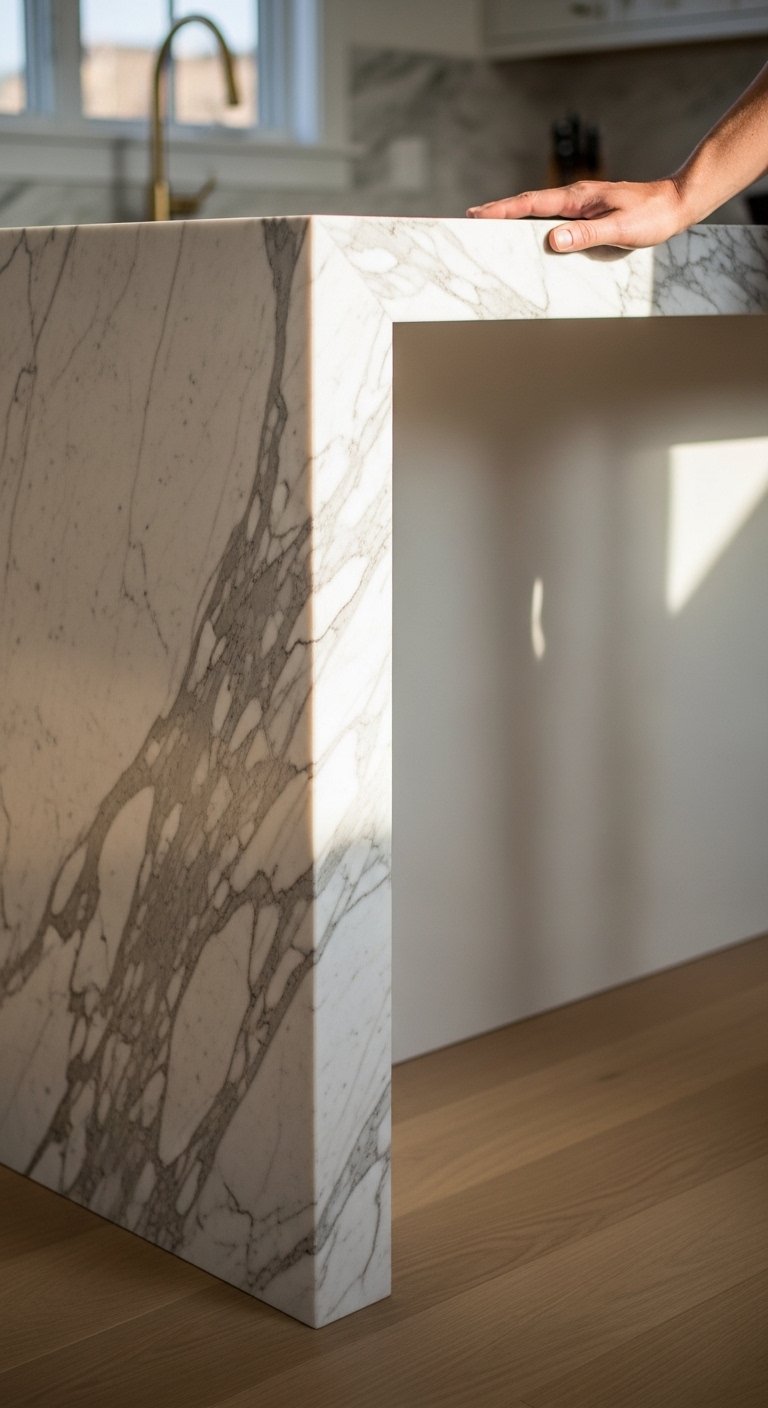
A waterfall countertop continues the surface material down the sides of the island, all the way to the floor. It looks architectural and deliberate.
This works best with stone, quartz, or marble. The continuous surface removes the visual break between countertop and cabinet, making the island feel like one solid piece.
It costs more than a standard edge. It also looks significantly better. IMO, if you’re already investing in an island, the waterfall edge is worth the upgrade.
4. Install an Undermount Sink
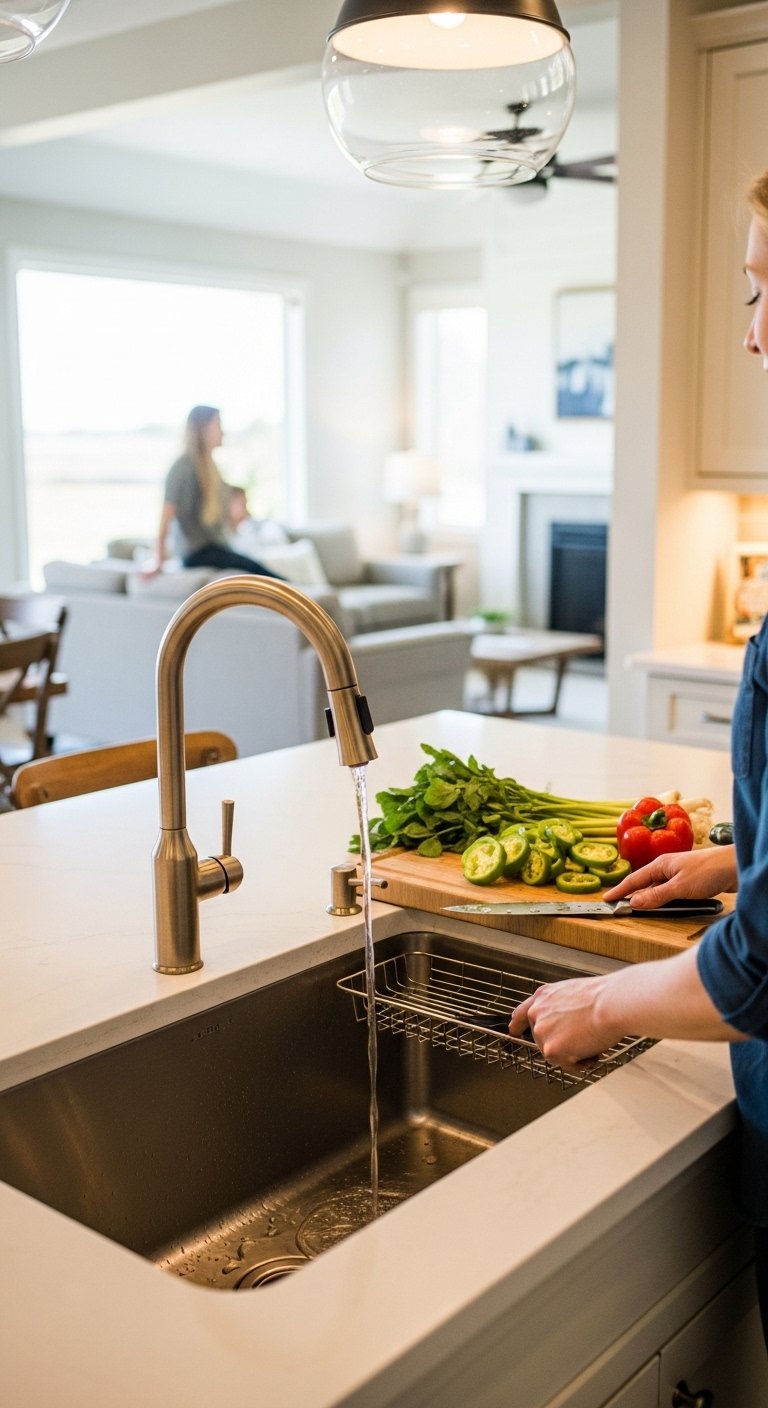
A sink on your island changes how you cook. You face the room while washing vegetables, cleaning up, or prepping ingredients instead of staring at a wall.
It also shortens your workflow distance. Sink to cutting board to stove in a tight triangle rather than crossing the full kitchen.
Things to confirm before installing:
- Plumbing rough-in needs to run under the floor to the island location.
- You’ll need a drain and supply lines extended to the island.
- Factor in plumber costs, which add to the total project budget.
The functional payoff outweighs the installation complexity in most kitchens.
5. Add a Prep Sink Instead of a Full Sink
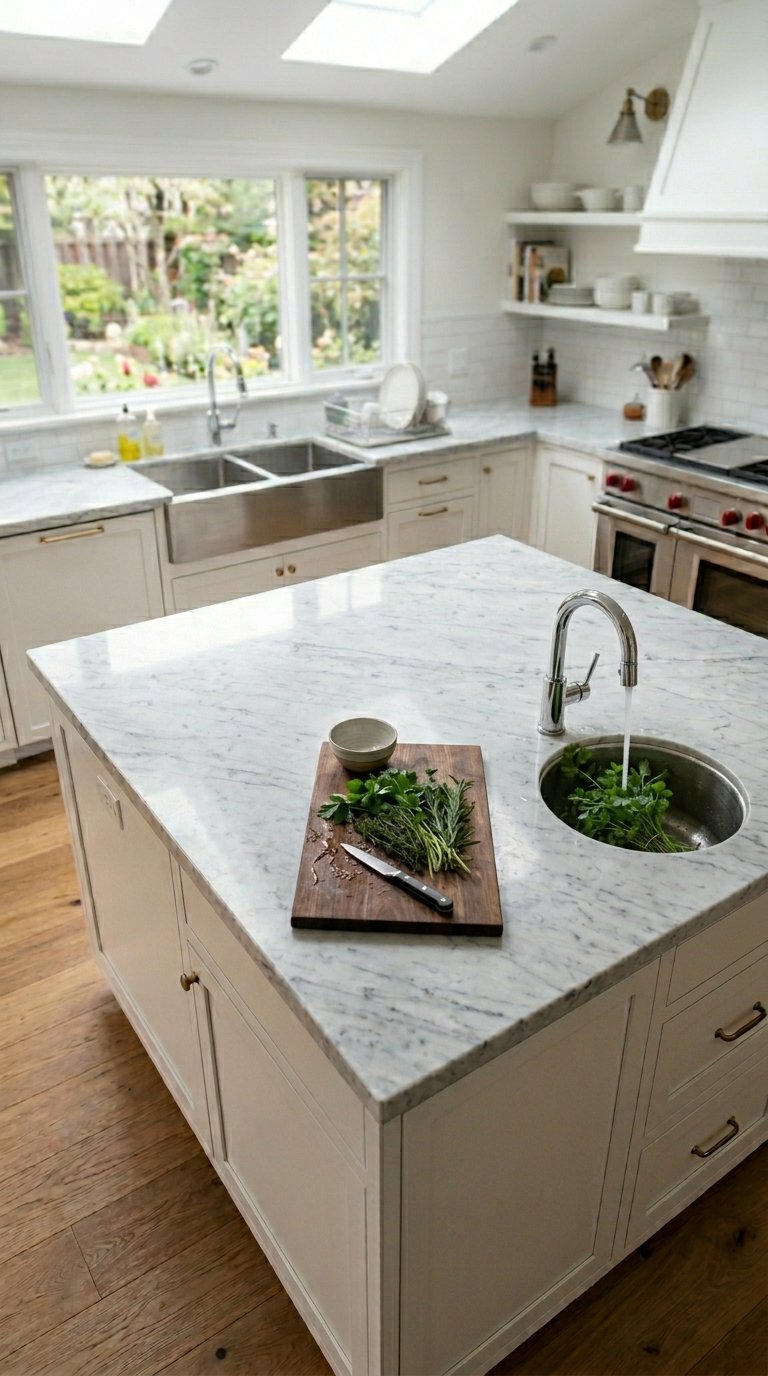
If a full sink feels like too much, a small prep sink solves the same workflow problem at lower cost and with less plumbing work.
A prep sink is typically 9 to 15 inches wide. It handles rinsing produce, filling pots, and quick cleanup. It keeps traffic away from your main sink and frees it up for dishes.
This works especially well in larger kitchens where the main sink is on the perimeter and the island sits far from it.
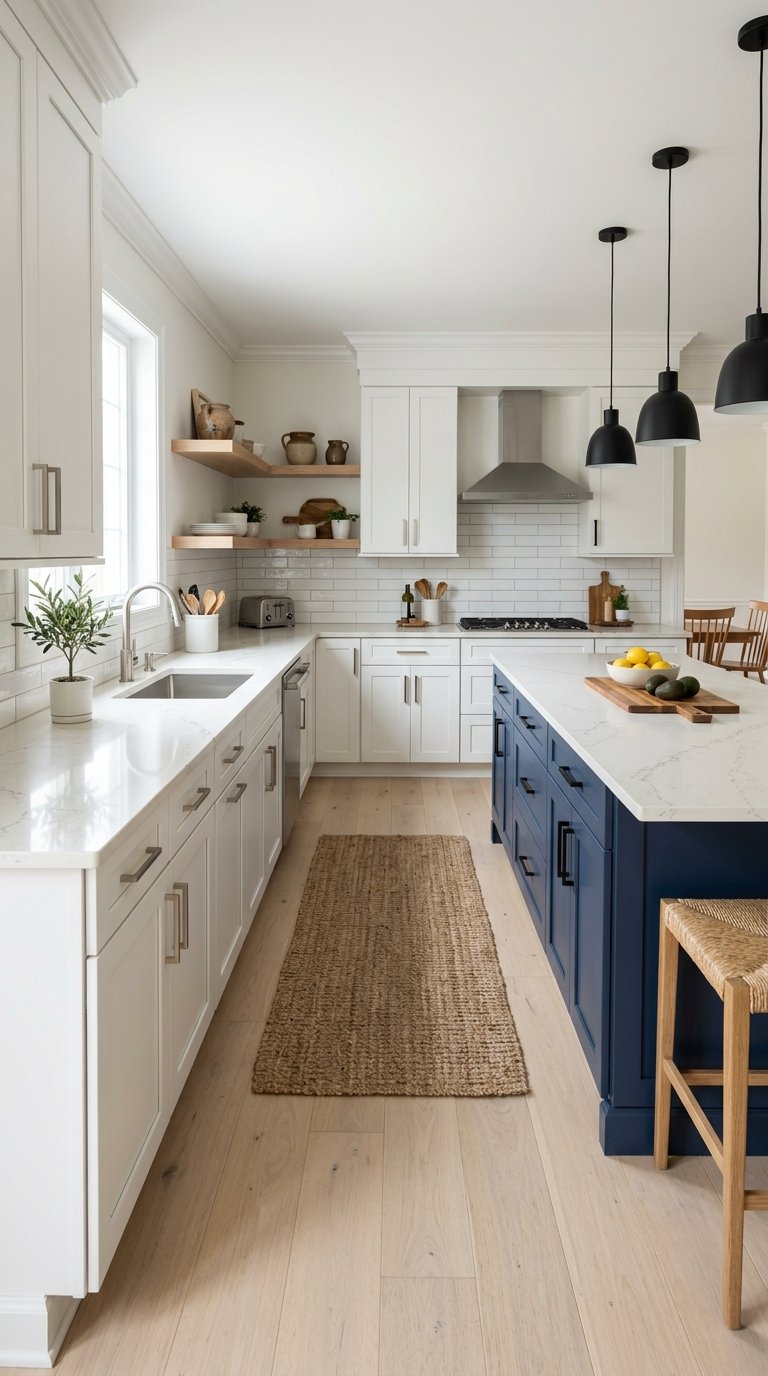
6. Choose Contrasting Cabinet Colors
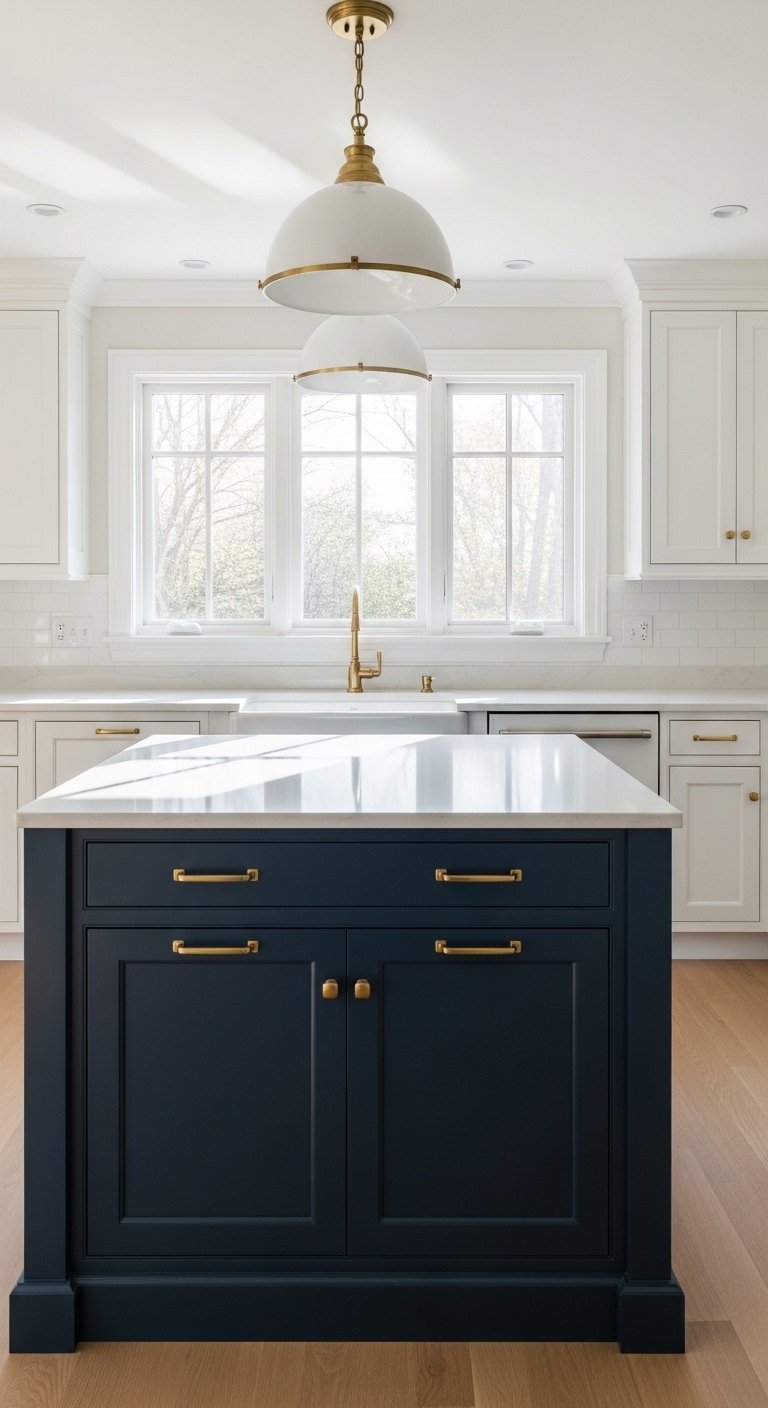
Your perimeter cabinets don’t have to match your island. In fact, contrasting colors often look better.
A white kitchen with a navy, forest green, or charcoal island adds visual depth without requiring a full kitchen renovation. The island becomes an intentional focal point.
Color combinations that work:
- White perimeter cabinets with a deep navy island.
- Light gray kitchen with a warm sage green island.
- All-white kitchen with a black island for maximum contrast.
- Natural wood perimeter with a painted island in any muted tone.
One rule: keep the countertop material consistent across both for a cohesive look.
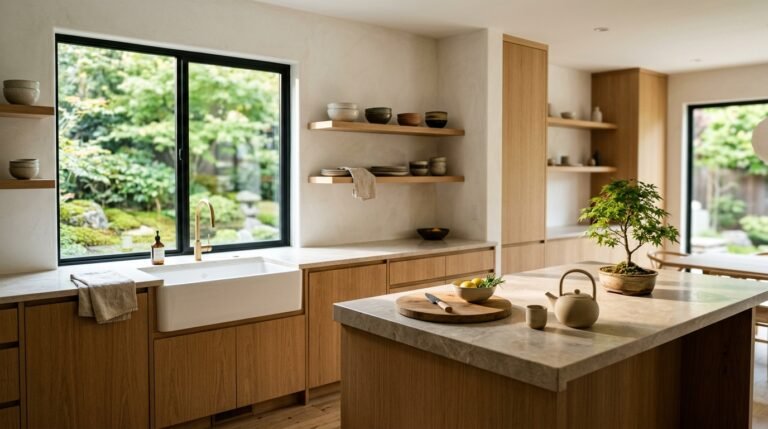
7. Use Open Shelving on One Side
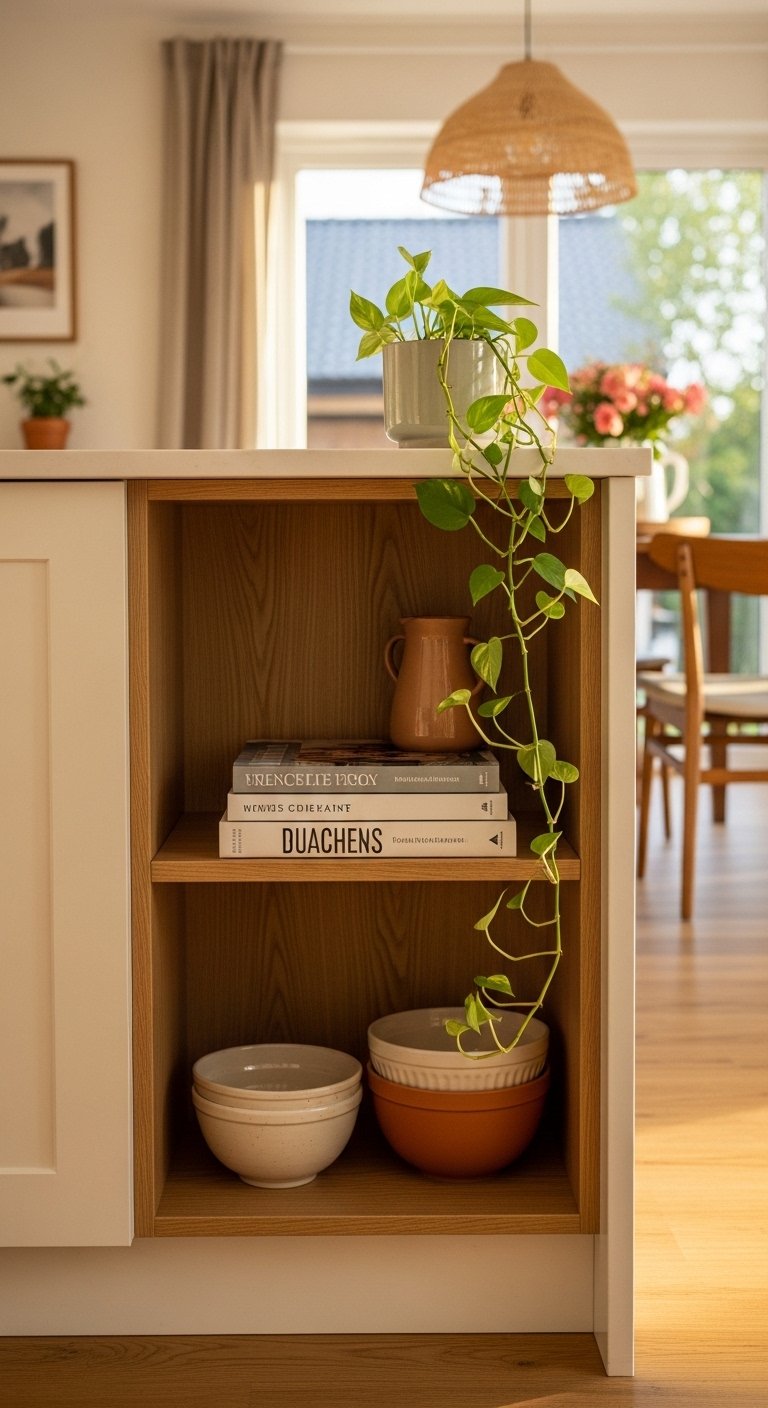
Closed cabinets on all sides of an island can look heavy. Open shelving on one end or one full side lightens the visual weight and gives you accessible storage for cookbooks, bowls, or everyday items.
The open side also invites people to interact with the island from that direction, which works well if the open shelving faces into a living or dining area.
Keep the shelves edited. Two or three objects per shelf looks intentional. Ten objects per shelf looks like a garage sale.
8. Add a Built-In Cooktop
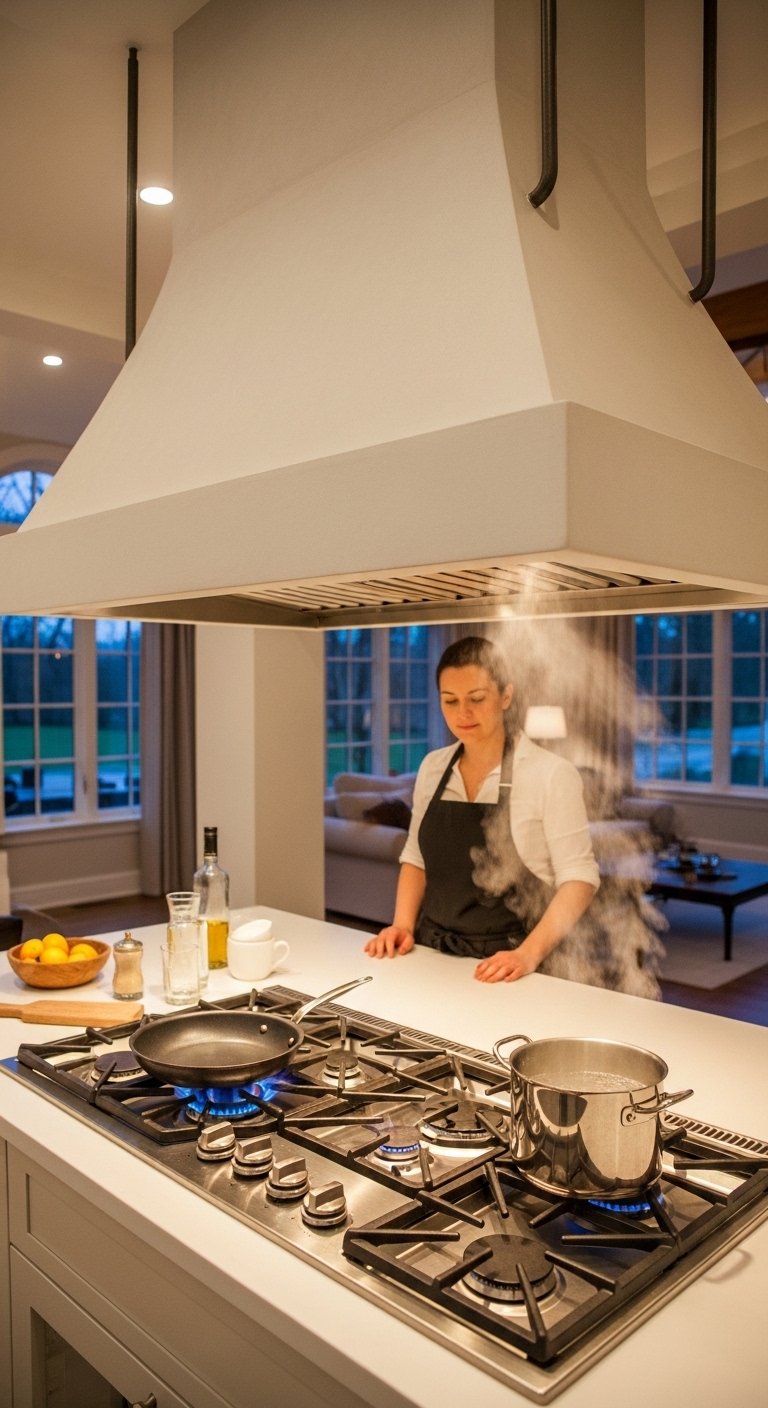
Moving the cooktop to the island puts the cook at the center of the room. You face guests, family, or the open living space while cooking rather than a wall.
What this requires:
- A downdraft ventilation system or an overhead range hood centered above the island.
- Gas lines or electrical wiring run under the floor to the island.
- Adequate clearance between the cooktop and any seating area (at least 12 inches of non-flammable counter space on each side).
The overhead range hood above an island becomes a design feature in its own right. Choose it carefully because it sits at eye level from every angle in the room.
9. Use a Statement Range Hood as a Design Anchor
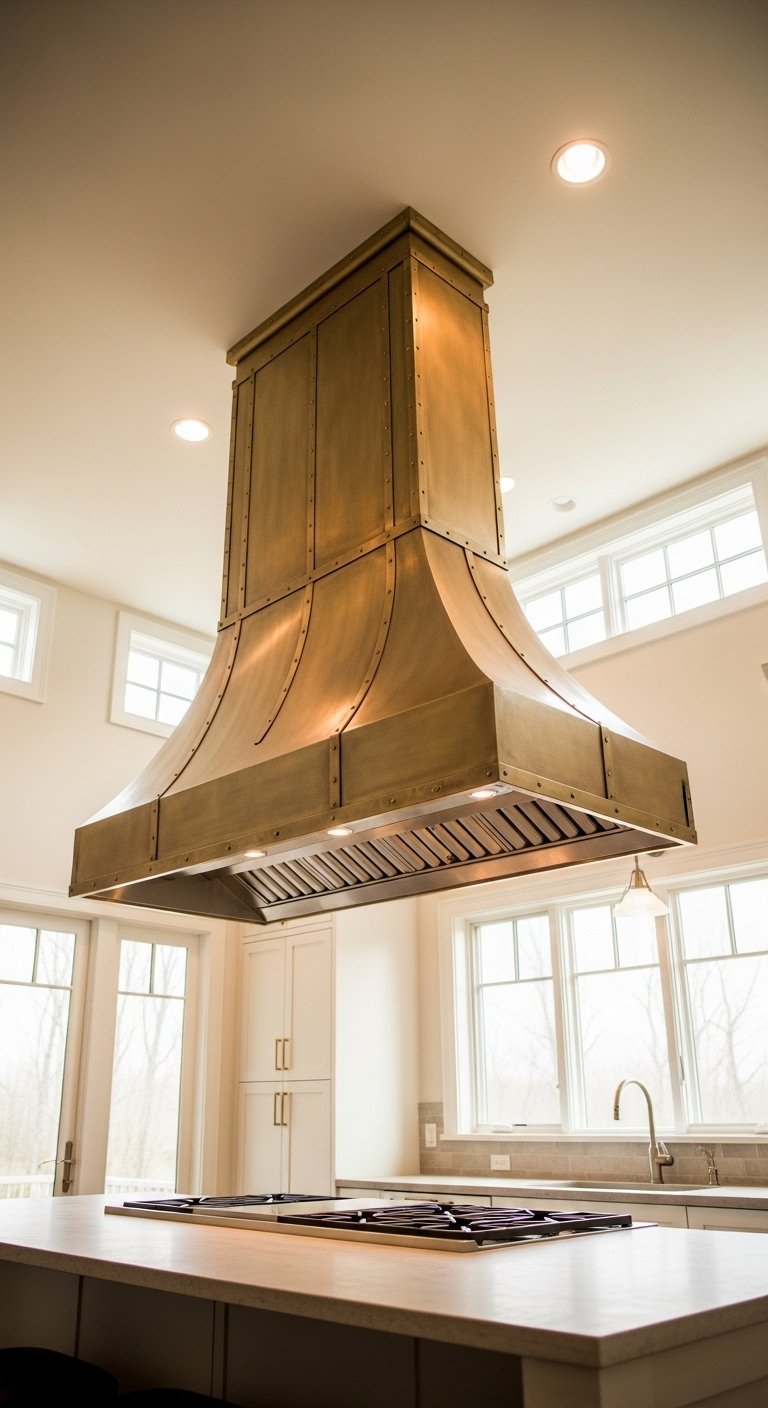
If you move the cooktop to the island, the range hood above it becomes one of the most visible design elements in your kitchen.
Options include:
- Custom plaster hoods for a European farmhouse look.
- Stainless steel industrial hoods for a professional kitchen feel.
- Brass or copper hoods for warmth and a high-end finish.
- Painted wood hoods to match cabinetry for a seamless built-in look.
The hood should be proportional to the island below it. A small hood over a large island looks undersized and awkward.
10. Install Deep Drawer Storage
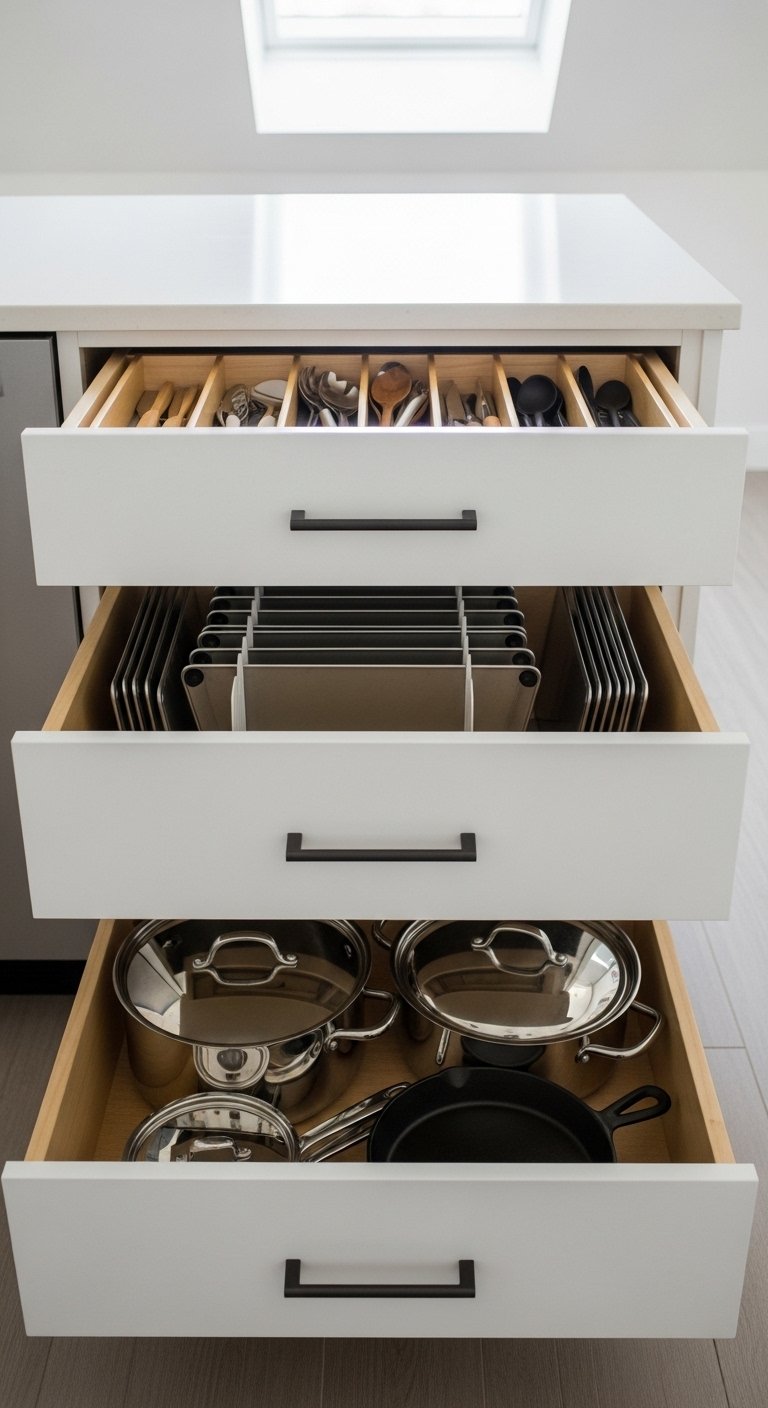
Deep drawers beat cabinets for kitchen storage in almost every situation.
You see everything in a drawer at a glance. In a cabinet, items in the back get ignored and forgotten. Deep drawers in an island work for pots, pans, mixing bowls, baking sheets, and anything else that would otherwise stack awkwardly in a cabinet.
Recommended drawer configuration for an island:
- One extra-deep bottom drawer for large pots and pans.
- One mid-depth drawer for lids and baking items.
- Two shallow top drawers for utensils and small tools.
Soft-close drawer hardware is worth the additional cost every single time.
11. Add a Wine or Beverage Fridge

A small wine or beverage fridge built into the island base keeps drinks accessible without crowding your main refrigerator.
This works particularly well in open-plan homes where the kitchen flows into a living or dining area. Guests help themselves without entering the main cooking zone.
Standard undercounter beverage fridges range from 15 to 24 inches wide. Measure your island base before purchasing one.
12. Use a Different Countertop Material on the Island
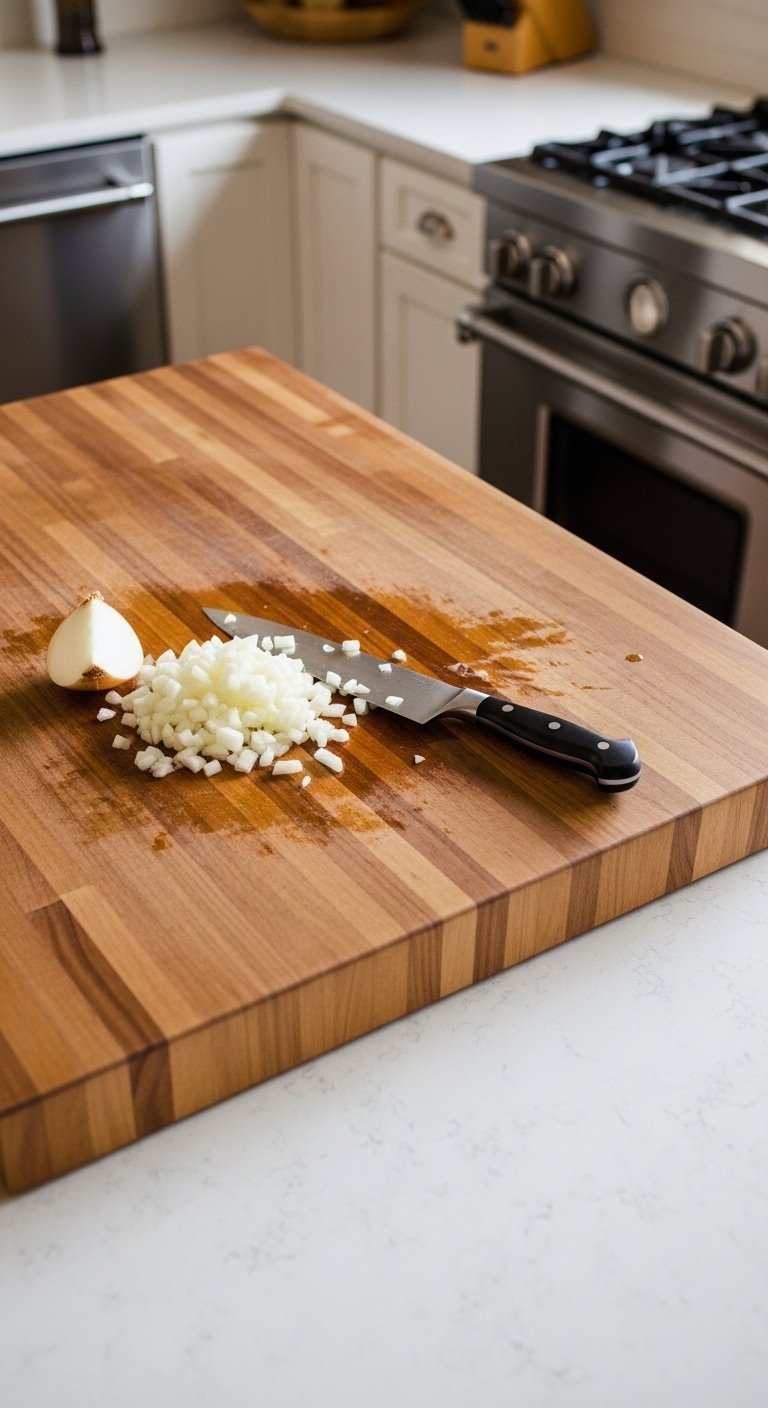
Your perimeter countertops and island don’t need to match. Using a different material creates visual interest and lets each surface serve a different purpose.
A common approach: butcher block on the island for chopping and food prep, stone on the perimeter for durability near the stove and sink. The warmth of wood against cooler stone creates a layered, professional kitchen look.
Popular island countertop choices:
- Butcher block for warmth and knife-friendly prep.
- Marble for a classic, high-end look (requires sealing and maintenance).
- Quartz for durability and low maintenance.
- Concrete for an industrial, textural finish.
- Soapstone for a matte, dark, and durable surface.
13. Make It a Portable Rolling Island
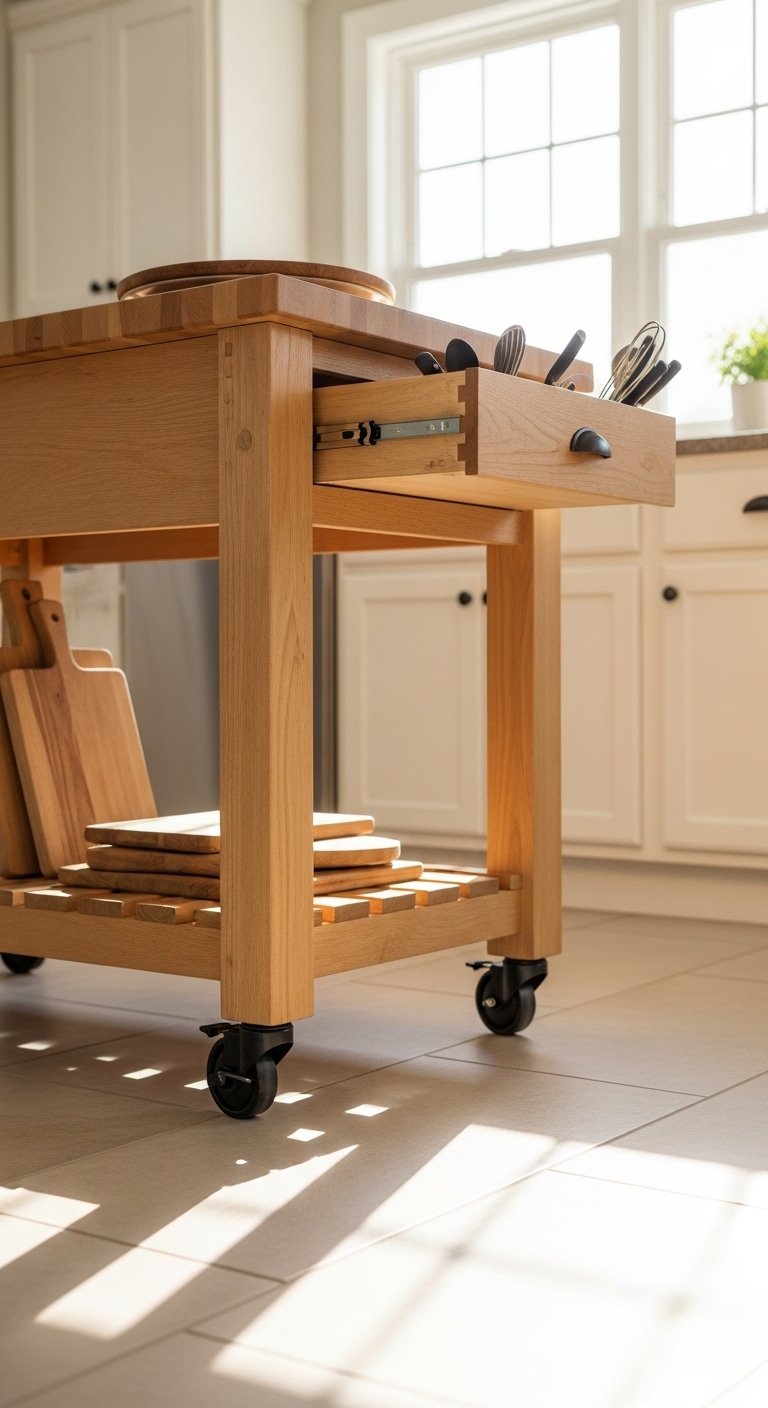
Not every kitchen needs a permanent island. A well-built rolling island gives you flexibility: use it as prep space when cooking, roll it out of the way when you need floor space, and reposition it when your needs change.
Look for rolling islands with:
- Locking casters so it stays in place during use.
- A solid wood or butcher block top for actual prep work.
- At least one drawer and one shelf for storage.
- A weight that keeps it stable without being impossible to move.
This works well in rentals, smaller kitchens, and households where the kitchen layout changes based on how many people are cooking.
14. Add Built-In Trash and Recycling Pullouts

A trash can sitting on the floor of your kitchen takes up visible space and collects visual clutter. A built-in pullout inside the island hides it completely.
Most standard trash pullout systems fit inside a 15 to 18-inch cabinet opening. You get one bin for trash and one for recycling side by side.
This is one of those upgrades that costs relatively little but changes how your kitchen feels every single day. Underrated, full stop.
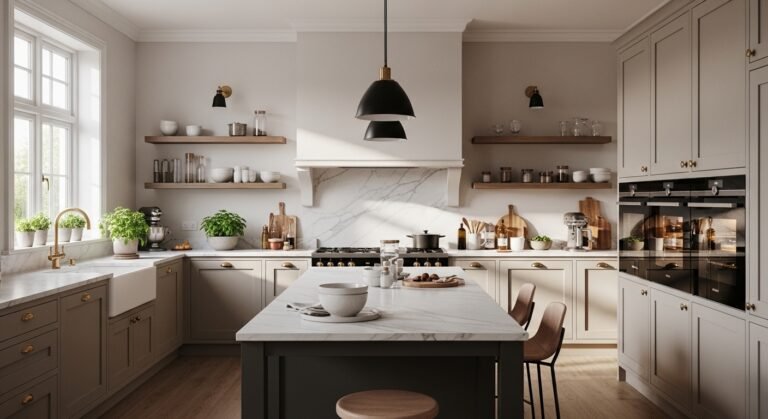
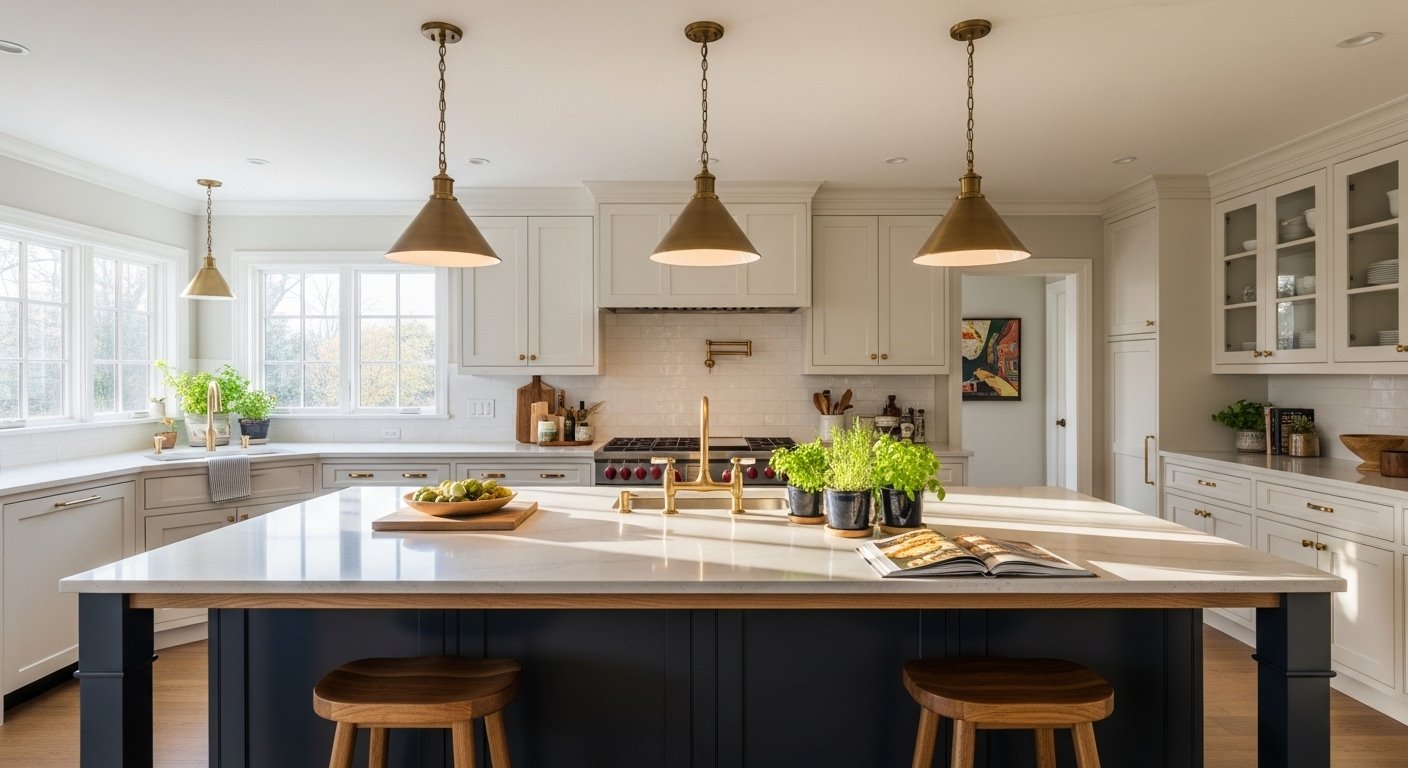
15. Use Pendant Lights to Define the Island Zone
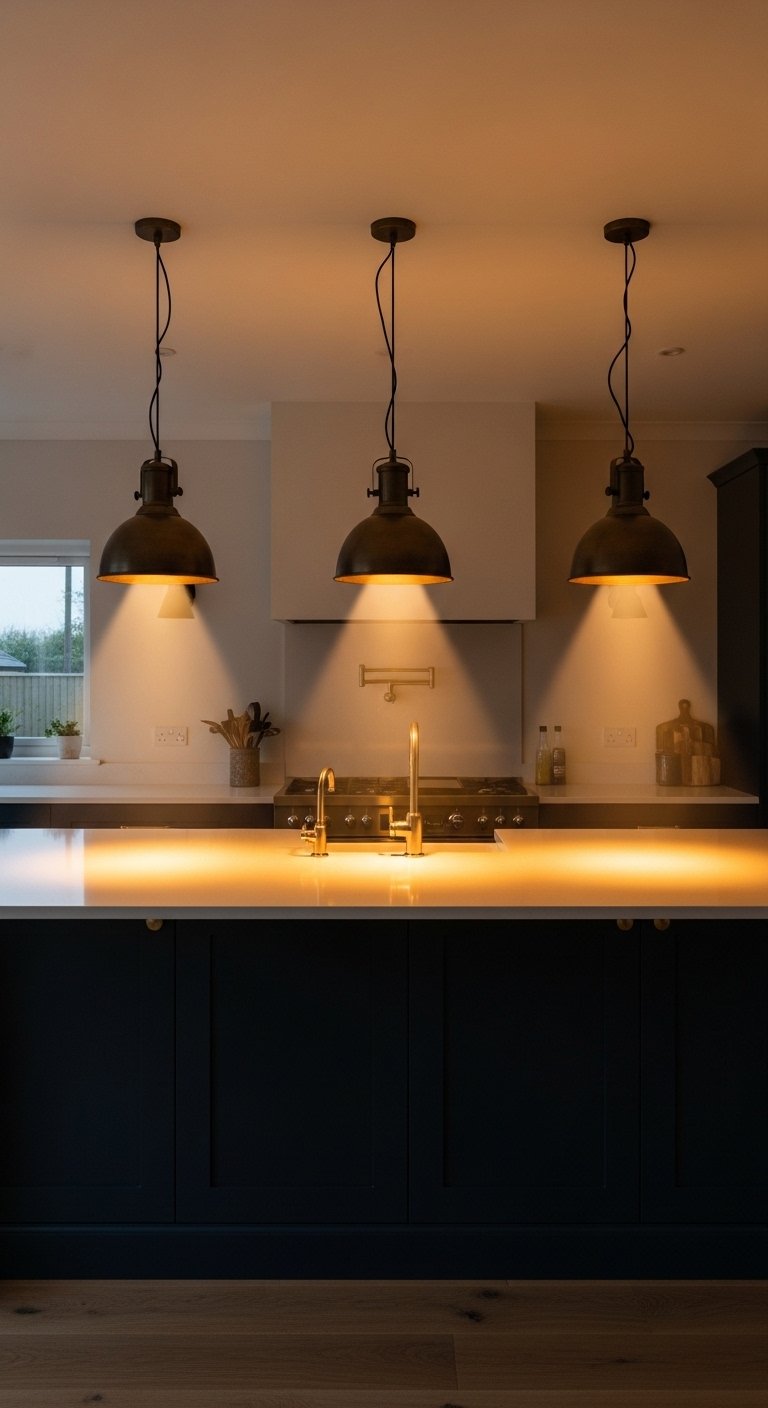
Pendant lights above an island do two things: they provide task lighting for prep work and they visually define the island as a distinct zone within the room.
Pendant light guidelines:
- Hang pendants 30 to 36 inches above the countertop surface.
- For islands up to 4 feet long, use two pendants.
- For islands 5 to 7 feet long, use three pendants.
- Space pendants evenly and center them above the island length.
The pendant style sets the tone for the whole kitchen. A wrong pendant choice undermines an otherwise well-designed space. Choose carefully.
16. Add a Breakfast Bar Overhang on One End

Instead of seating along the full length of the island, an overhang on one short end creates a compact breakfast bar that seats two people without dominating the island footprint.
This works well in kitchens where the island runs perpendicular to the main traffic path. The end seating keeps diners out of the cook’s way.
An 18-inch overhang at standard counter height seats two people comfortably with the right stool height.
17. Go Leggy: Use Furniture-Style Legs
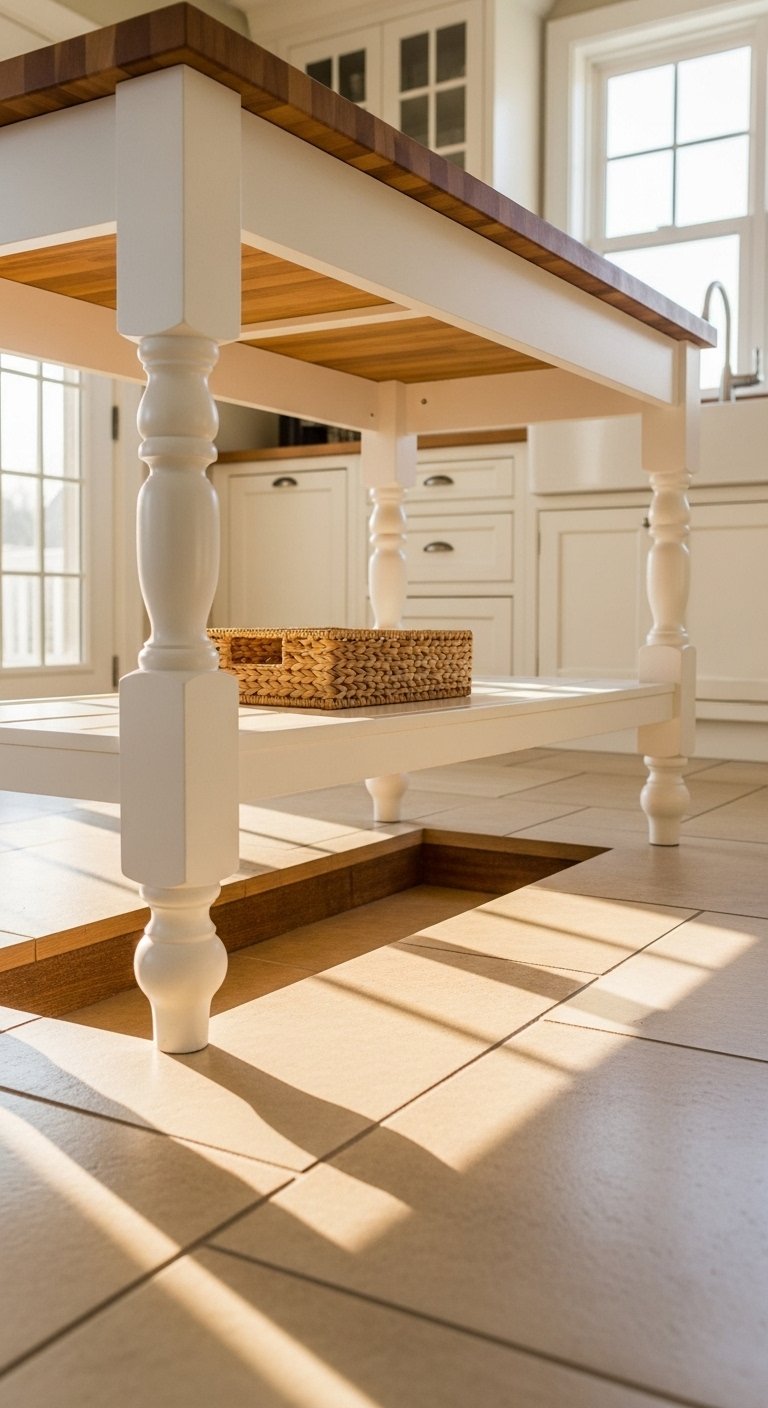
Most kitchen islands sit on a solid base of cabinets that runs to the floor. A furniture-style island with visible legs looks less like a built-in and more like a piece of furniture.
This style works especially well in farmhouse, transitional, and traditional kitchens. The legs add visual breathing room at floor level, making the island feel lighter in the space.
Turned wood legs, tapered legs, and bracket-style legs all work depending on your kitchen style.
18. Build in a Charging Station

Phones, tablets, and laptops end up on the kitchen counter because that’s where everyone gathers. Build a dedicated charging spot into the island and stop fighting it.
A simple recessed USB outlet with a standard plug in a discreet corner of the island handles this cleanly. Some island designs include a small cabinet with a power strip inside, keeping cables hidden.
FYI, this is one of those practical additions that every person who adds it wonders why they waited so long.
19. Use Two-Tone Cabinet Hardware
Most people pick one hardware finish and use it consistently across all kitchen cabinets. Using two finishes strategically, one on the perimeter and a different one on the island, reinforces the visual separation between the two zones.
For example: brushed nickel on perimeter cabinets and matte black on the island. Or brass on the perimeter and oil-rubbed bronze on the island.
Keep the two finishes in the same temperature family (both warm or both cool) to avoid a clash.
20. Add a Microwave Drawer
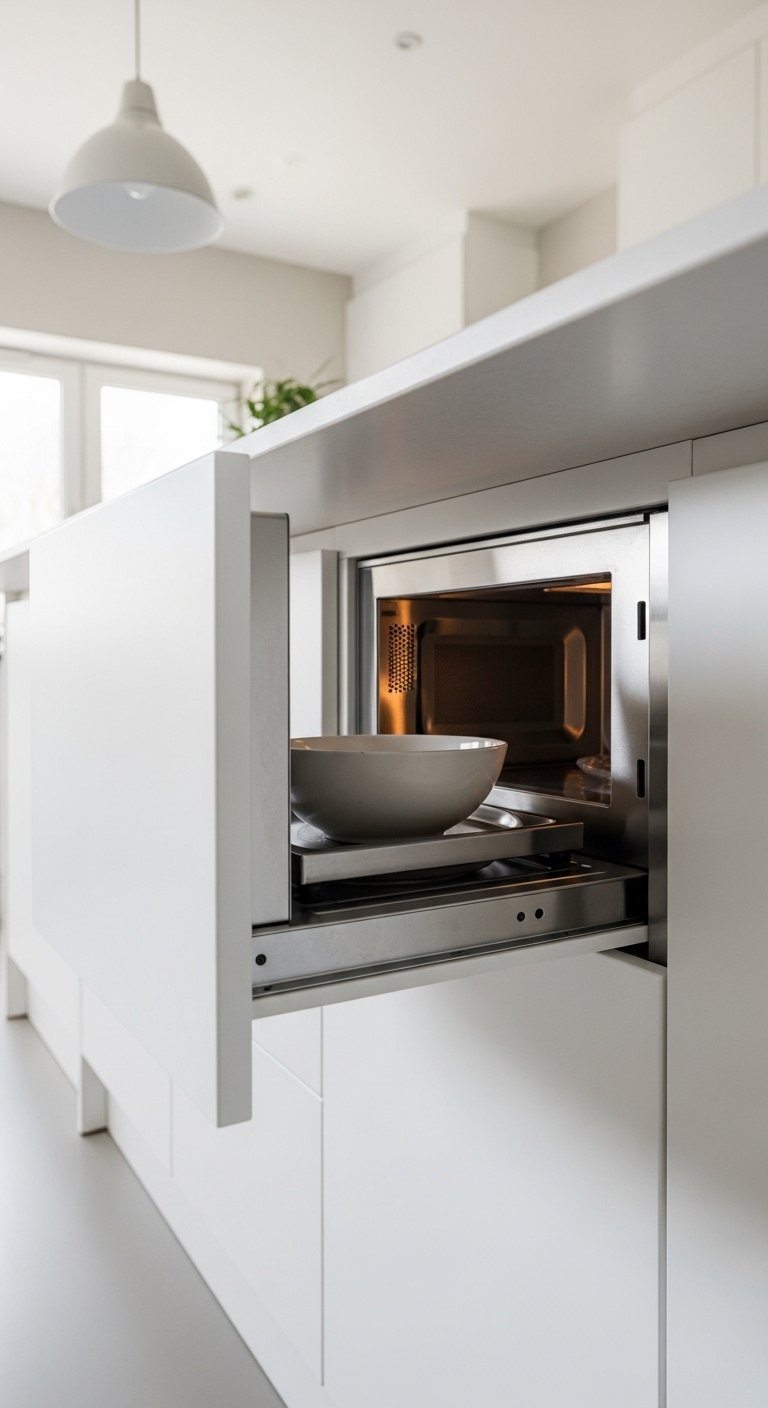
A microwave drawer installed in the island base removes the microwave from your countertop or upper cabinet and integrates it cleanly into the island.
Microwave drawers open downward like a drawer and sit flush with the cabinet face. They free up significant counter space and eliminate the awkward upper-cabinet microwave that many people have to reach up into.
The main downside is cost. Microwave drawers run significantly more than standard countertop units. Weigh the counter space gain against the budget increase.
21. Match the Island to Your Flooring, Not Your Cabinets
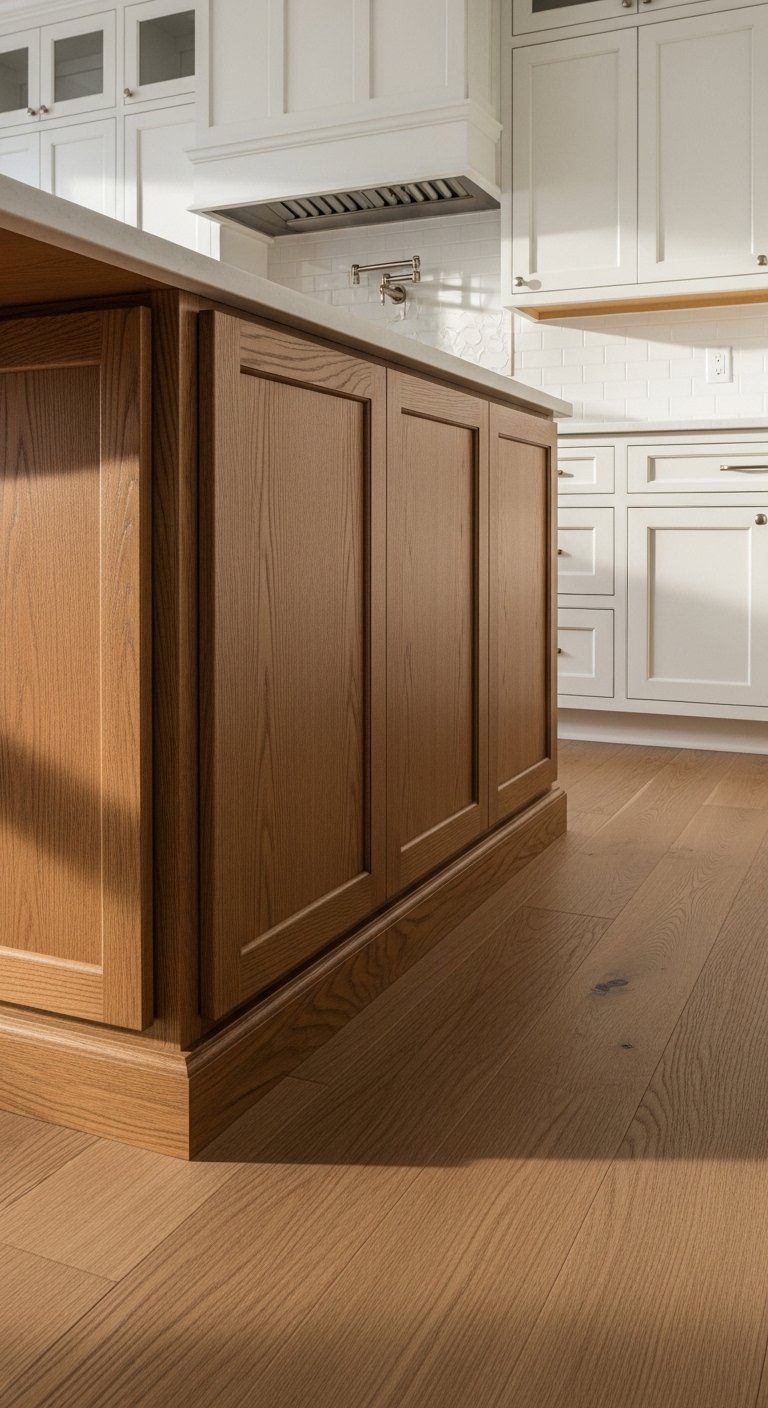
This is a less common approach but one worth considering.
When the island base color relates to the floor material rather than the cabinet color, the island appears to grow out of the floor. It feels grounded and intentional rather than dropped into space.
A warm oak floor paired with a warm wood-tone island base, set against white painted perimeter cabinets, creates a layered three-material kitchen that feels designed rather than assembled.
22. Add a Towel Bar Rail
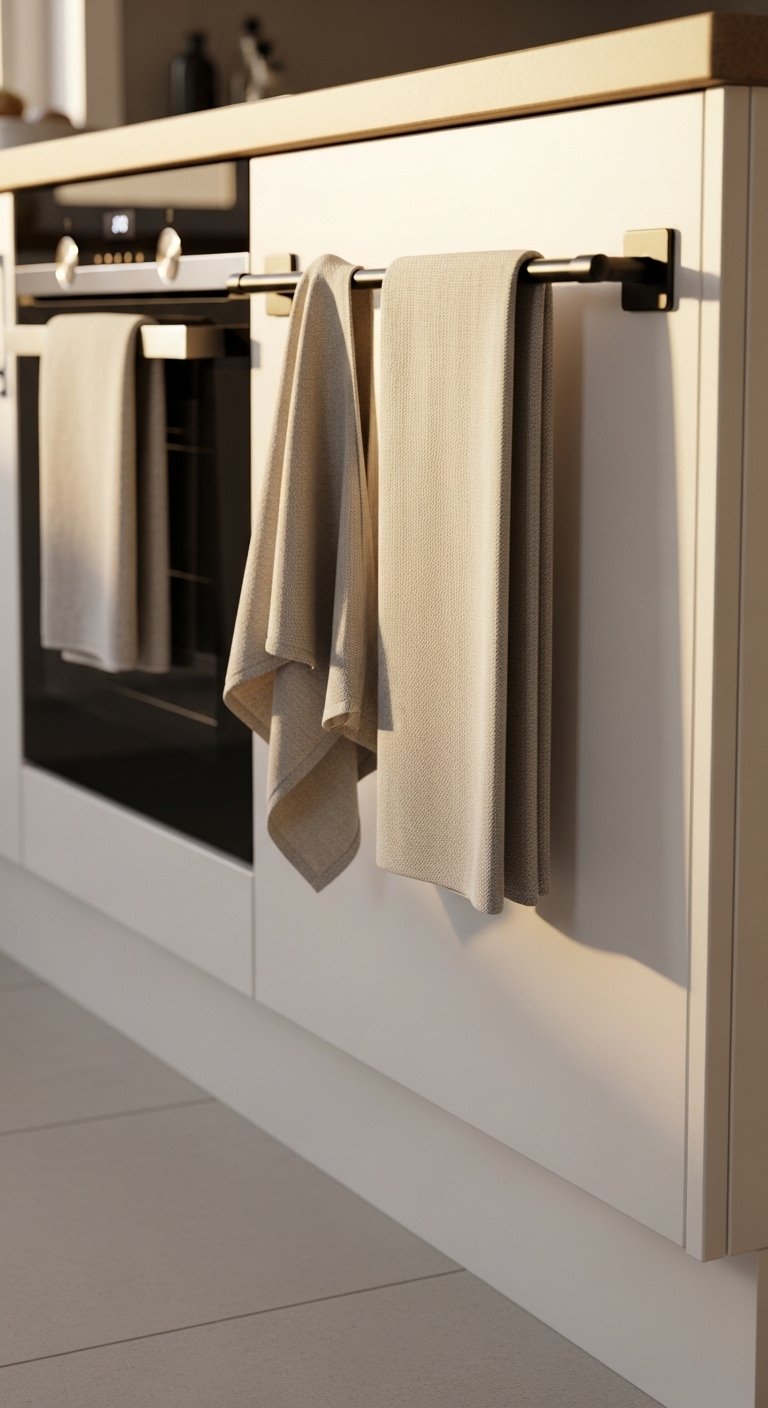
A simple towel bar rail mounted on the side of your island keeps dish towels accessible while cooking without draping them over cabinet doors or oven handles.
This costs almost nothing to add. A few screws and a rail from any kitchen hardware supplier. Yet it eliminates one of the small daily annoyances in a kitchen where towels never seem to have a proper home.
Small detail. Real improvement.
23. Use the Island End as a Display Wall
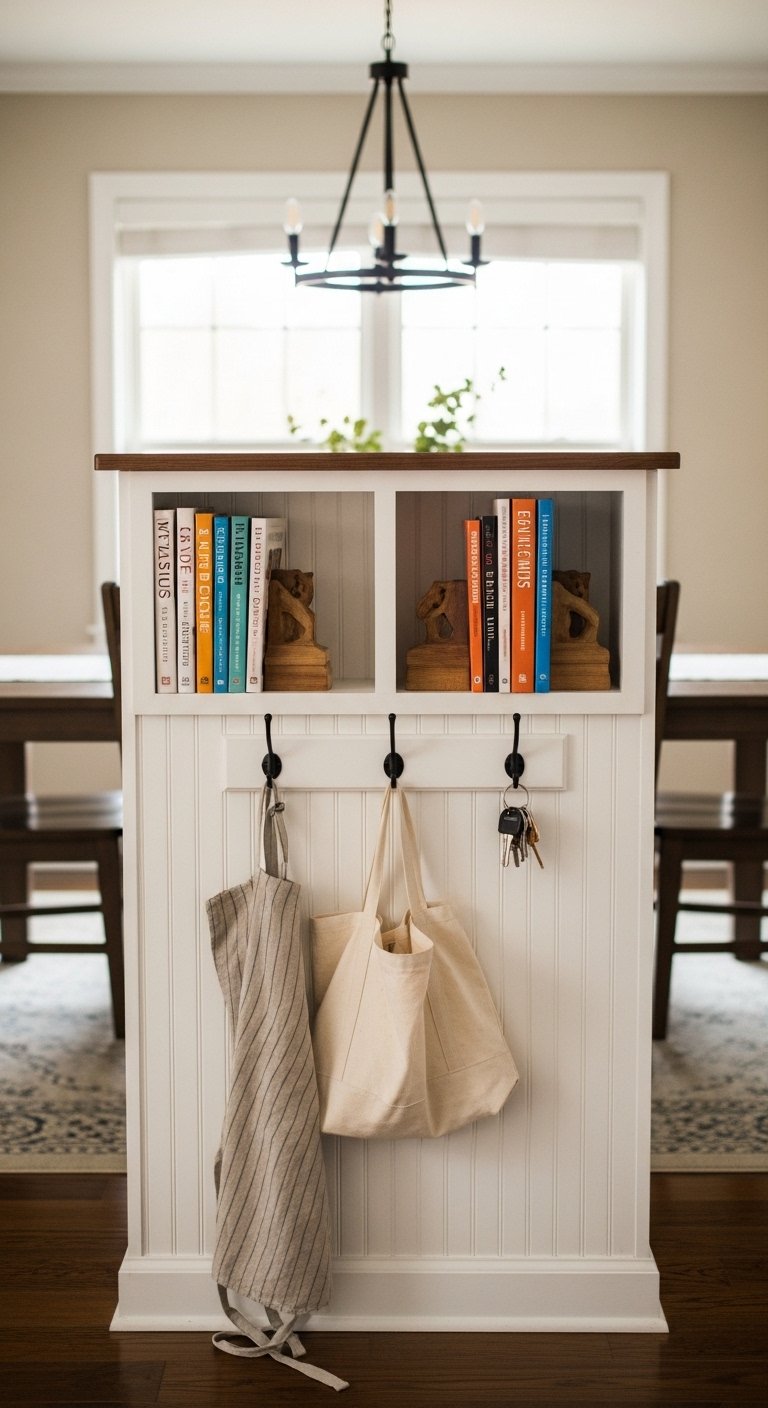
The short end of your island, the side facing into the dining or living area, is a visible surface that most people ignore.
Use it intentionally. Options include:
- A small built-in bookshelf end for cookbooks.
- Decorative panel detail or beadboard for texture.
- A chalkboard surface for notes and grocery lists.
- A narrow row of hooks for bags, aprons, or keys.
This end faces your guests every time they sit at your dining table. Make it do something.
24. Consider an L-Shaped or T-Shaped Island
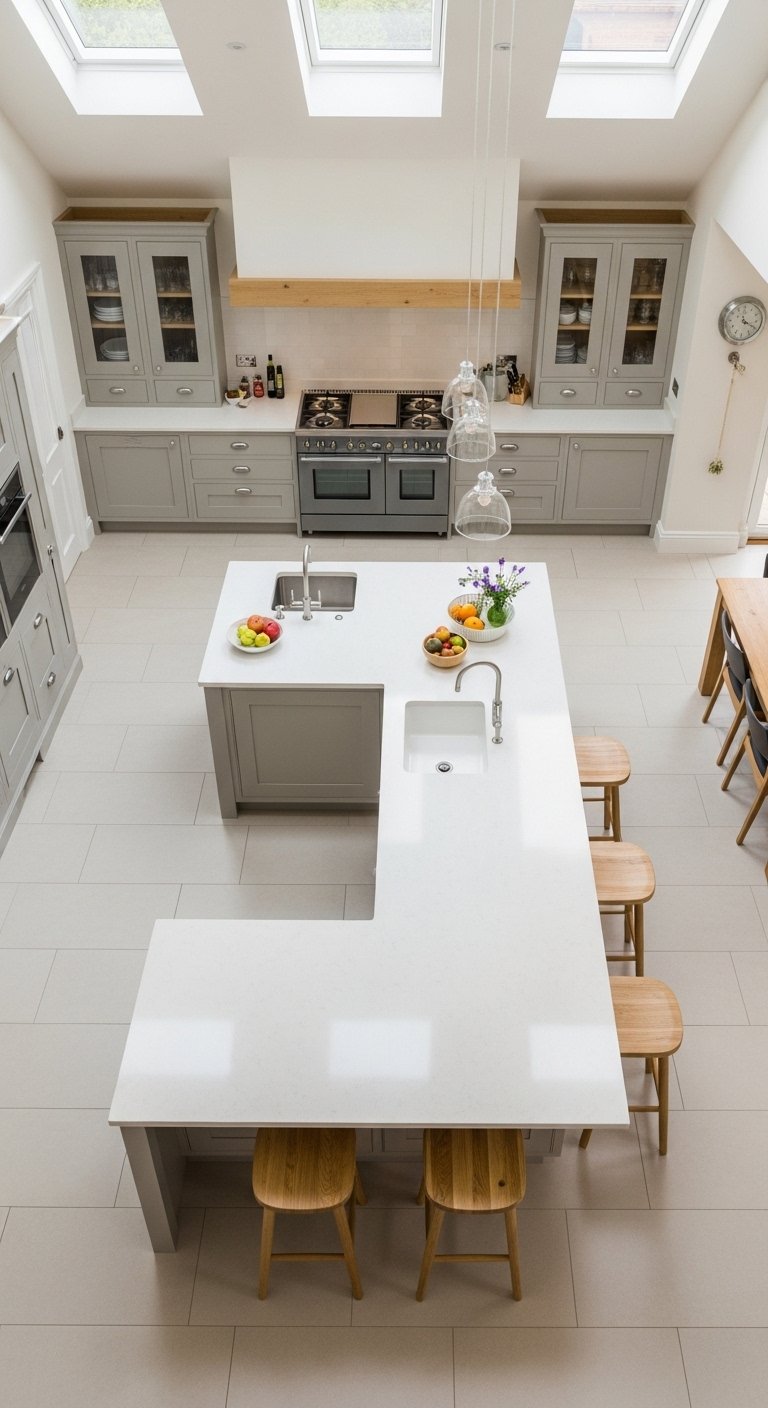
Standard islands are rectangular. But if your kitchen layout allows it, an L-shaped or T-shaped island creates multiple work zones within the same footprint.
An L-shaped island works well when one arm extends toward a dining area, creating a natural separation between the cooking zone and the eating zone without a wall.
A T-shaped island adds a third arm that works as a dedicated seating bar while keeping the main island surface clear for prep.
These configurations require more floor space. Confirm your clearances before committing.
25. Keep the Island Surface Clear
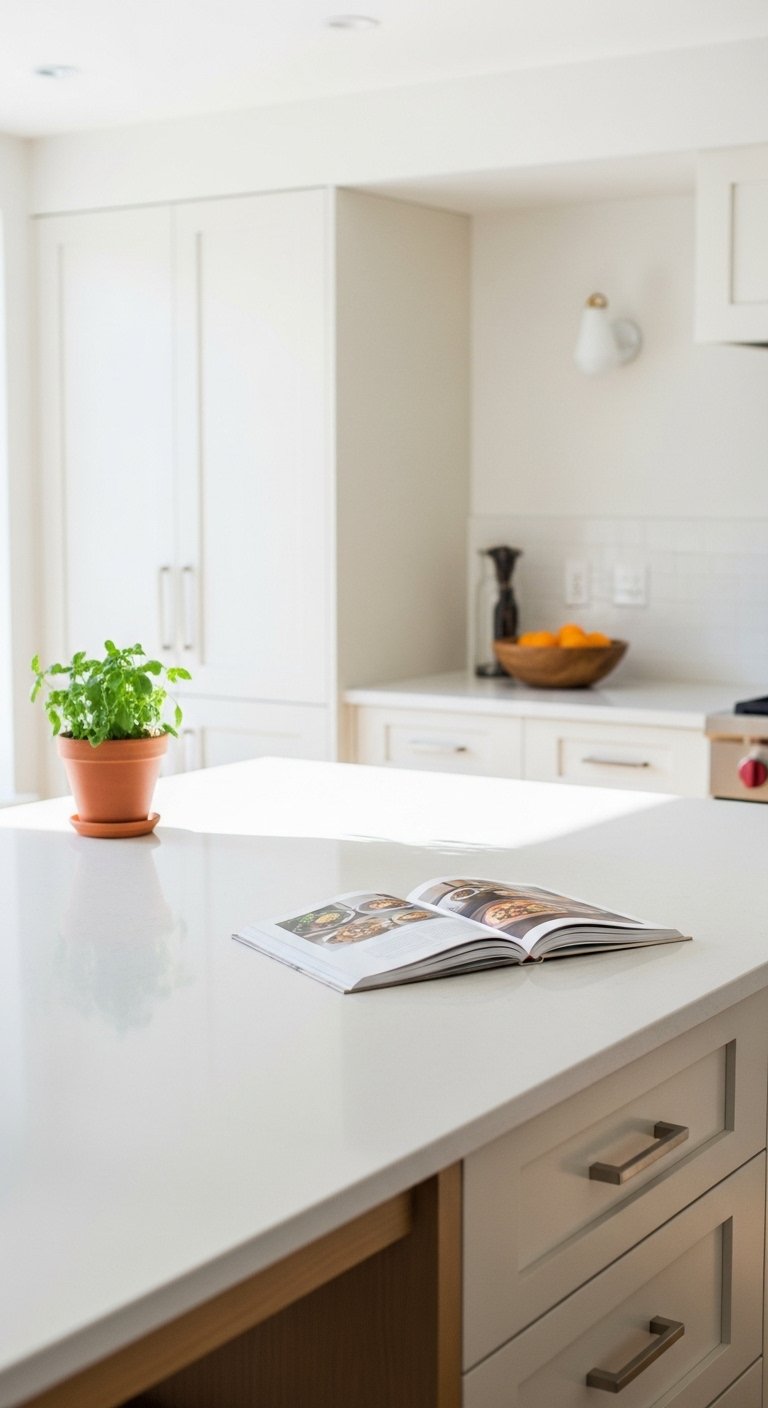
This is the idea that makes every other idea work better.
An island covered in appliances, mail, bags, fruit bowls, and random objects is not a kitchen island. It’s a horizontal surface that accumulates things.
Every item that lives permanently on your island surface takes away prep space and visual order. Be ruthless about what stays.
- One or two appliances maximum, and only the ones you use daily.
- One small decorative object or plant if you want personality.
- Everything else gets a drawer, a shelf, or a different home entirely.
The island works best as a clear, functional surface. Treat it like one.
Final Thoughts
A kitchen island is one of the highest-return investments you make in a kitchen, but only when the size, function, and design choices align with how you actually use the space.
Start with clearance and size. Get that wrong and nothing else matters. Then layer in the functional upgrades: storage, seating, lighting, and workflow improvements. Style decisions come last and work best when they support the function rather than the other way around.
Pick three to five ideas from this list that address your specific frustrations. Do those well before adding anything else. A kitchen island that works hard and looks good is not complicated. It just requires making decisions in the right order.