25 Backyard Fire Pit Ideas to Create the Ultimate Hangout
There’s a reason people gather around fire. It’s not just warmth, it’s not just light, it’s the way a fire pit turns a regular Tuesday evening in your backyard into something worth remembering. I built my first backyard fire pit from stacked retaining wall blocks on a Saturday afternoon, spent $60 in materials, and used it more that first autumn than I used my living room. A fire pit is the single outdoor addition that delivers the highest return on time, money, and social energy of anything you put in a backyard. These 25 ideas cover every style, budget, and yard size.
1. Build a Classic Stacked Stone Fire Pit
A stacked stone fire pit is where most people start and honestly, it’s hard to beat for value and visual impact. You stack natural or manufactured stone in a circle, add a metal fire ring insert inside, and the whole project costs $50 to $200 in materials. No mortar required for a basic build, which means you move or dismantle it if your layout changes.
What You Need for a Stacked Stone Fire Pit
- Metal fire ring insert: 36 to 48 inches diameter, $30 to $80 at most home improvement stores
- Retaining wall blocks, natural fieldstone, or decorative landscape stone
- Level ground or a gravel base for drainage and stability
- Approximately 40 to 60 blocks for a standard 36-inch diameter pit
I used standard retaining wall blocks from Home Depot for mine. Two hours of work, no special tools, and the result looked intentional and permanent. Stack two to three courses high for the right fire containment and visual proportion.
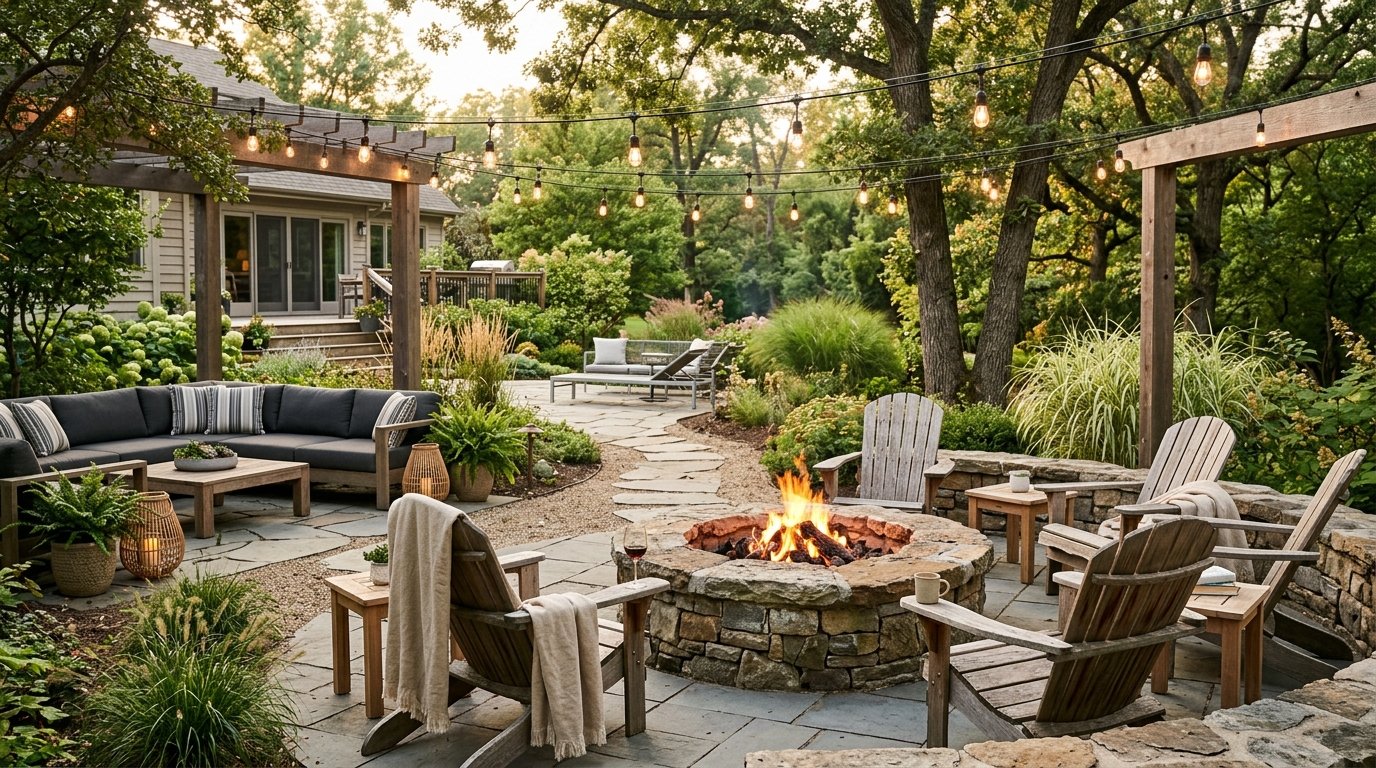
2. Install a Sunken Fire Pit for a Built-In Look
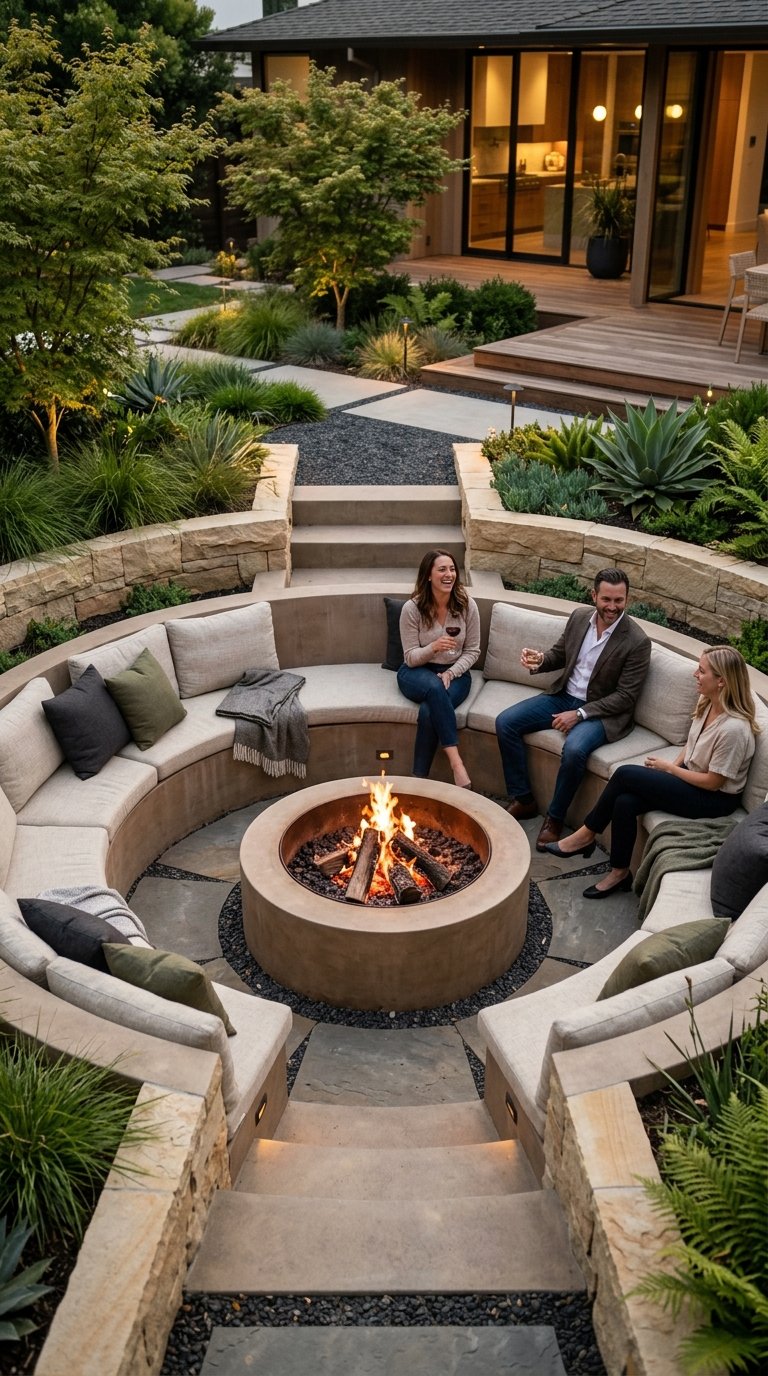
A sunken fire pit set below grade creates a completely different social dynamic than a surface-level installation. Digging the pit 12 to 18 inches into the ground and surrounding it with built-in bench seating at grade level gives every guest a front-row seat while the below-grade positioning naturally contains wind and reduces ember scatter.
The excavation adds labor but the finished result looks architecturally intentional in a way that a surface fire pit never achieves. Surround the sunken pit with concrete, flagstone, or poured aggregate seating walls at 17 to 18 inch height. Add cushions on the flat cap surfaces and the entire setup functions as a permanent outdoor room with the fire as its centerpiece.
3. Use a Prefabricated Steel Fire Bowl
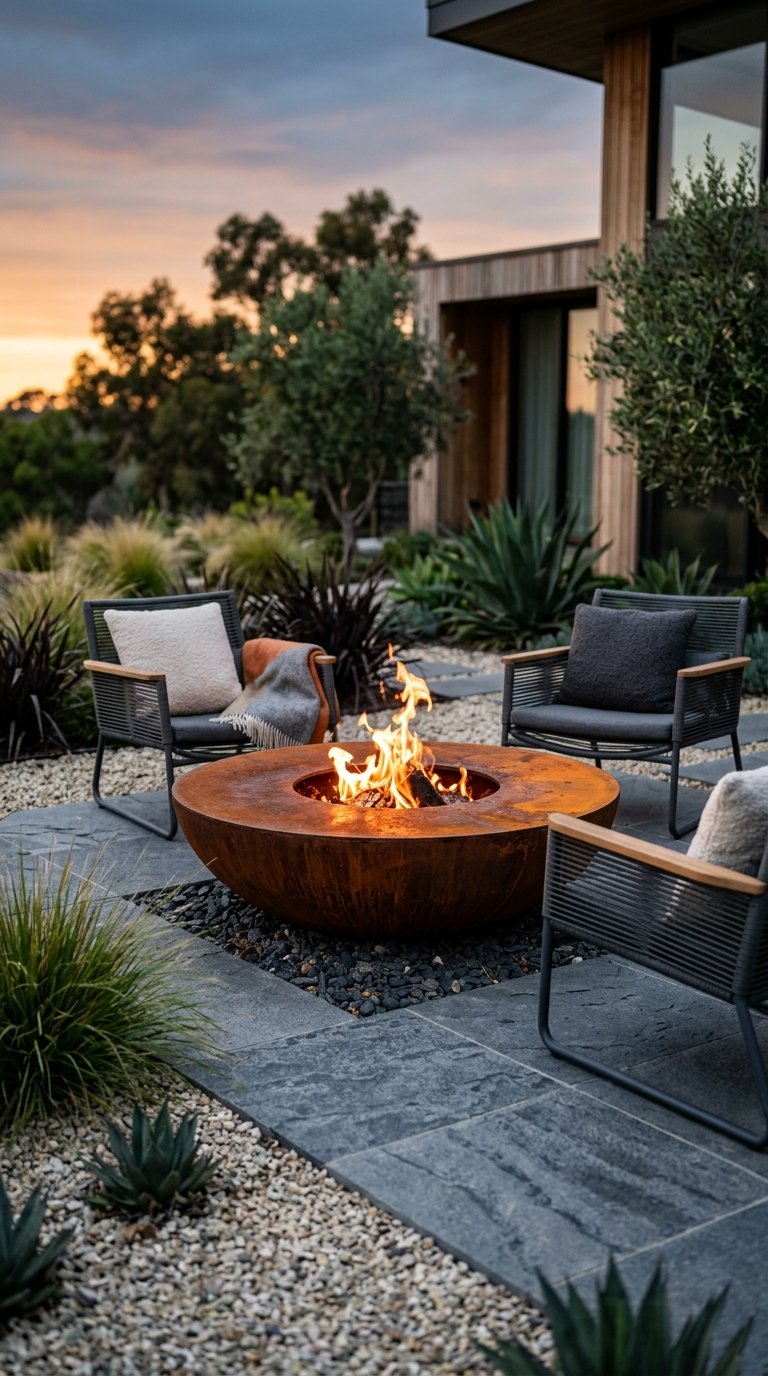
A steel fire bowl delivers maximum visual impact with minimum installation effort. A 36 to 48 inch powder-coated steel fire bowl on legs sits on any patio surface, requires no building, and moves to any location in seconds. The bowl shape concentrates heat upward and outward, warming a larger seated circle than a contained pit of the same diameter.
Steel Fire Bowl Comparison
- Corten weathering steel: develops a rich rust patina naturally, no treatment needed, extremely durable
- Powder-coated black steel: sleek modern look, heat-rated coating, $80 to $250
- Hammered copper bowl: high-end aesthetic, develops natural patina, $200 to $600
- Cast iron bowl: heaviest option, excellent heat retention, $100 to $300
Corten steel fire bowls are my personal favorite because the patina that develops over the first season looks intentionally designed rather than weathered. Solo Stove makes excellent versions starting at $170.
4. Create a Propane Fire Pit Table
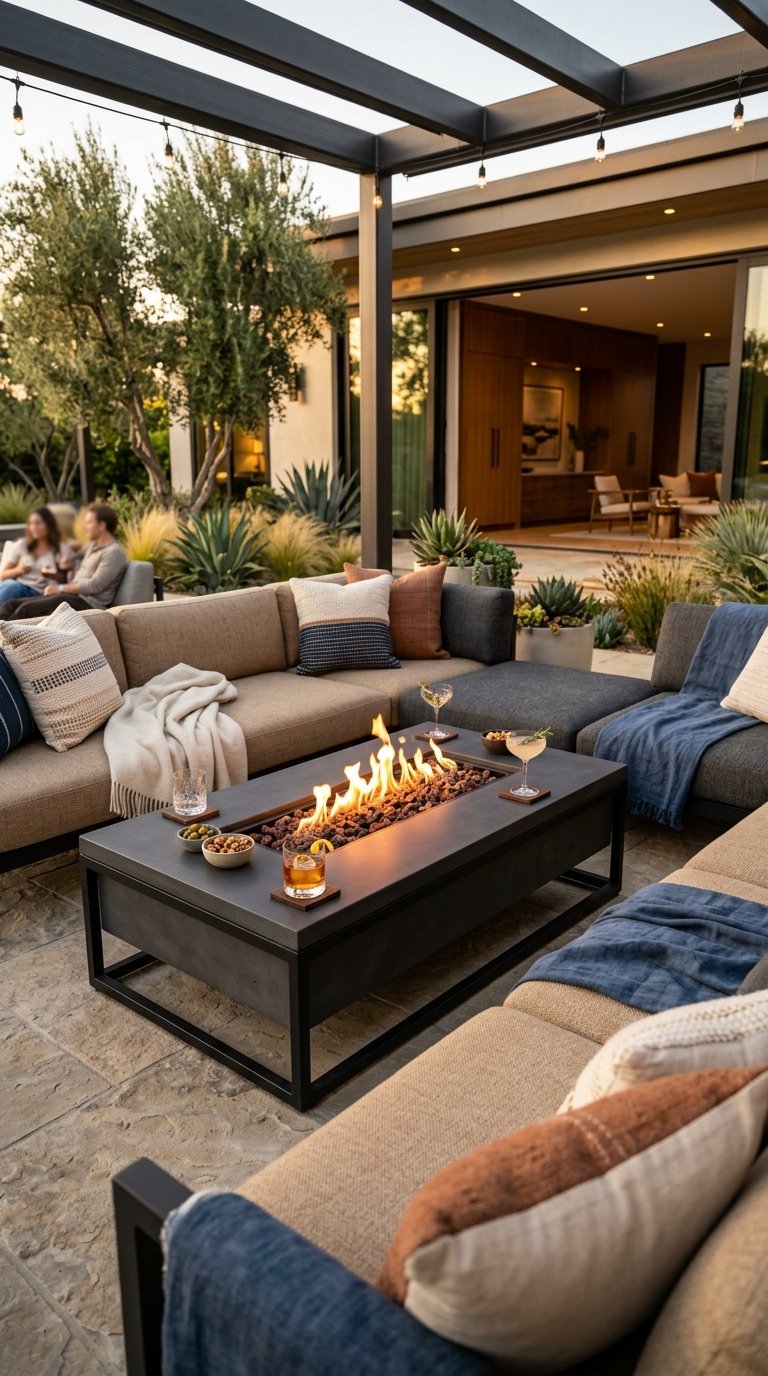
A propane fire pit table does something a wood-burning pit never does: it turns on with a knob and off with a knob. No wood sourcing, no smoke management, no ash cleanup, no ember concerns. For a patio close to the house or a backyard with fire restriction rules, a propane fire table solves every practical fire pit problem simultaneously.
Propane fire tables come in coffee table and dining table heights, which means you integrate them directly into your existing outdoor furniture layout. A 48-inch rectangular propane fire table seats six for dining while providing a central flame feature. Brands like Endless Summer and Outland Living offer quality options from $200 to $600.
5. Build a Brick Fire Pit With Mortar
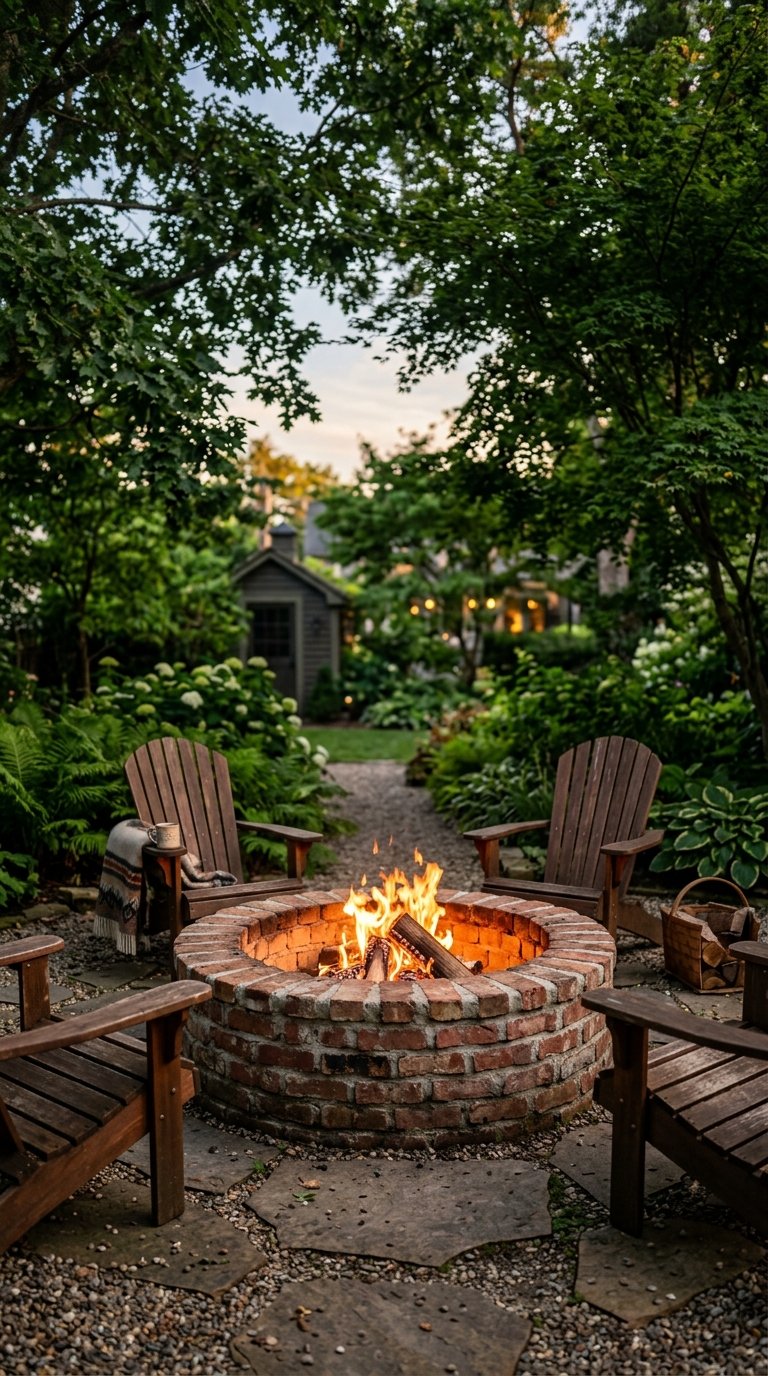
A mortared brick fire pit is the permanent version of the stacked stone build and it looks considerably more refined. Firebrick laid with refractory mortar withstands repeated high-temperature fire cycles without cracking or degrading the way standard brick and standard mortar do over time.
Brick Fire Pit Build Specs
- Use firebrick for the inner ring (direct flame contact) and standard brick for the outer decorative course
- Refractory mortar for inner joints, standard mortar for outer courses
- Minimum 36-inch interior diameter for practical fire management
- Build on a concrete pad or compacted gravel base for stability
A DIY mortared brick fire pit costs $150 to $400 in materials and takes a full weekend to build and cure. The result looks like a permanent landscape feature that adds measurable property value.
6. Design a Fire Pit Patio With Surrounding Pavers
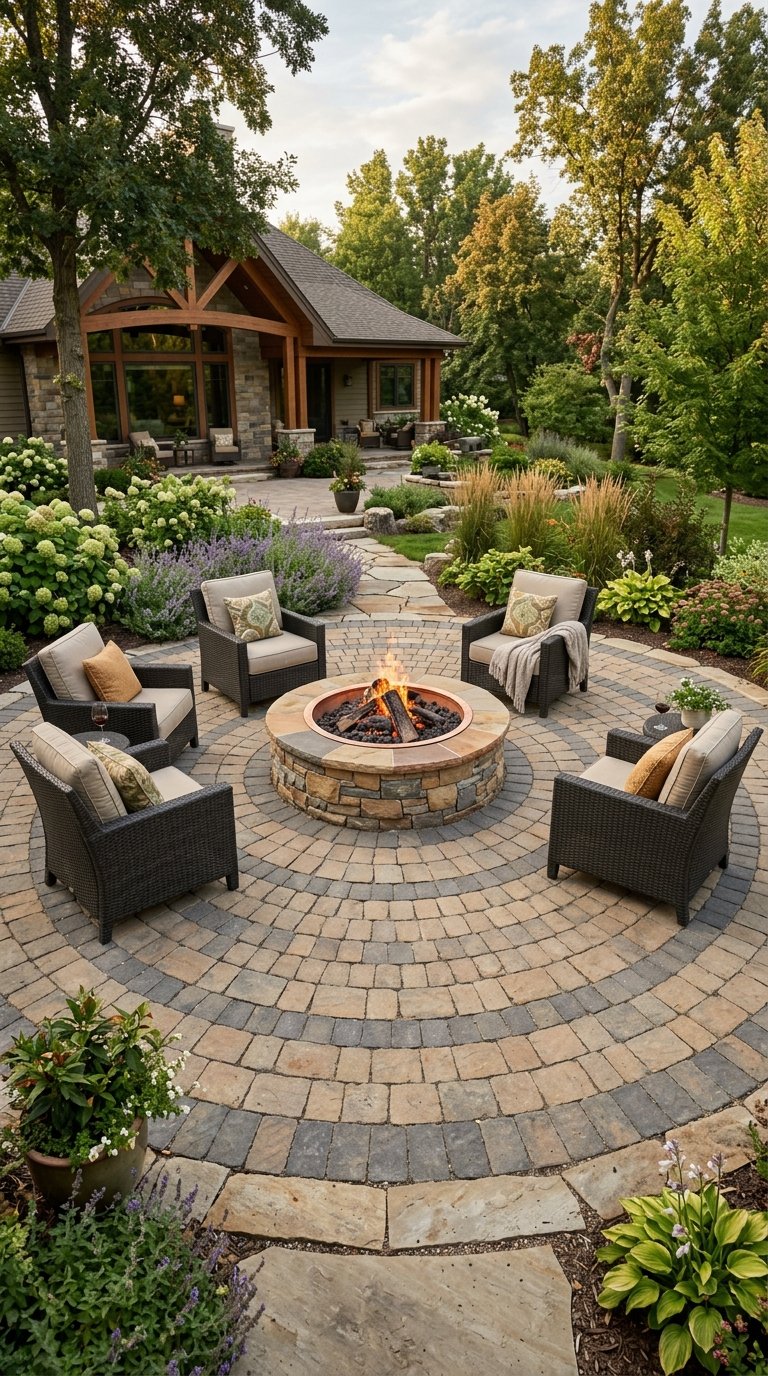
A fire pit sitting on bare grass looks unfinished. A defined paver patio surrounding the fire pit creates a complete outdoor destination rather than a single element sitting in the middle of a lawn. The paved surface handles chair movement, foot traffic, and heat radiation without the grass deterioration that fire pit areas suffer over time.
Concrete pavers, bluestone, or porcelain tile all work well for a fire pit surround. Create a circular paver pattern radiating outward from the fire pit center for the most visually cohesive result. A 14-foot diameter circular paver patio around a central fire pit costs $600 to $2,000 in materials depending on paver choice.
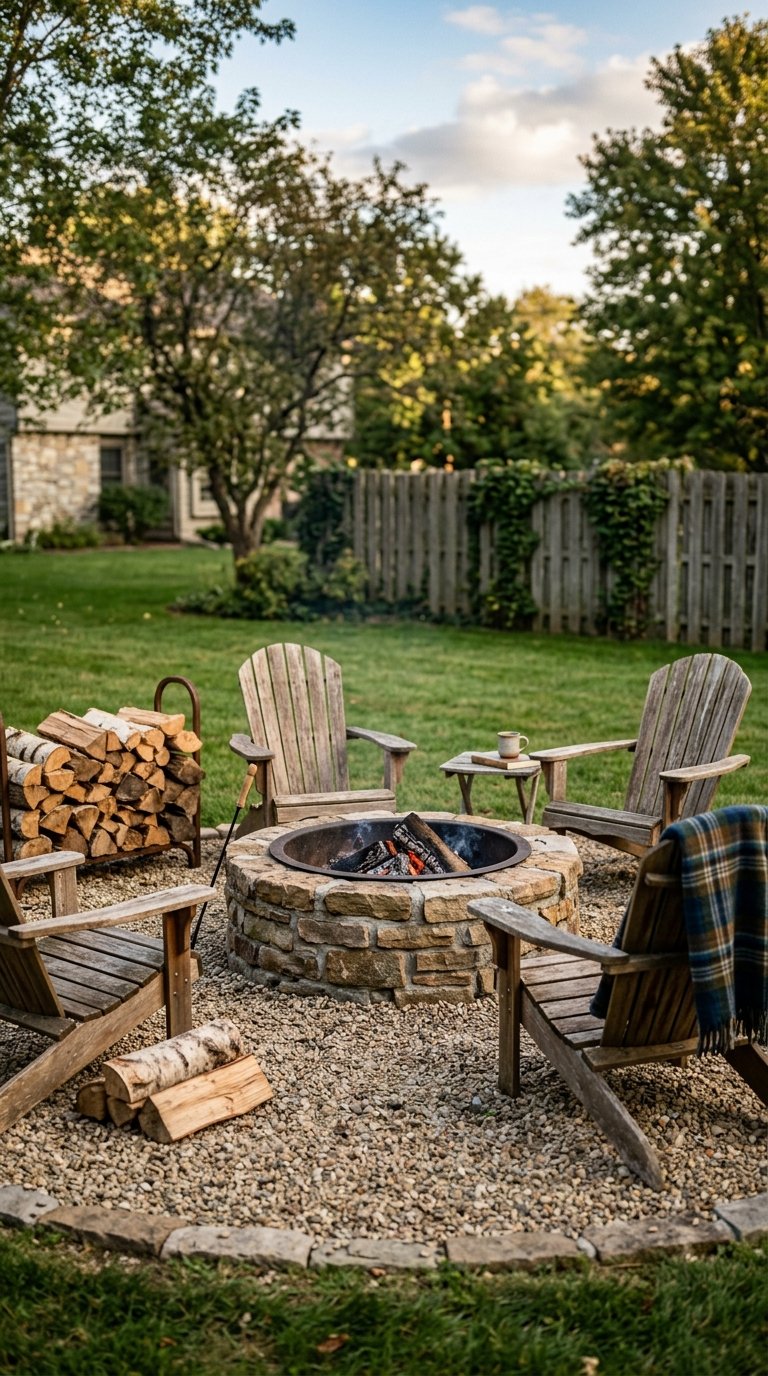
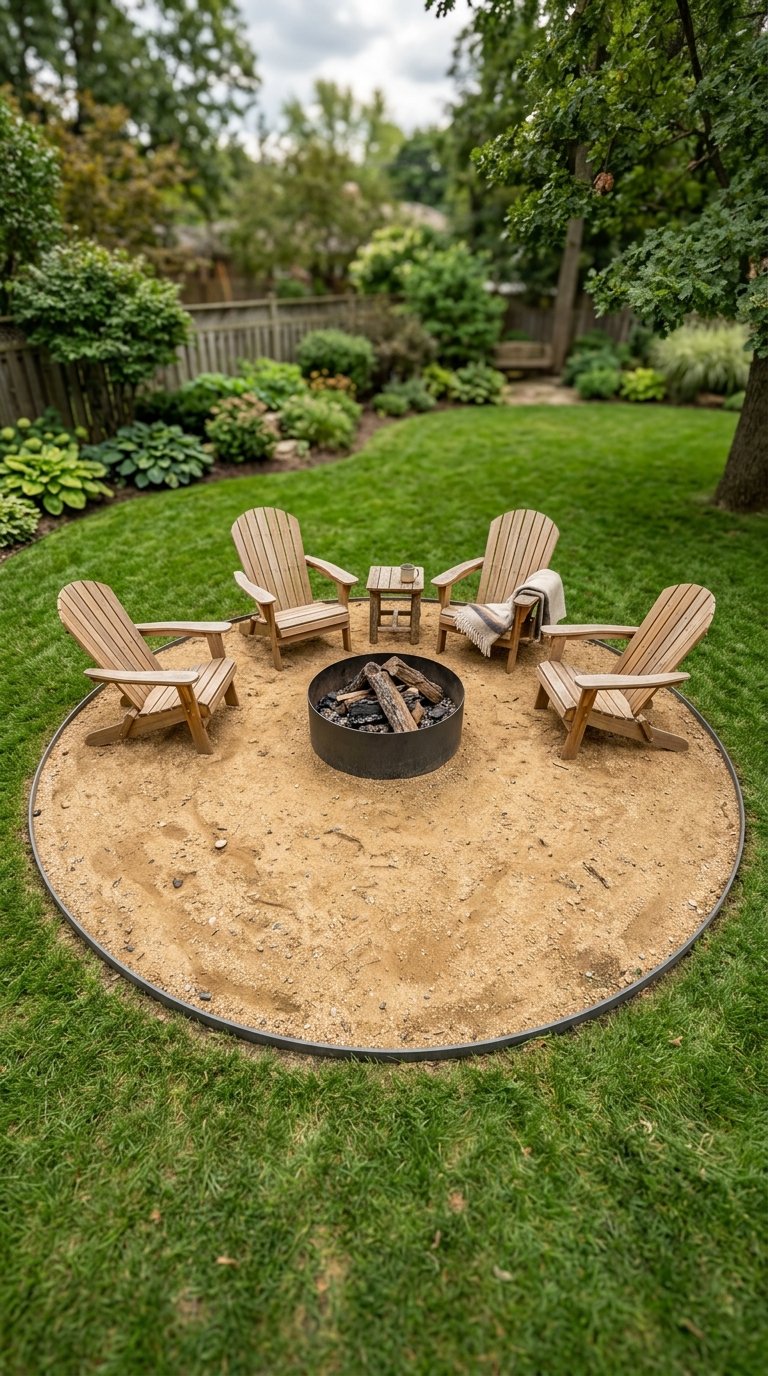
7. Add Adirondack Chairs Around the Fire Pit
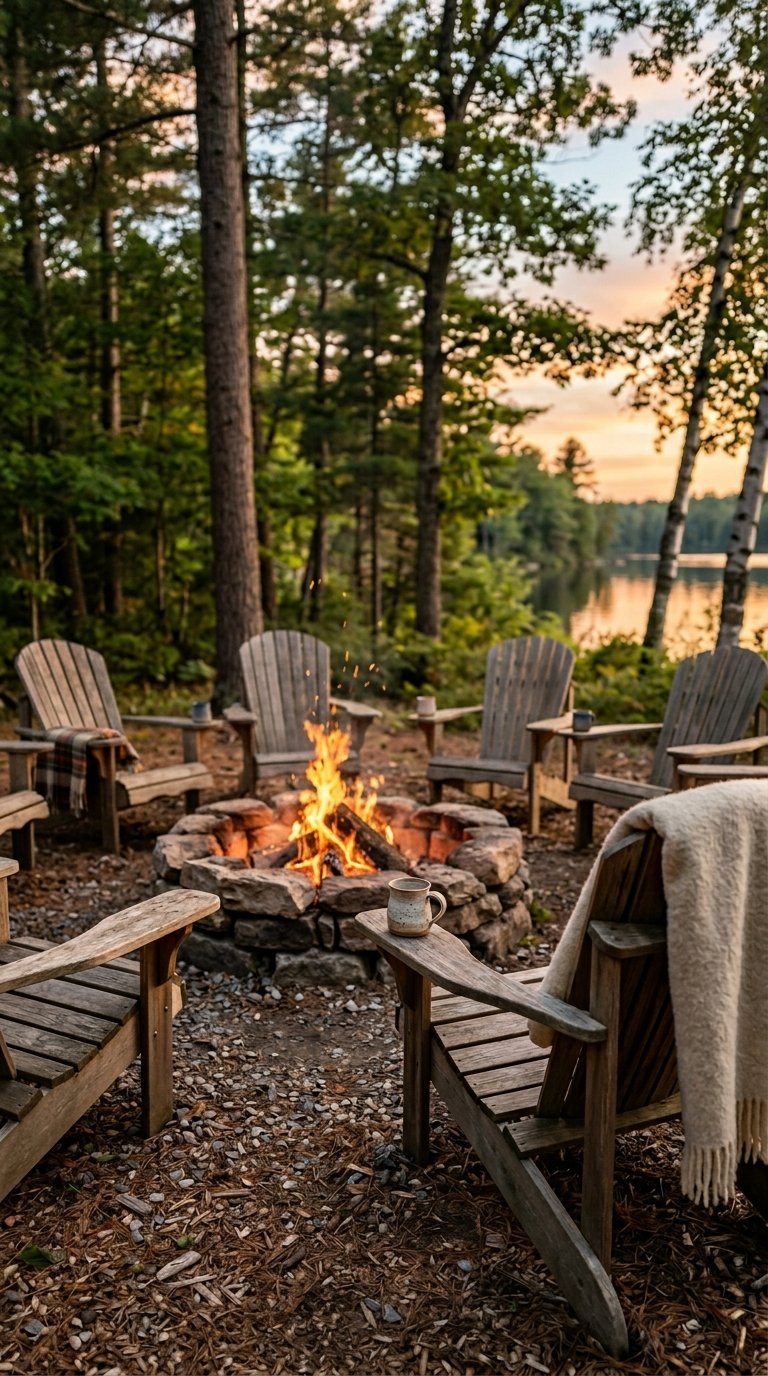
Adirondack chairs and fire pits belong together the way pizza and Friday nights do. Their wide flat armrests hold drinks and snacks, their reclined angle faces the fire at the perfect viewing position, and their substantial weight keeps them stable when guests shift and move around the fire circle.
Classic cedar Adirondack chairs cost $80 to $150 each and last 15 to 20 years with annual oiling. Poly lumber (HDPE) Adirondacks cost $150 to $300 each and last indefinitely with zero maintenance. Four chairs positioned 6 to 8 feet from the fire pit edge seats four adults at ideal warmth distance. Add two more for the guests who always show up unannounced.
8. Build a Fire Pit Into a Retaining Wall Design
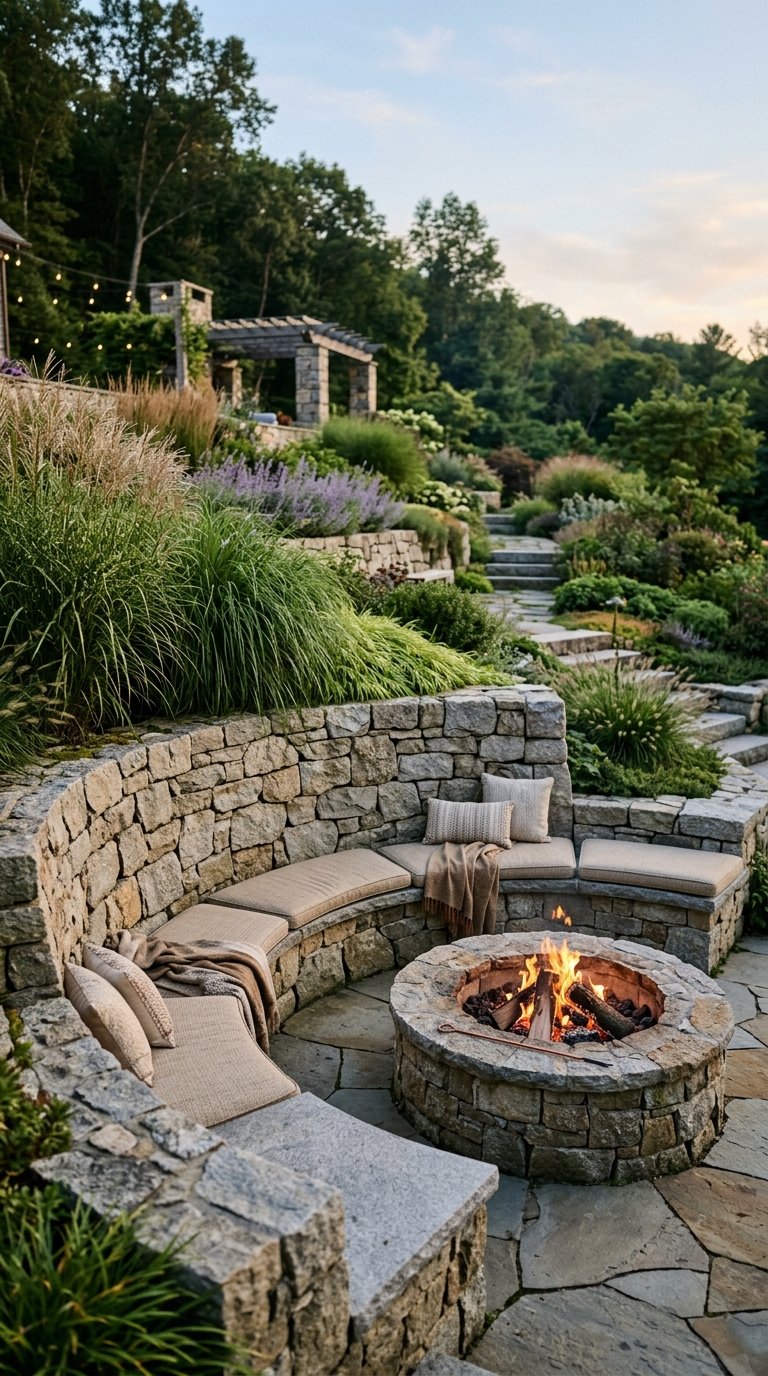
A sloped backyard presents a retaining wall challenge that a fire pit integration solves with brilliant efficiency. Design the retaining wall at seat height (17 to 18 inches) and position the fire pit at the base of the wall, creating a natural amphitheater where the wall serves simultaneously as retaining structure and seating for the fire pit area.
The wall cap becomes the seat surface. Add cushions on the flat cap stones during fire pit season. Plant ornamental grasses or perennial flowers above the wall to soften the structure. This design turns a landscaping necessity into a social feature that wouldn’t exist without the grade change.
9. Install a Gas Fire Pit With a Lava Rock or Glass Bead Fill
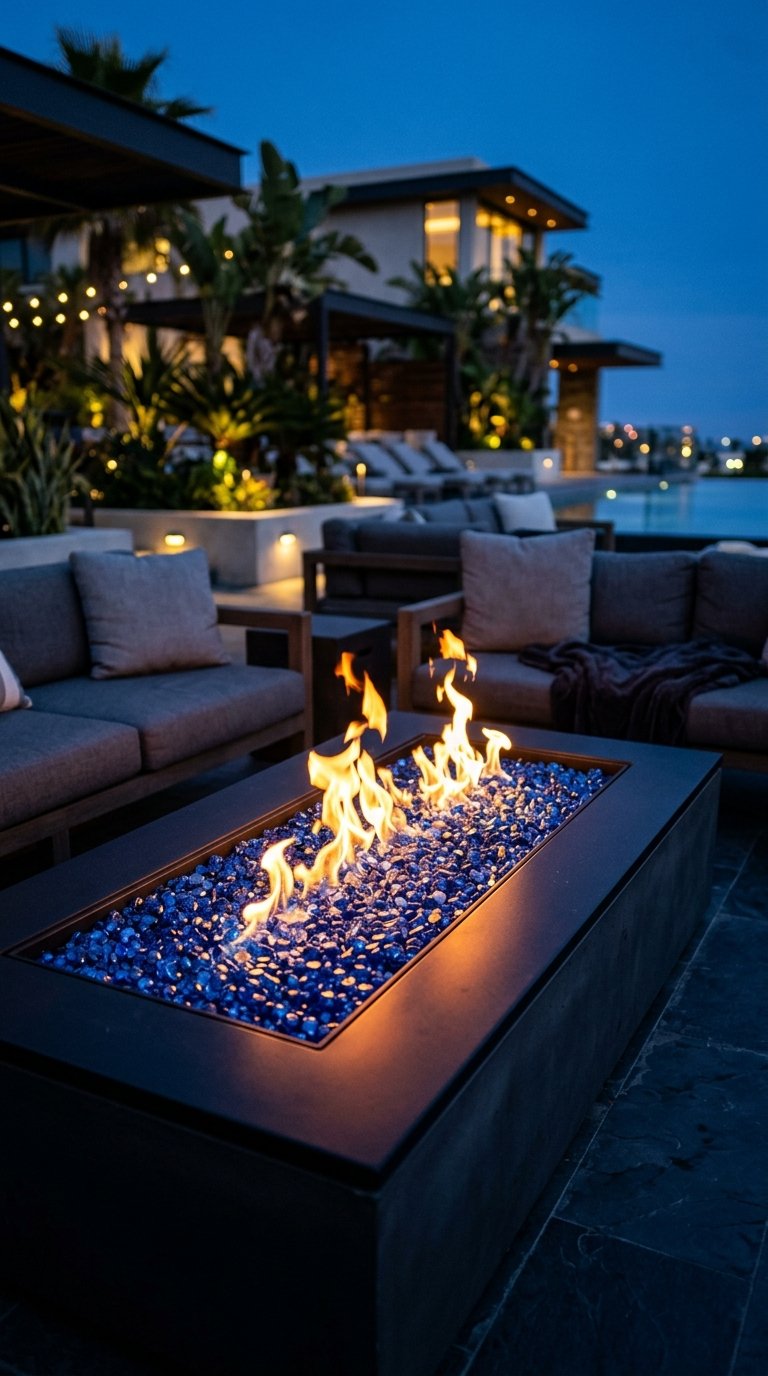
Gas fire pits with decorative media instead of wood create a visual effect that surprises everyone who sees it for the first time. Lava rocks, fire glass beads, or river stones distributed around the gas burner ring glow and pulse with reflected flame in a way that looks more like a luxury hotel feature than a backyard fire pit.
Decorative Fire Pit Media Comparison
- Lava rocks: natural volcanic stone, excellent heat distribution, $15 to $30 per bag
- Reflective fire glass: crushed tempered glass in multiple colors, $30 to $60 per bag
- Black river stones: sleek modern look, slow heat absorption, $20 to $40 per bag
- Ceramic fire logs: most realistic wood-fire appearance, $60 to $150 per set
Blue reflective fire glass against a black steel fire bowl is one of the most visually striking fire pit combinations available and costs under $100 in media to achieve.
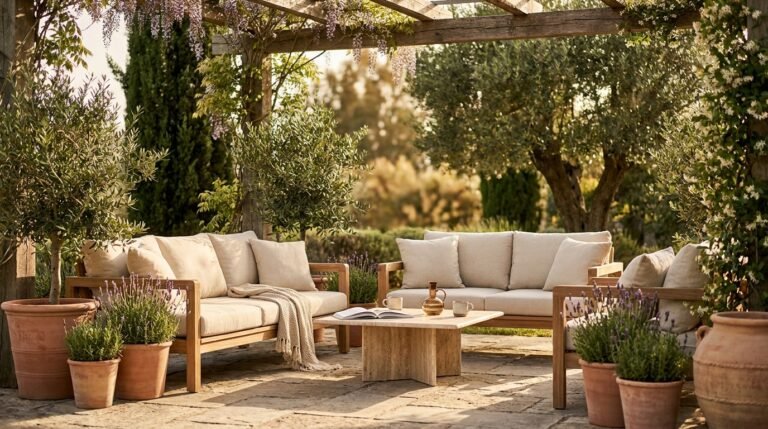
10. Create a Fire Pit Seating Area With a Pergola Overhead
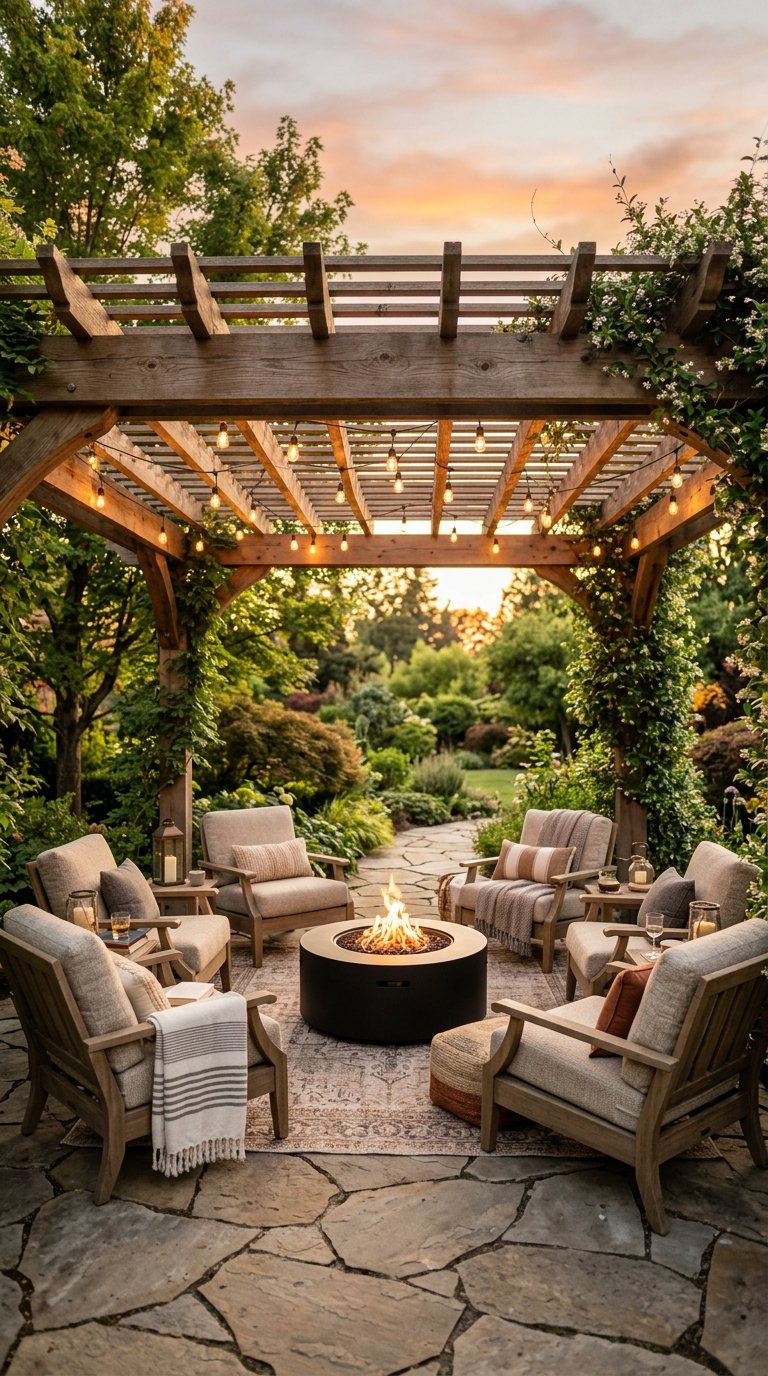
A fire pit under a pergola sounds counterintuitive but works brilliantly with the right clearance. Position a gas or propane fire pit (never wood-burning) under a pergola with a minimum 10-foot ceiling clearance and you create a covered outdoor fire destination that functions in light rain and blocks wind from above.
The pergola frame above the fire pit supports string lights, which combine with the flame below to create one of the most atmospheric outdoor spaces possible. A 12×14 pergola centered over a propane fire table with six lounge chairs seats a full gathering in comfort regardless of light rain or evening chill. IMO, this combination is the pinnacle of backyard fire pit design.
11. Use Landscaping to Frame the Fire Pit Area
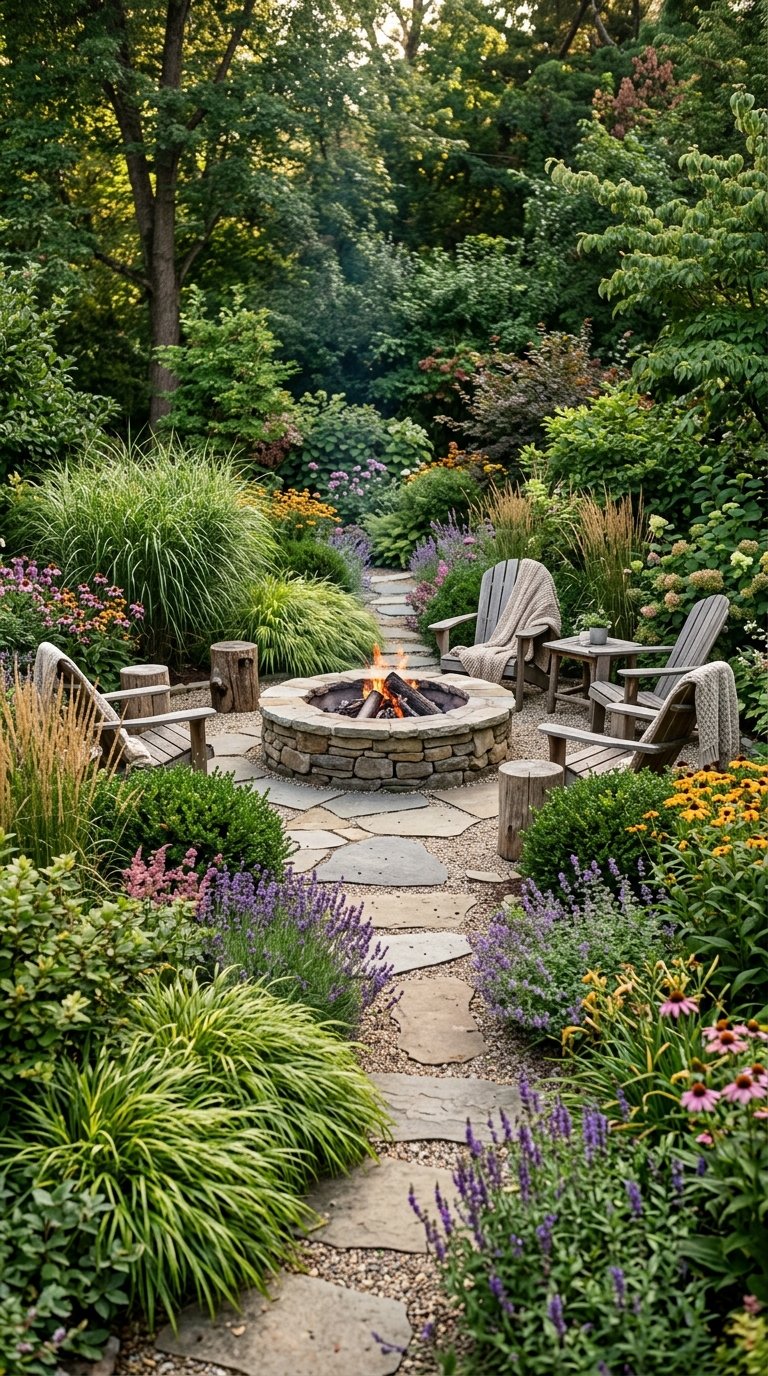
A fire pit sitting in an open lawn without any surrounding planting lacks the enclosed, destination quality that makes people want to stay. Planting ornamental grasses, low shrubs, or perennial garden borders around the fire pit perimeter creates natural walls that define the space as its own outdoor room.
Keep plantings at least 6 to 8 feet from the fire pit edge for safety. Ornamental grasses like Karl Foerster or Miscanthus reach 4 to 6 feet tall and create a rustling, natural privacy screen. Low boxwood hedges define the boundary without blocking sightlines. The planting frames the fire pit the way walls frame a room.
12. Build a Fire Pit Into an Outdoor Kitchen Design
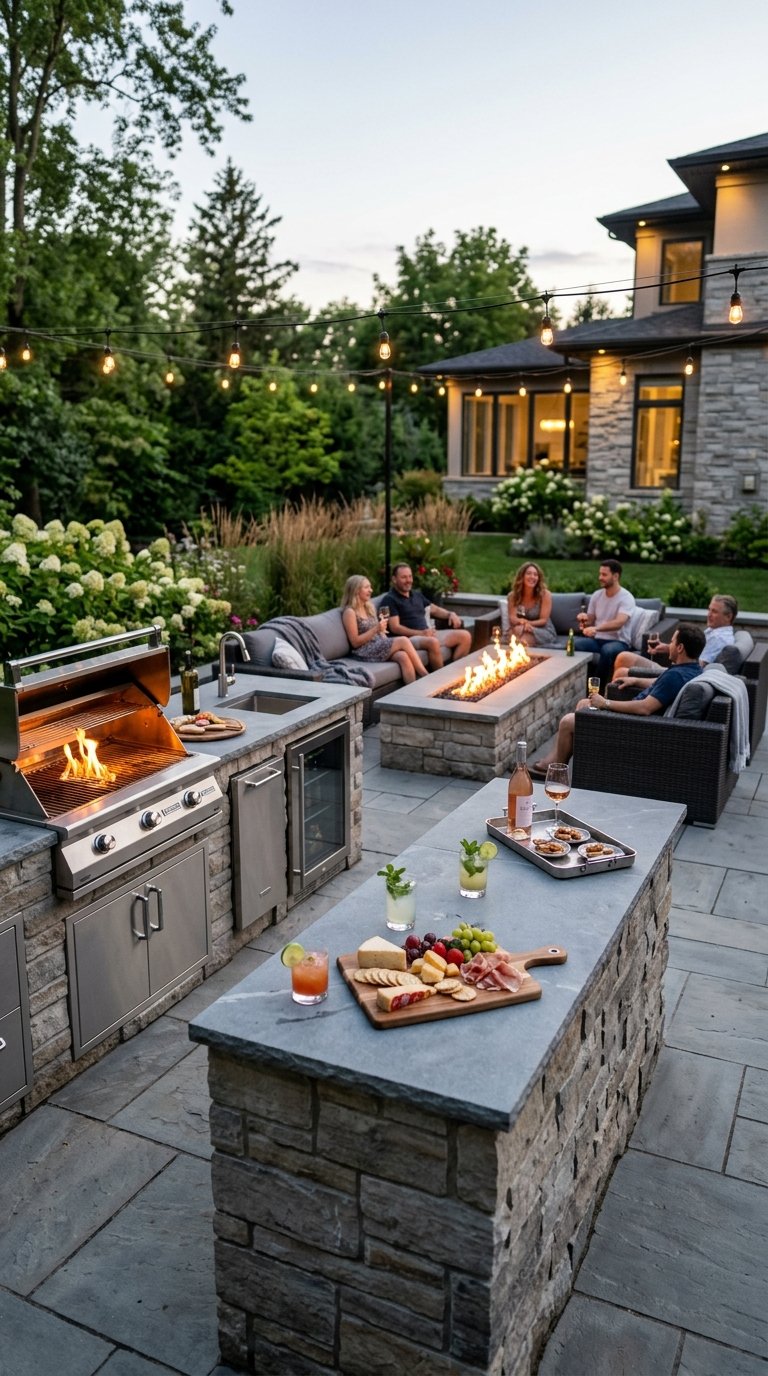
A fire pit and an outdoor kitchen occupy the same backyard zone in most entertaining setups. Building them as a connected design with shared stone or masonry materials creates a cohesive outdoor room where cooking and fire gathering happen in the same visual and physical space.
Position the fire pit seating area 10 to 15 feet from the grill station so smoke from cooking doesn’t drift over the guests. Shared bluestone countertop surfaces, matching stone veneer on the grill surround and fire pit walls, and connected paver paving tie the two elements into a single outdoor kitchen and living destination.
13. Add a Spark Screen and Fire Pit Tools
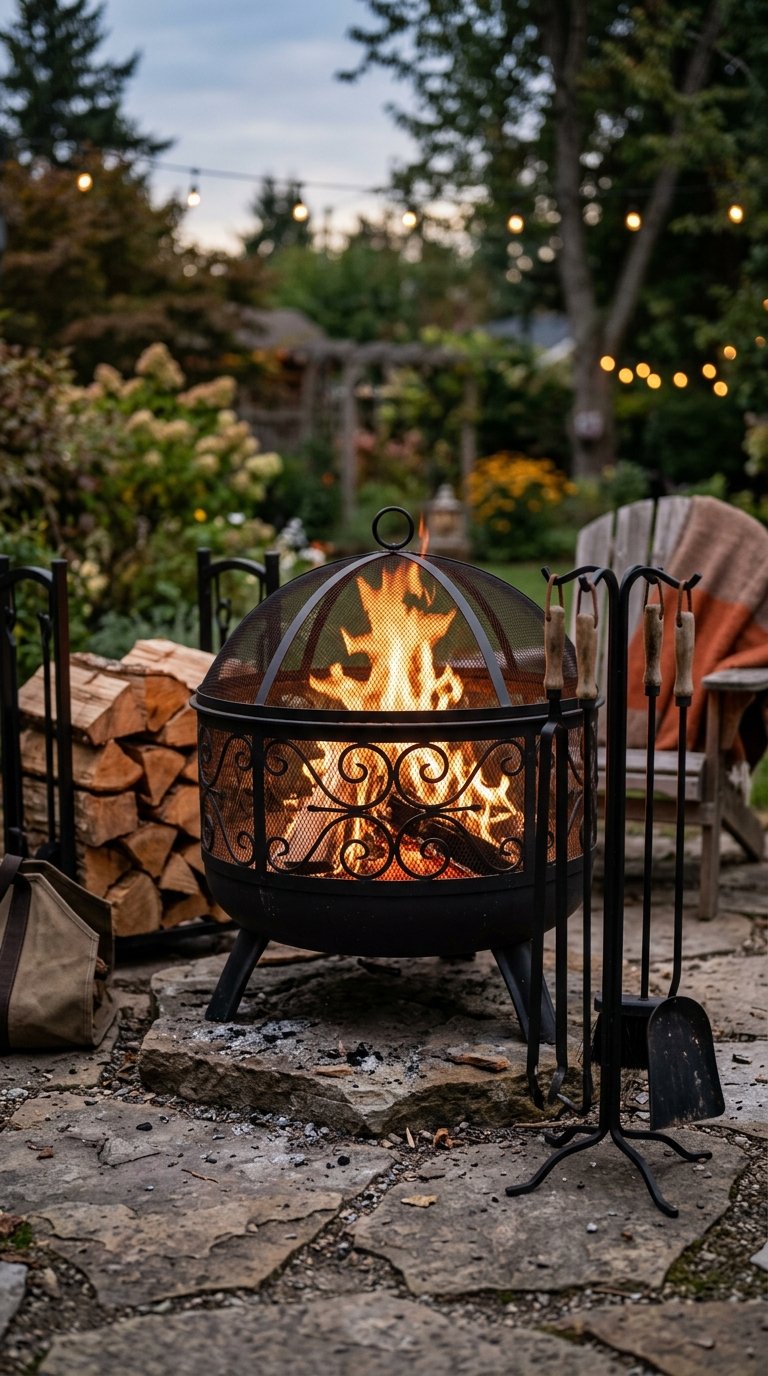
A fire pit without a spark screen is a liability, not a feature. A fitted dome or flat spark screen sits over the fire pit opening and catches embers before they land on cushions, clothing, or dry grass. This isn’t optional safety equipment, it’s the difference between a fire pit you use confidently and one that makes everyone subtly nervous.
Essential Fire Pit Tool Set
- Poker: 28 to 36 inches long for safe log repositioning
- Tongs: for adding wood and managing burning pieces
- Ash shovel: for post-fire cleanup
- Brush: for clearing the pit interior
- Log rack: keeps firewood off the ground and dry, positioned nearby
A complete fire pit tool set costs $30 to $80. A fitted spark screen for a standard 36-inch pit runs $25 to $60. Both purchases extend the fire pit season by making the setup genuinely comfortable to use.
14. Design a Fire Pit Area With String Light Overhead
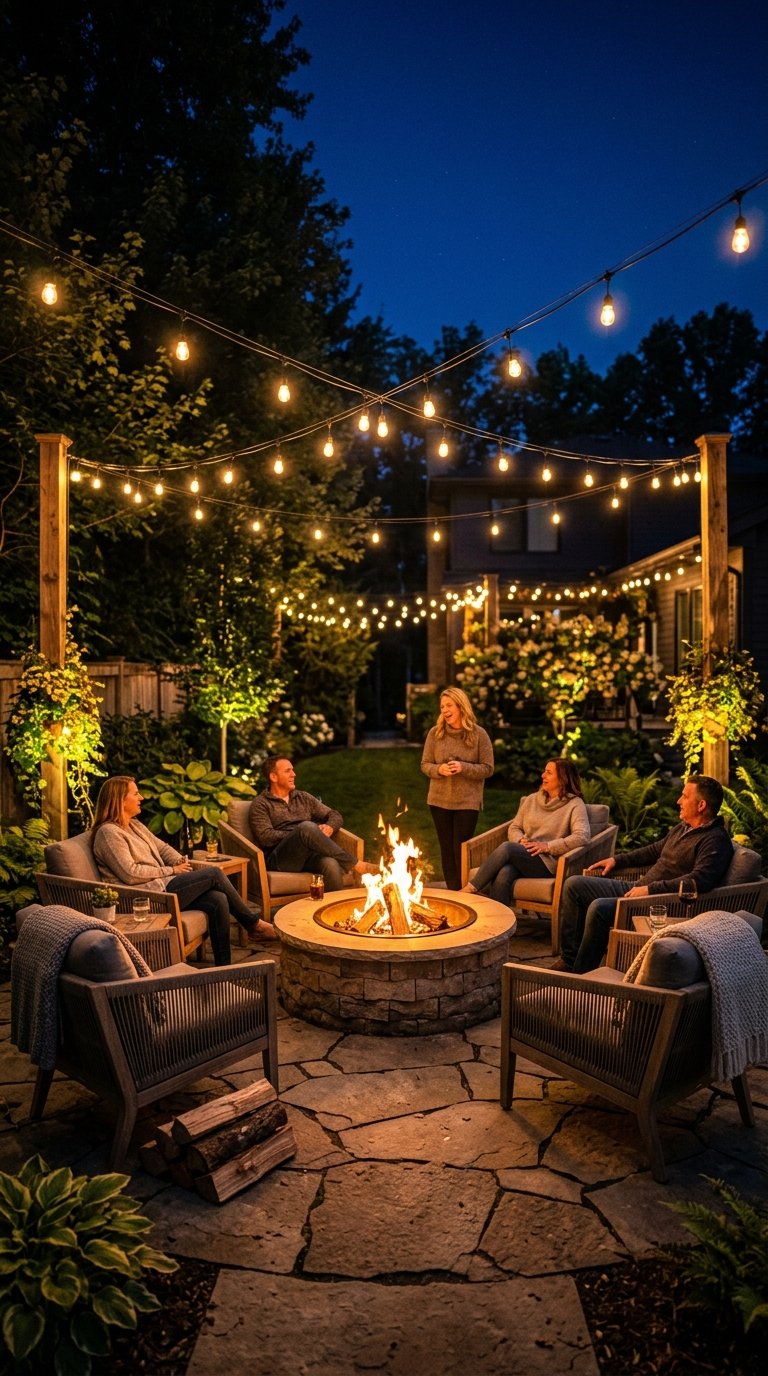
The combination of a fire pit below and string lights above creates a layered lighting effect that no single element achieves alone. Run a canopy of string lights 8 to 10 feet above the fire pit seating area between posts, trees, or a pergola frame to add warm overhead light that extends the visual warmth beyond the fire’s immediate glow.
The string lights handle the ambient lighting layer while the fire provides the focal, dynamic light. Together they make the fire pit area readable and inviting from anywhere in the backyard at night. A 50-foot strand of G40 globe lights covers the typical fire pit seating circle for under $40.
15. Build a Concrete Fire Pit for a Modern Look
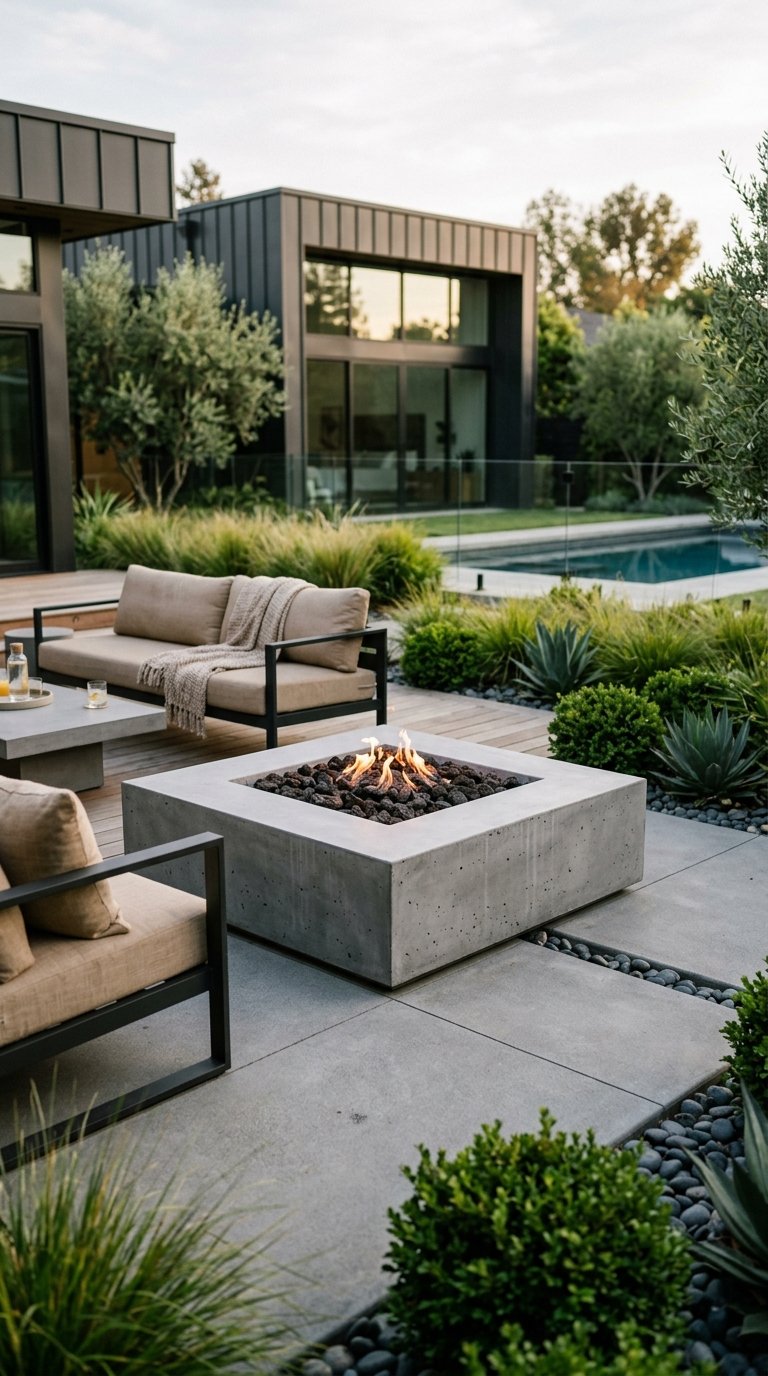
Poured concrete or concrete block fire pit construction delivers the cleanest, most contemporary fire pit aesthetic available. A square or rectangular poured concrete fire pit with clean geometric lines reads as an architectural feature rather than a traditional campfire setup, which suits modern and minimalist backyard designs perfectly.
A square 36×36 inch concrete fire pit built from concrete masonry units (CMU) and finished with a concrete overlay costs $200 to $500 in materials. The flat cap surface on all four sides provides seating for eight when you add cushions. The geometric form looks equally good with a gas insert or a wood-burning configuration.
16. Create a Fire Pit Destination With Outdoor Lighting
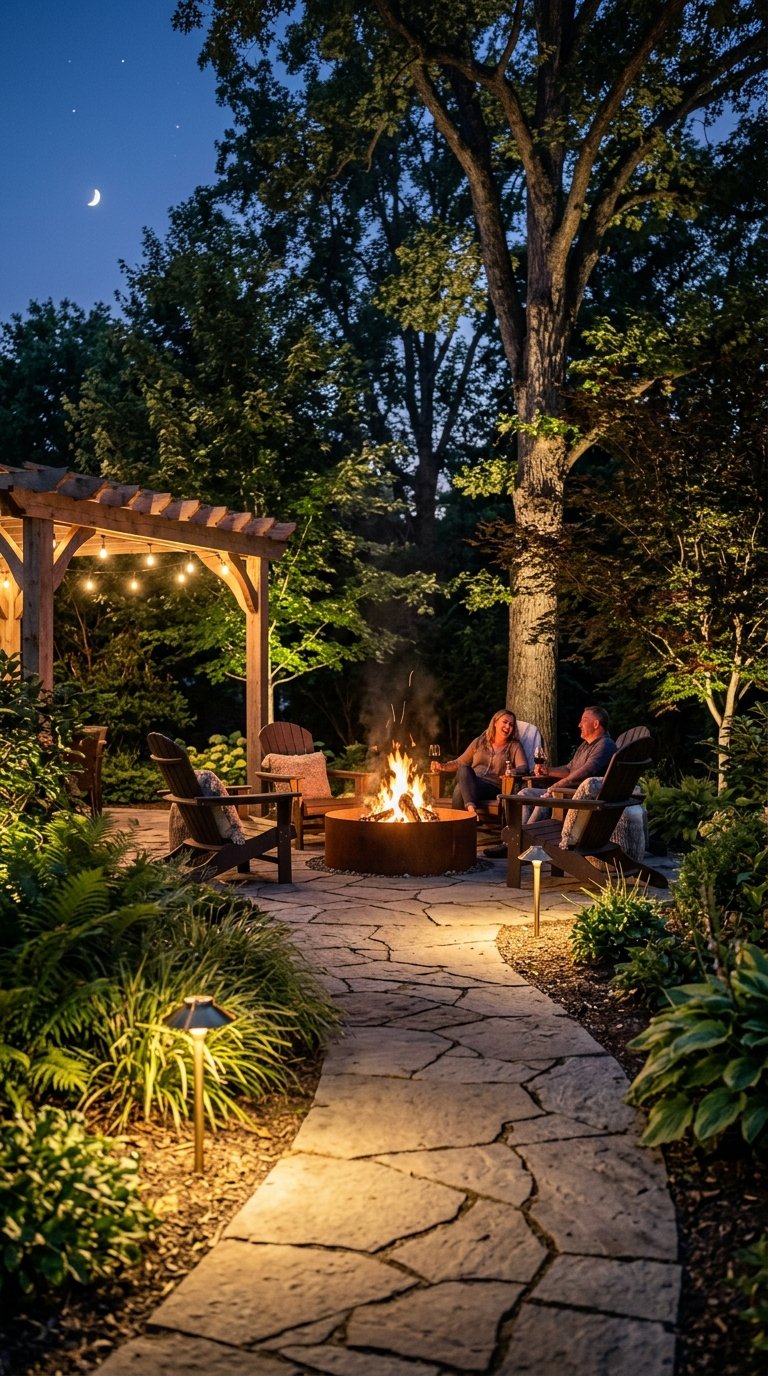
A fire pit area without perimeter lighting forces guests to navigate the yard in near darkness. Solar path lights along the approach, uplighting on surrounding trees, and low-voltage stake lights at the seating perimeter create a complete lighting scheme that makes the fire pit destination feel professionally designed.
Uplighting a tree or two behind the fire pit seating with low-voltage landscape spotlights adds dramatic depth to the nighttime scene. The backlit trees create a dark silhouette against the lit canopy that frames the fire pit circle beautifully. Total landscape lighting cost for a fire pit area: $80 to $200 in solar and low-voltage fixtures.
17. Install a Chiminea as a Compact Fire Feature
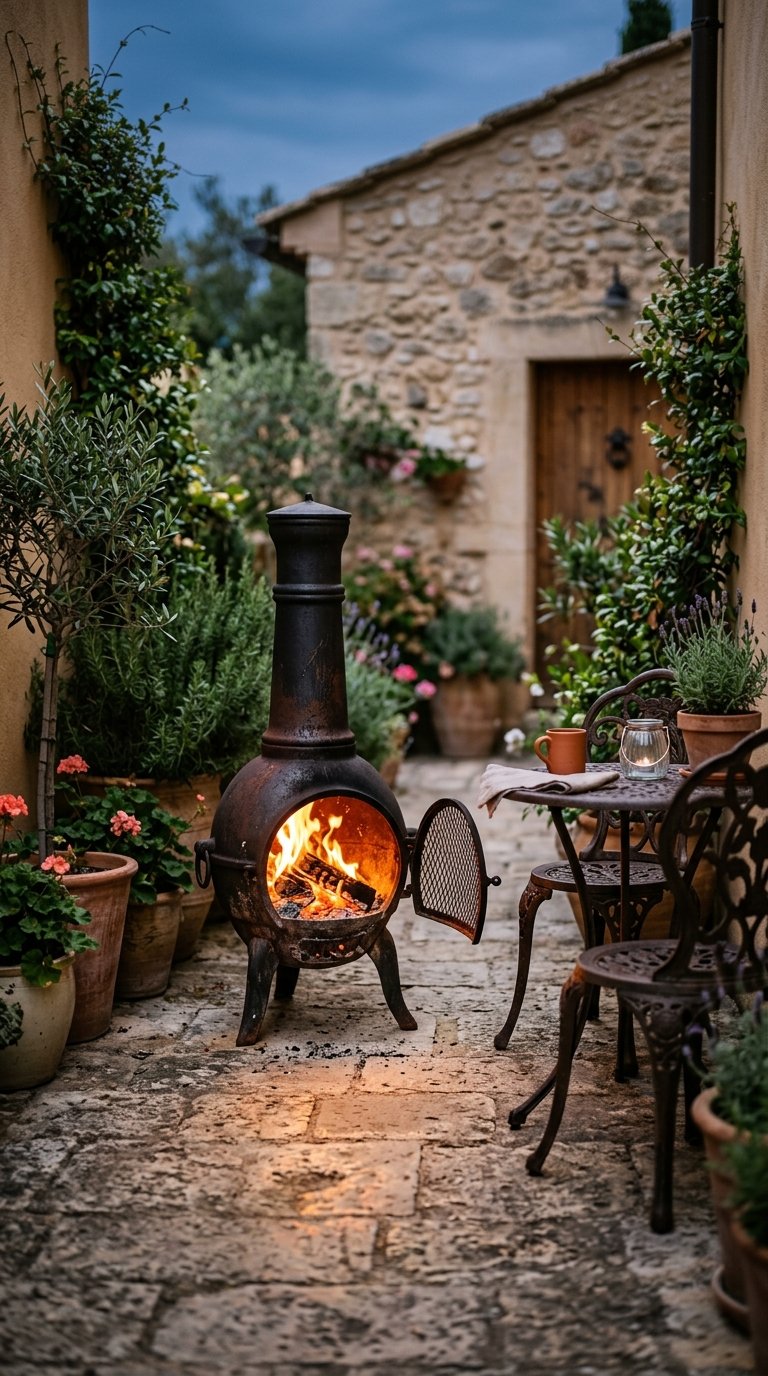
A chiminea is the apartment balcony or small patio solution to the fire pit problem. A cast iron or clay chiminea stands on three legs in a 24-inch footprint and directs smoke upward and away through its narrow chimney neck, making it suitable for smaller spaces where a standard fire pit creates smoke issues for neighbors or guests.
Cast iron chimineas cost $100 to $300 and last indefinitely with a coat of high-heat paint each season. Clay chimineas cost $60 to $150 but crack in freeze-thaw climates without a cover. For a small patio or courtyard, a chiminea delivers genuine fire ambiance in a form factor that a 36-inch fire pit physically can’t fit.
18. Build a Double-Sided Fire Pit for Large Gatherings
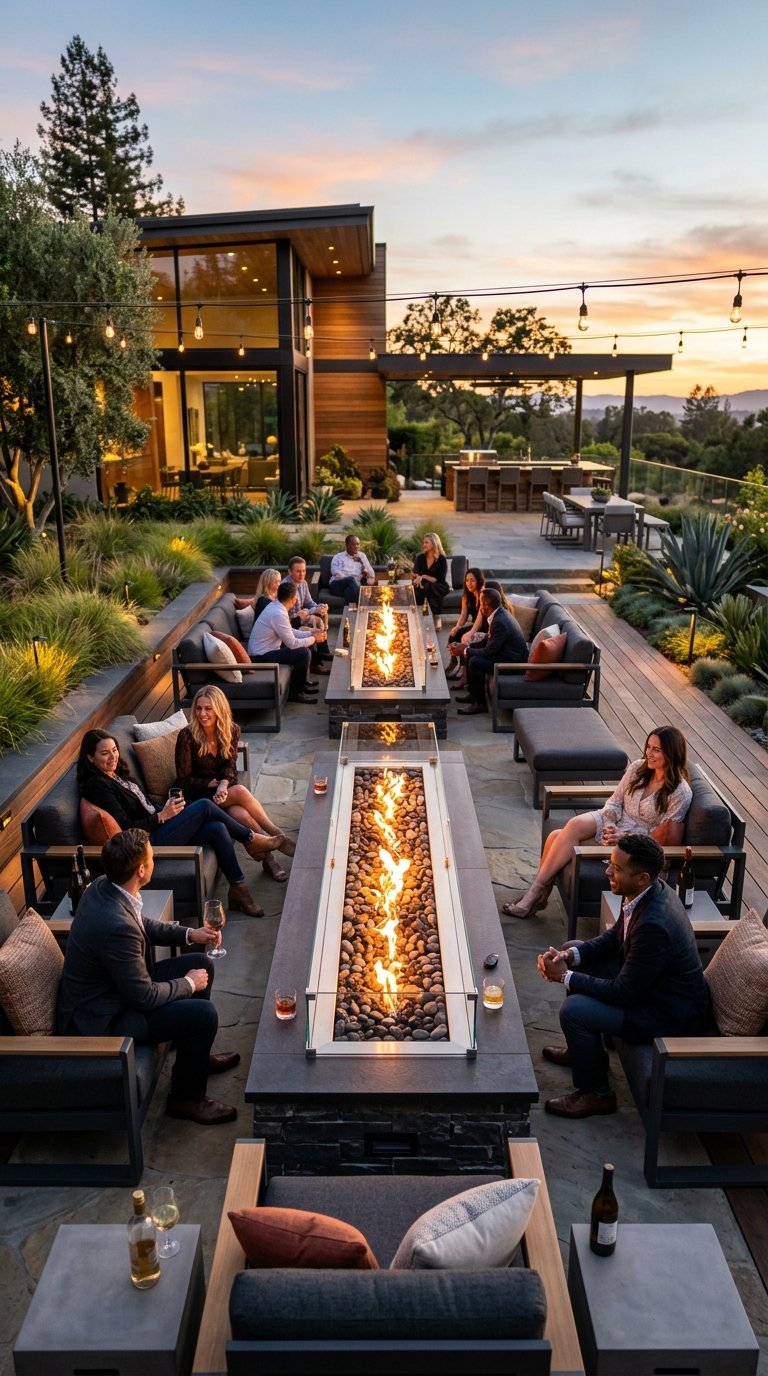
Standard round fire pits seat eight to ten adults comfortably. A large gathering needs more. A long rectangular fire pit with seating on both long sides accommodates 12 to 16 guests with everyone maintaining an equal relationship to the fire, no one pushed to the back.
A 6-foot long rectangular fire pit built from stone, concrete, or steel seats six to eight adults on each long side. This format works particularly well for an elongated patio or a yard with a linear layout. The rectangular form also accepts a gas insert more easily than a round pit, which simplifies the fuel management for a large fire feature.
19. Add a Fire Pit Grill Grate for Cooking
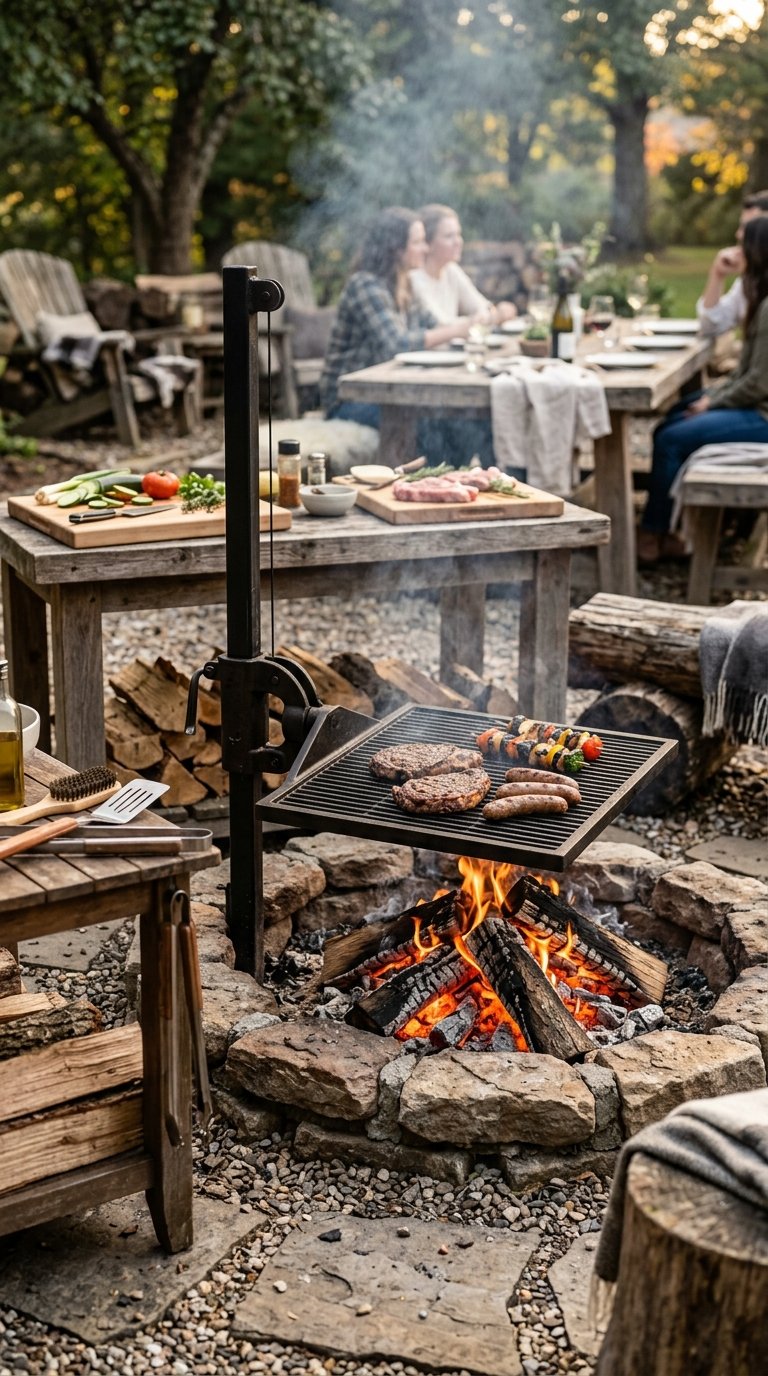
A fire pit with a swing-arm grill grate converts your backyard fire feature into a genuine cooking station. A cast iron grill grate on an adjustable swing arm mounts to the fire pit edge and swings over the fire for cooking, then swings out of the way when you want a pure fire experience.
Cooking over a wood fire tastes dramatically different from gas grilling and the fire pit grill grate unlocks that experience without a separate installation. Cast iron grill grates designed for fire pits cost $60 to $150. Use hardwood logs like oak, hickory, or cherry for cooking fires to avoid resinous smoke from softwoods that affects food flavor.
20. Design a Fire Pit Lounge With a Sectional Around It
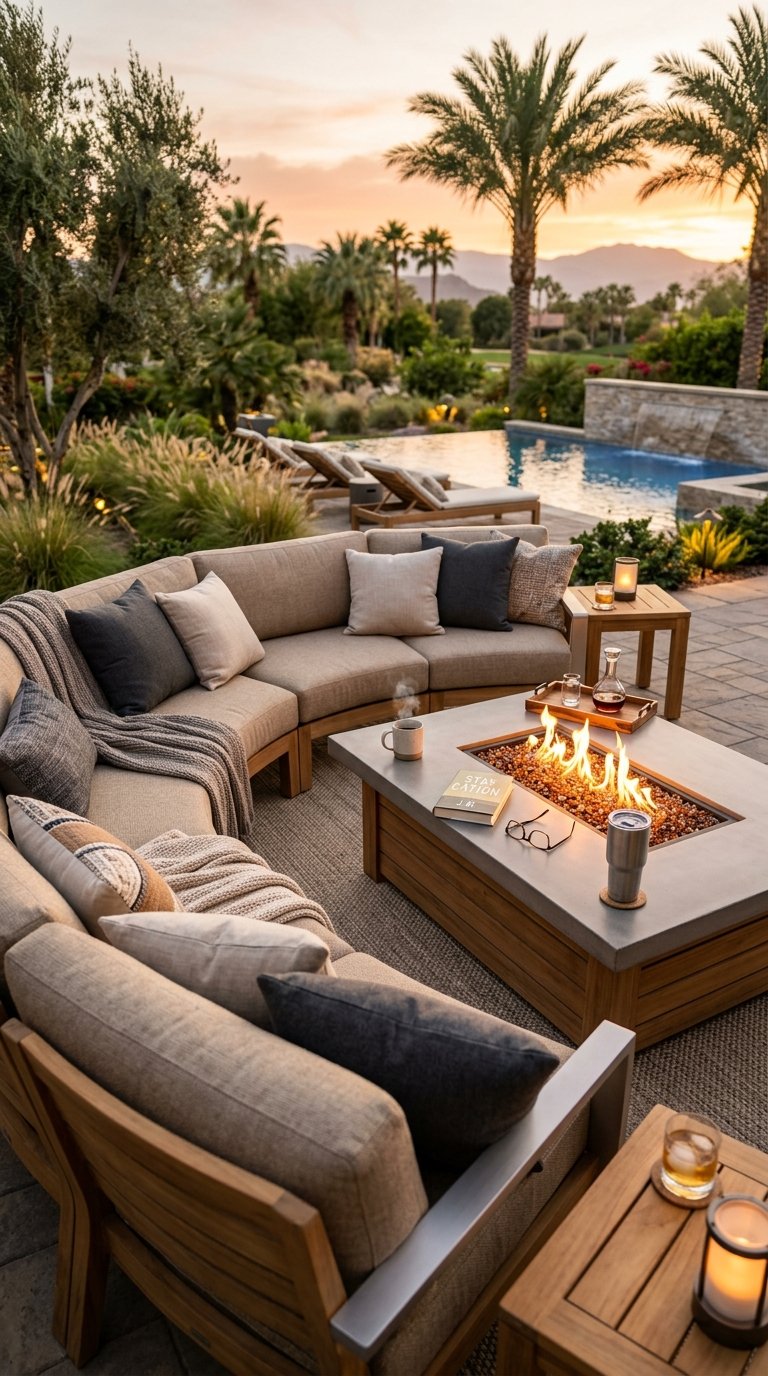
A sectional wrapped around a fire pit creates the most comfortable fire pit seating arrangement possible. Curved outdoor sectional pieces arranged in a C or U shape around the fire pit side bring guests closer together and create a conversation-first social dynamic that a loose circle of individual chairs never quite achieves.
Curved outdoor sectional configurations designed specifically for fire pit use cost $800 to $3,000 depending on material and quality. Teak and aluminum frame options with Sunbrella cushions perform best long-term. The sectional configuration works best with a propane fire table at the center because the table surface integrates naturally with the sectional depth.
21. Use Gravel or Decomposed Granite Around the Fire Pit
Grass around a fire pit deteriorates quickly under foot traffic, chair movement, and heat radiation. A 10 to 14 foot diameter circle of pea gravel or decomposed granite around the fire pit solves the ground surface problem permanently at minimal cost.
Pea gravel costs $30 to $50 per cubic yard. A 12-foot diameter circle 3 inches deep requires about half a cubic yard, bringing the material cost to $15 to $25. Edging the gravel circle with a metal landscape border keeps the stone contained and the line between gravel and lawn clean. This is one of the fastest and cheapest fire pit area improvements available. FYI, decomposed granite compacts more firmly underfoot than pea gravel and works better under furniture legs.
22. Build a Fire Pit With a Pizza Oven Combination
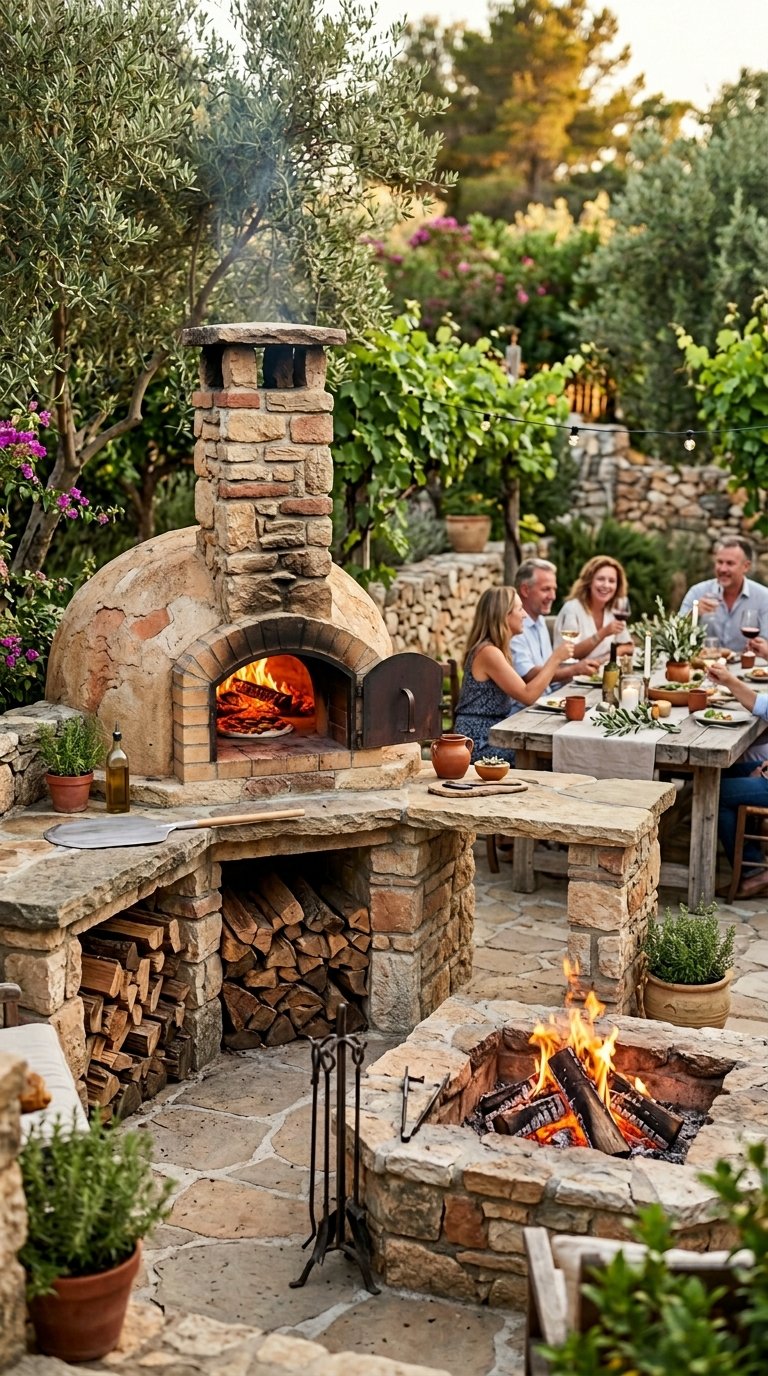
A combined fire pit and pizza oven turns your backyard fire feature into a full outdoor culinary destination. A wood-fired pizza oven built into the same masonry structure as the fire pit shares the same fuel source and the same aesthetic language while adding a cooking function that no standalone fire pit offers.
The pizza oven dome sits on a raised masonry platform beside or above the fire pit structure. Wood burns in the oven chamber to heat the dome surface for pizza baking. The fire pit below handles the social gathering while the oven above handles the food. This combination build costs $1,500 to $5,000 in materials and professional labor but creates a backyard feature that guests talk about for years.
23. Create a Seasonal Fire Pit With Portable Seating
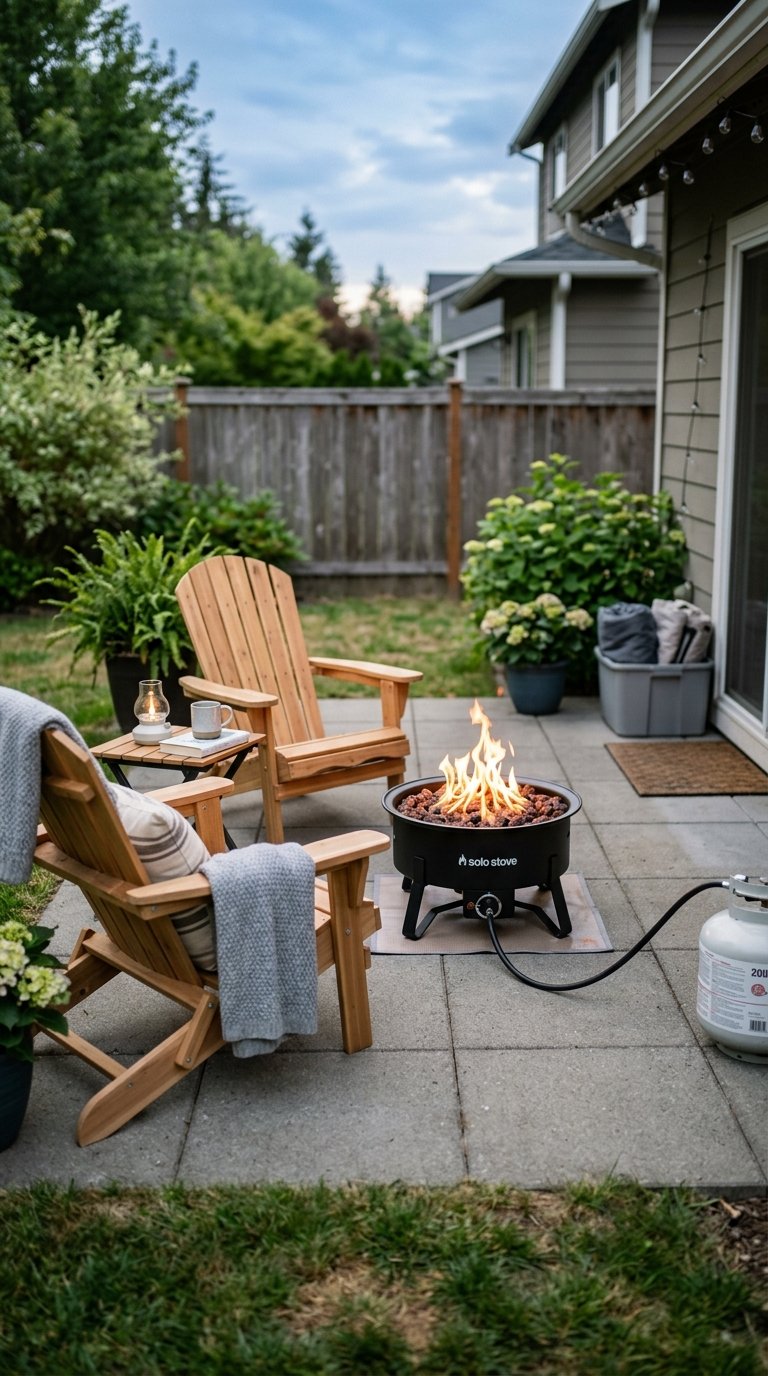
Not every fire pit setup needs to be permanent. A portable propane fire bowl combined with foldable Adirondack chairs and a folding side table creates a complete fire pit area that sets up in 15 minutes and stores away entirely when the season ends.
This approach works brilliantly for rental properties, shared outdoor spaces, or backyards where the layout changes frequently. The portable propane fire bowl ($80 to $200) connects to a standard 1-pound propane canister or a 20-pound tank with an adapter hose. Foldable poly Adirondack chairs ($60 to $100 each) fold flat for seasonal storage. The whole setup fits in a garage corner when not in use.
24. Add a Water Feature Near the Fire Pit
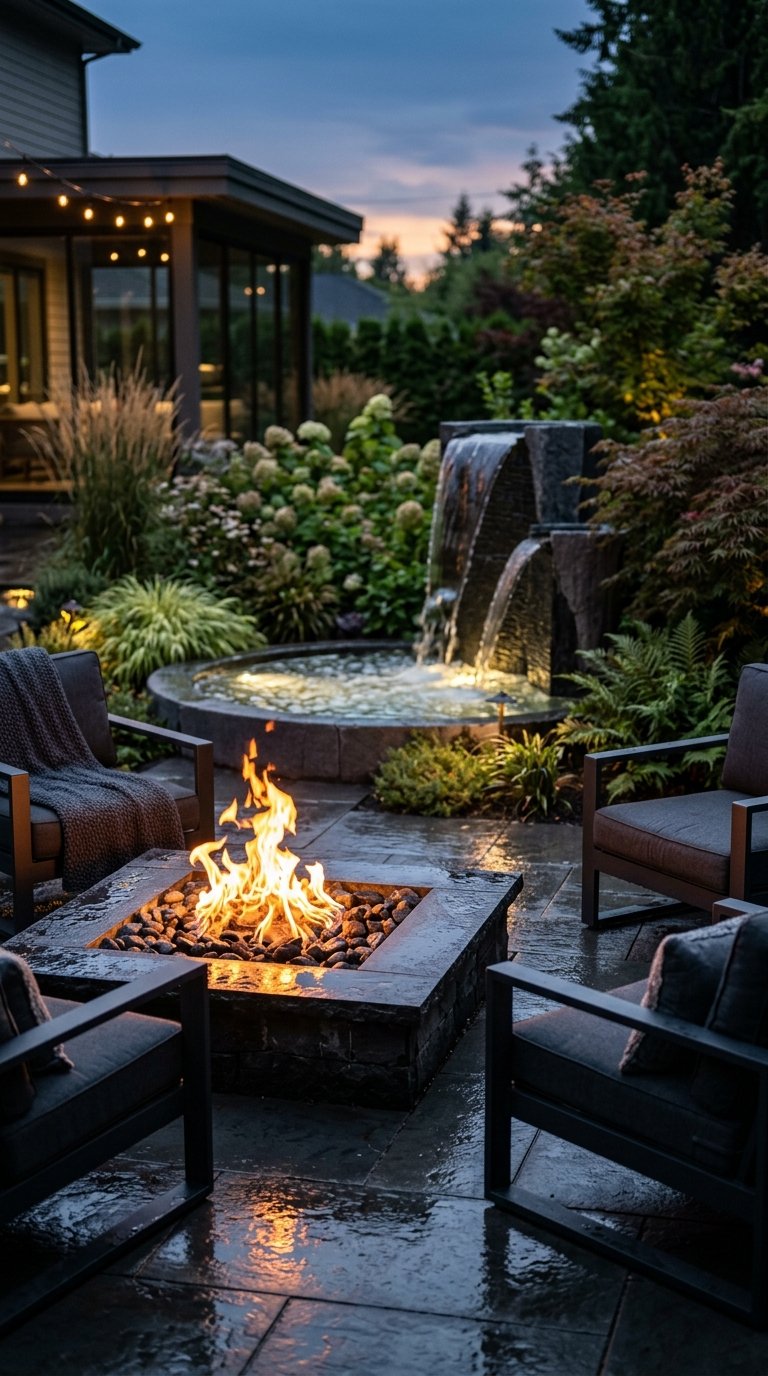
Fire and water in the same outdoor space create a sensory contrast that makes the area feel genuinely designed rather than assembled. A small recirculating wall fountain or freestanding water feature positioned 10 to 15 feet from the fire pit adds the sound of moving water to the warmth and light of the fire, creating a multi-sensory outdoor environment.
The water feature doesn’t compete with the fire visually because they occupy different planes (vertical water feature, horizontal fire at ground level). The contrast between the two elements makes each one more noticeable and more satisfying than either would be alone. A compact recirculating fountain costs $60 to $200 and requires only a standard outdoor outlet.
25. Light the Fire Pit Area With Lanterns and Candles
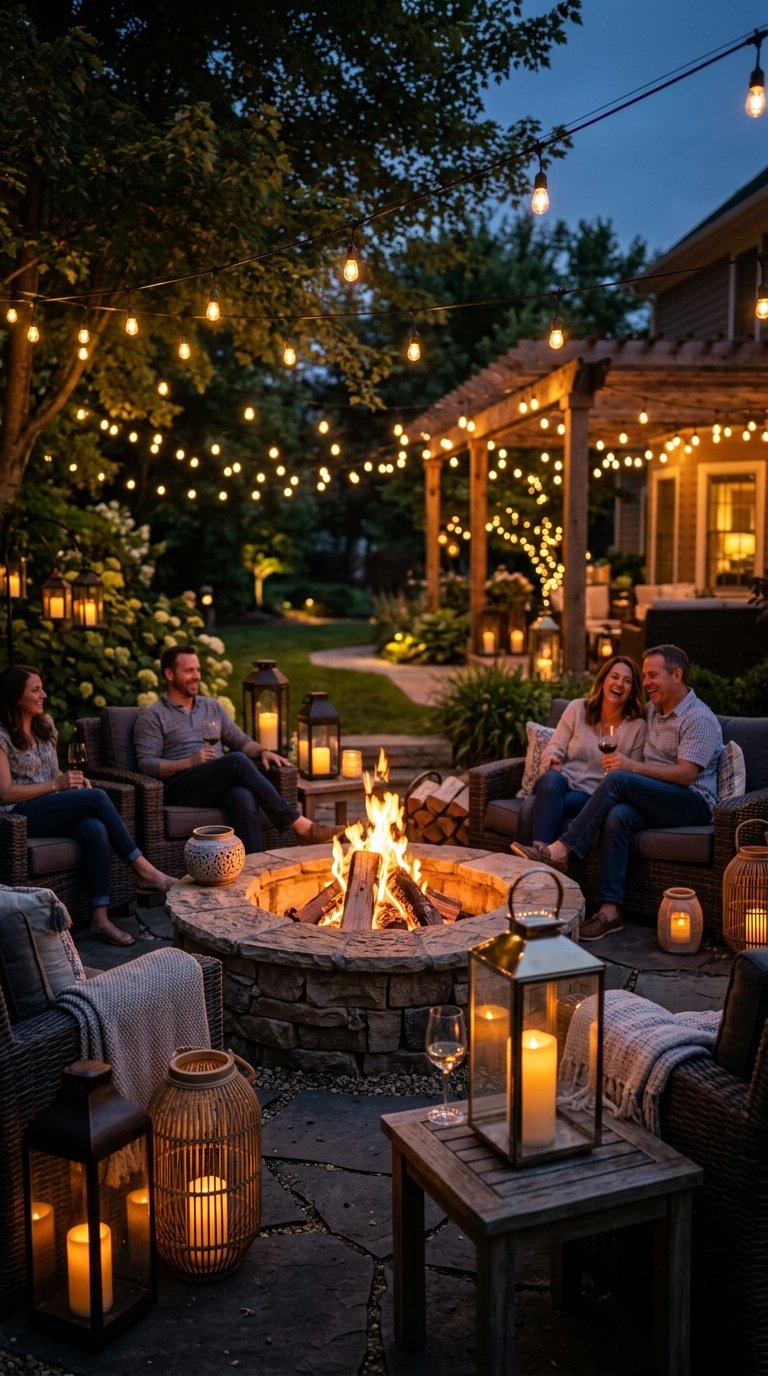
No fire pit area ever suffered from too many lanterns. A collection of varying-height lanterns with pillar candles positioned along the seating perimeter and on nearby surfaces creates layered light that fills the gaps between the fire glow and the overhead string lights.
Lantern Placement Strategy for Fire Pit Areas
- Two tall lanterns flanking the fire pit at opposite sides, 18 to 24 inches tall
- Three medium lanterns on a low stone wall or nearby surface
- Scattered tea lights in glass holders along the paver edge
- LED flameless candles in all lanterns for wind resistance on exposed sites
The fire provides dynamic center light. The string lights handle ambient overhead coverage. The lanterns fill the mid-level and perimeter with warm pools of soft light that complete the layered lighting scheme. A fully lit fire pit area with all three layers costs under $100 to achieve and looks like something from a resort property.
Final Thoughts
A backyard fire pit delivers more social return per dollar than almost any other outdoor investment you make. Whether you spend $60 on stacked retaining wall blocks or $5,000 on a mortared stone masterpiece with a pizza oven attached, the result is the same: a reason for people to gather outside, stay longer, and come back again.
Start with the fire pit format that fits your budget and yard right now. A portable propane bowl costs $80 and works tonight. A permanent built-in installation takes a weekend and $400 in materials. Either one transforms how you use your outdoor space from the first fire forward. Pick your starting point, build it well, and let the fire do the rest.