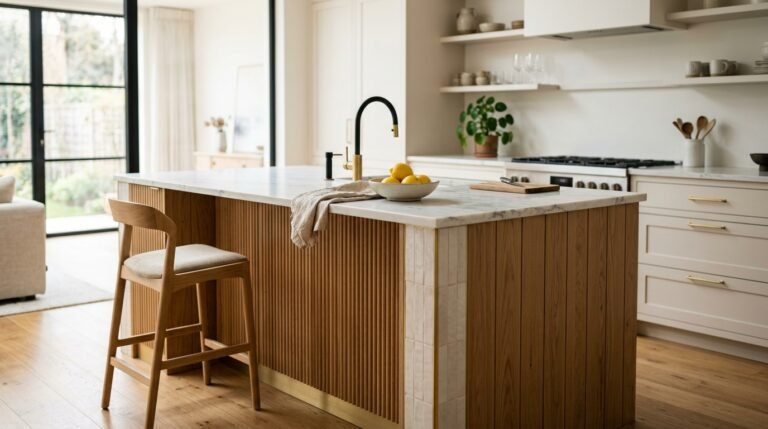
21 Kitchen Pantry Organization Ideas That Actually Work
Open your pantry right now. If something just fell out, this article is for you.
A disorganized pantry costs you money through expired food you forgot you had, time through searching for things that are technically in there somewhere, and mental energy every single time you cook. None of those are small problems.
These 21 kitchen pantry organization ideas work in walk-in pantries, reach-in closet pantries, cabinet pantries, and everything in between. No Pinterest fantasy setups. Just systems that hold up after the first week.
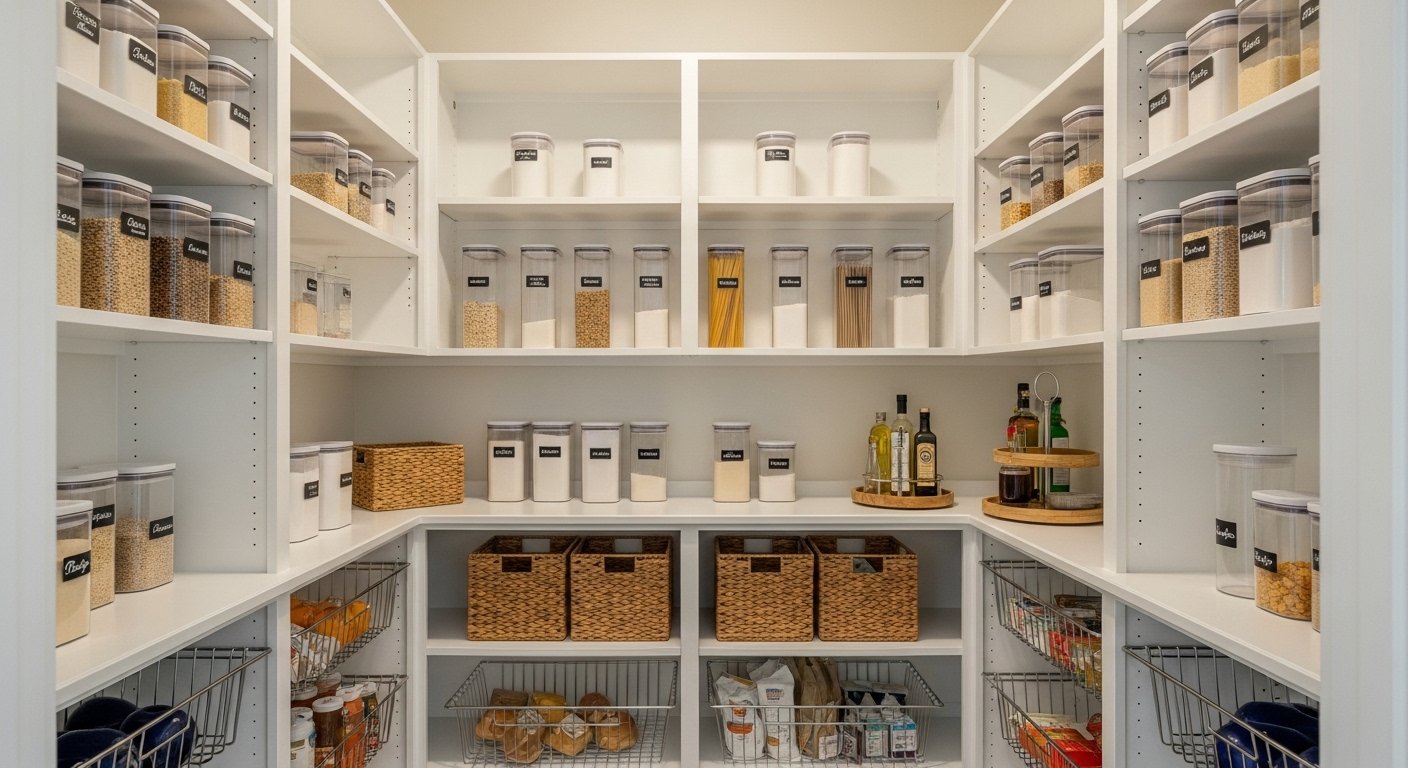
1. Decant Everything Into Clear Containers
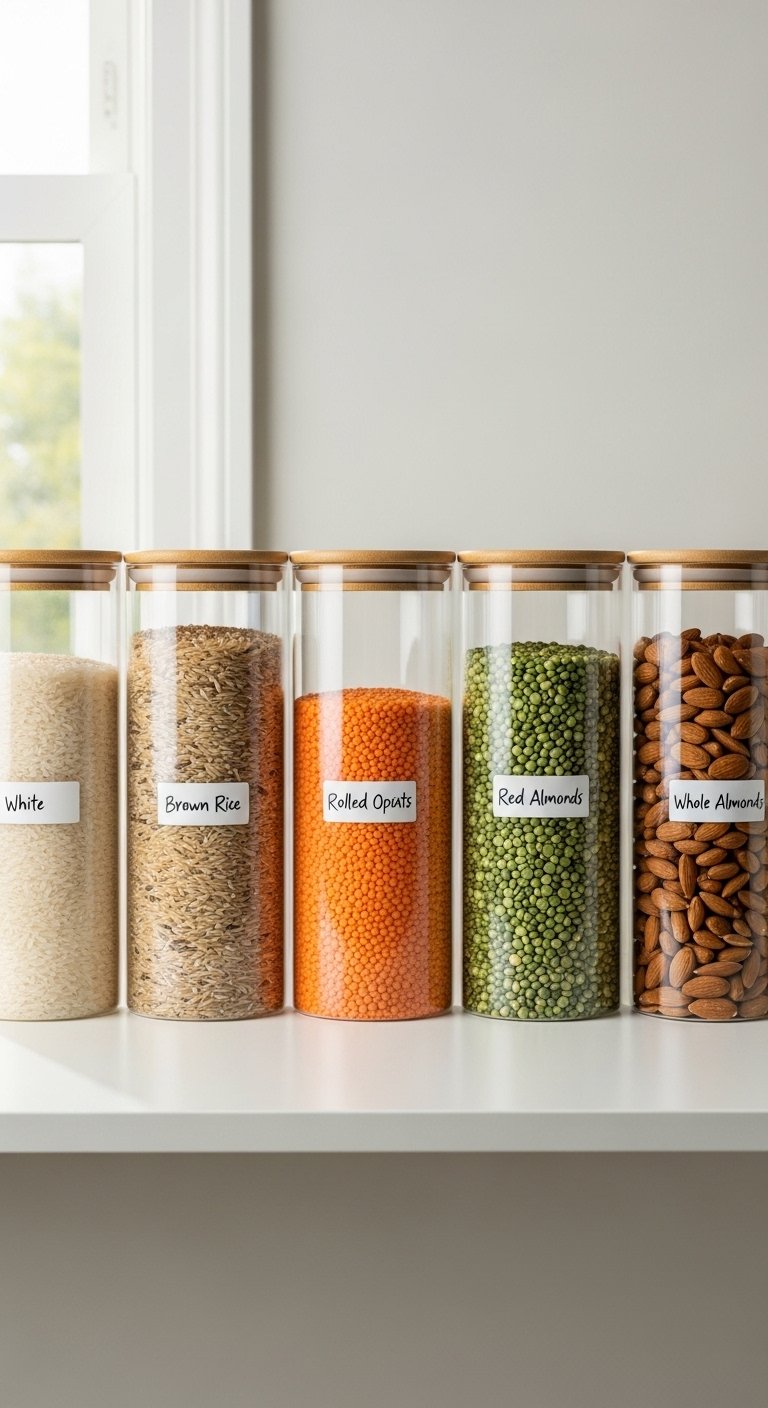
Decanting means transferring food from its original packaging into uniform, clear containers. It sounds fussy until you do it once and realize you can see everything at a glance without touching a single item.
The best containers for pantry decanting:
- Airtight glass jars: Best for grains, pasta, nuts, and coffee. Heavy but beautiful and truly airtight.
- OXO Pop containers: The gold standard in plastic. The push-button lid creates a genuine airtight seal.
- Flip-top glass canisters: Good for frequently accessed items like flour and sugar.
- Stackable square containers: Square shapes use shelf space more efficiently than round ones.
Label everything immediately after decanting. Unlabeled clear containers look great for about three days before you start confusing quinoa with couscous and nobody needs that stress.
2. Use Shelf Risers to Double Your Vertical Space
Most pantry shelves have 12 to 18 inches of vertical clearance between them. Most cans and jars are 4 to 6 inches tall. That gap above your items is wasted space. A shelf riser cuts that space in half by adding a second surface level within the same shelf.
Riser options worth considering:
- Wire step risers: Affordable, adjustable, good airflow
- Bamboo two-tier risers: Warm and natural-looking, solid construction
- Stackable plastic risers: Most affordable, modular, easy to reconfigure
- Under-shelf baskets: Clip onto the shelf above and hang below, creating storage from nothing
Shelf risers are the single cheapest upgrade with the most immediate storage gain. Most pantries double their can and jar capacity with two or three risers and zero structural changes.
3. Install a Lazy Susan on Every Deep Shelf
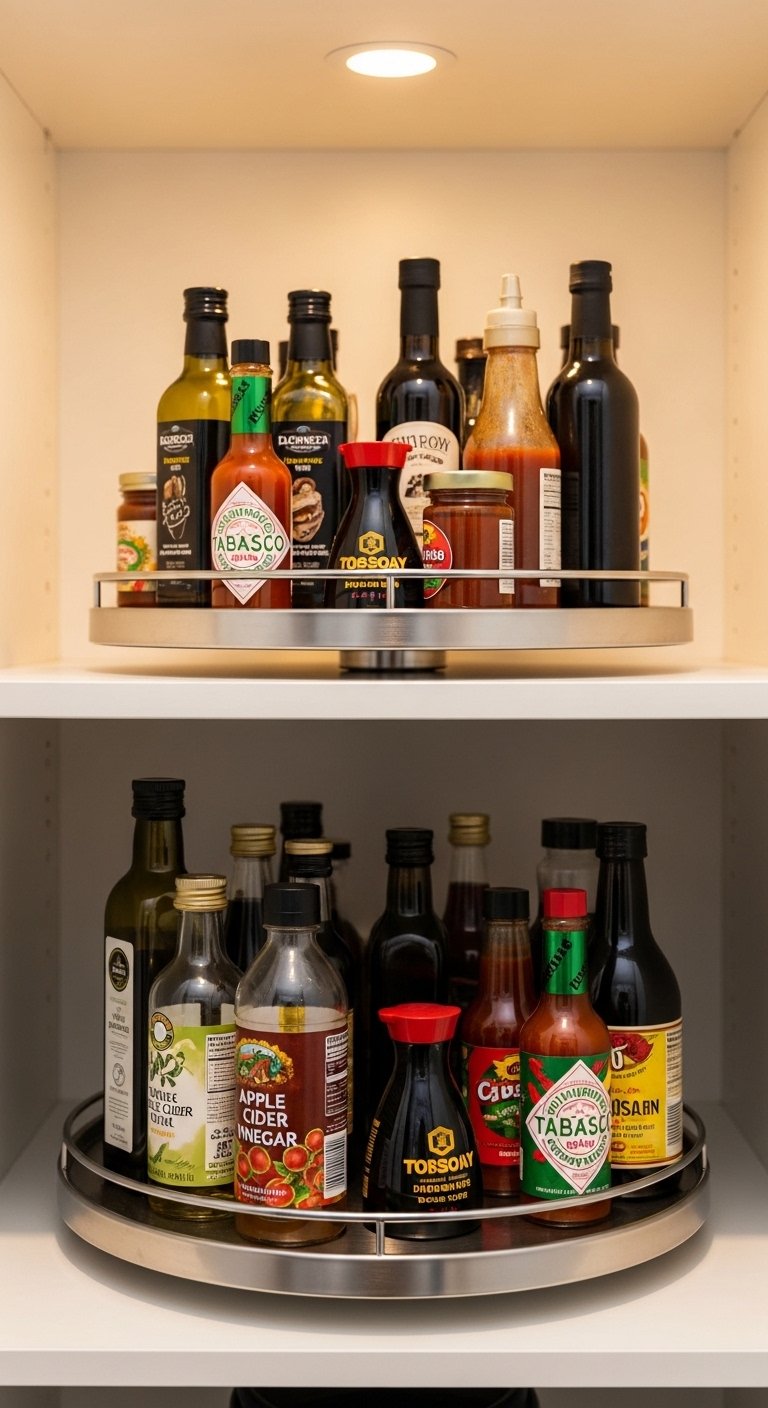
Deep shelves are pantry enemies. Items at the back get pushed out of sight, out of mind, and eventually out of date. A lazy Susan solves this by spinning everything to the front with one rotation.
Lazy Susan sizes and uses:
- Small (9 to 12 inches): Spices, condiment bottles, small jars
- Medium (12 to 16 inches): Canned goods, sauces, oils and vinegars
- Large (18 inches or more): Heavy items, large bottles, bulk containers
Use two-tier lazy Susans on taller shelves. One rotation brings the back row to the front on both levels simultaneously. It sounds small. It changes how the pantry functions completely.
4. Label Everything With a Consistent System
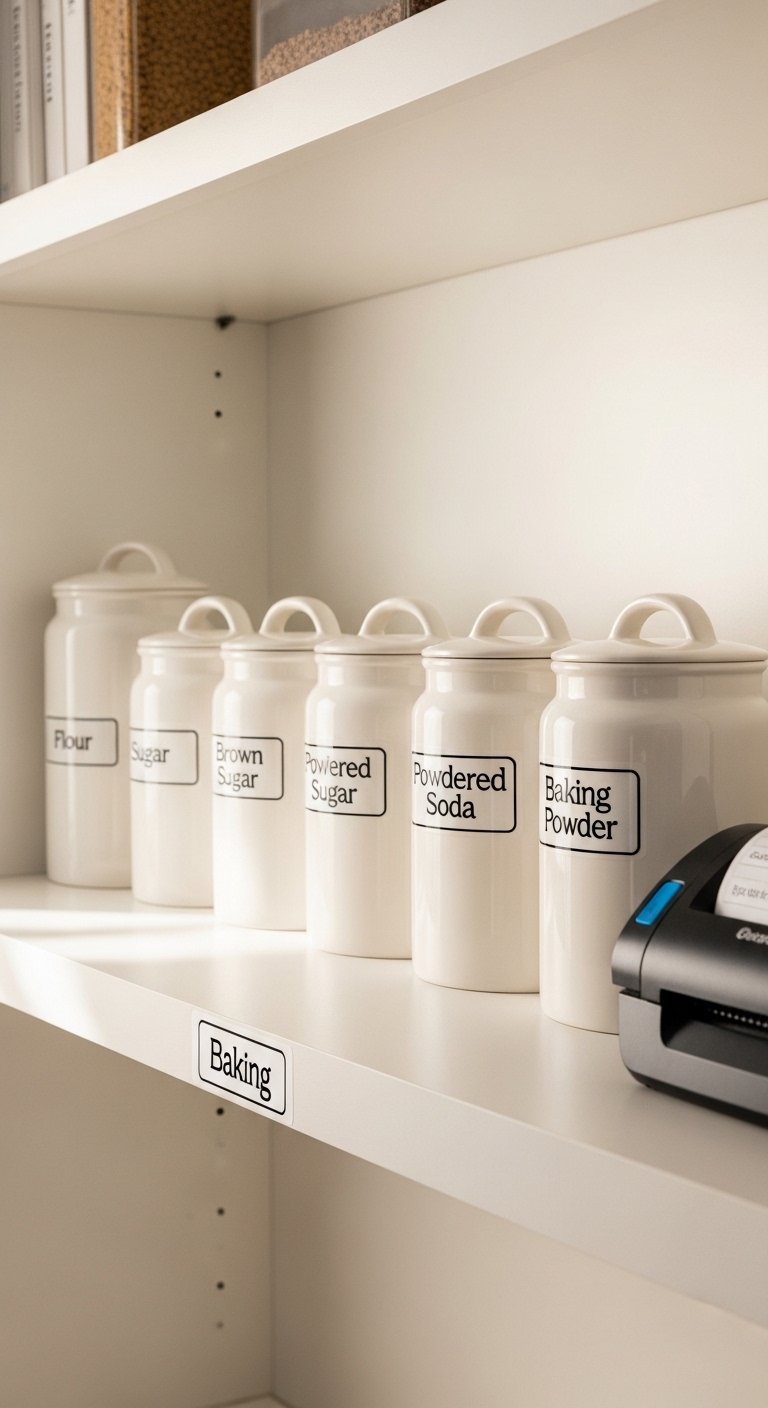
Labels do more than identify contents. They create a visual system that everyone in the household understands and follows. A labeled pantry puts items back in the right place because the right place is clearly marked.
Labeling options by commitment level:
- Chalkboard labels: Reusable, works for changing contents, requires chalk marker
- Printed adhesive labels: Clean and professional, requires a label maker
- Handwritten kraft paper labels: Warm and personal, works with a fine-tip pen
- Vinyl cut labels: Most permanent and polished option, requires a cutting machine
Label the shelf or bin, not just the container. When a container is empty and in the dishwasher, the labeled shelf still tells you where it belongs when it comes back.
5. Group Items by Category and Zone
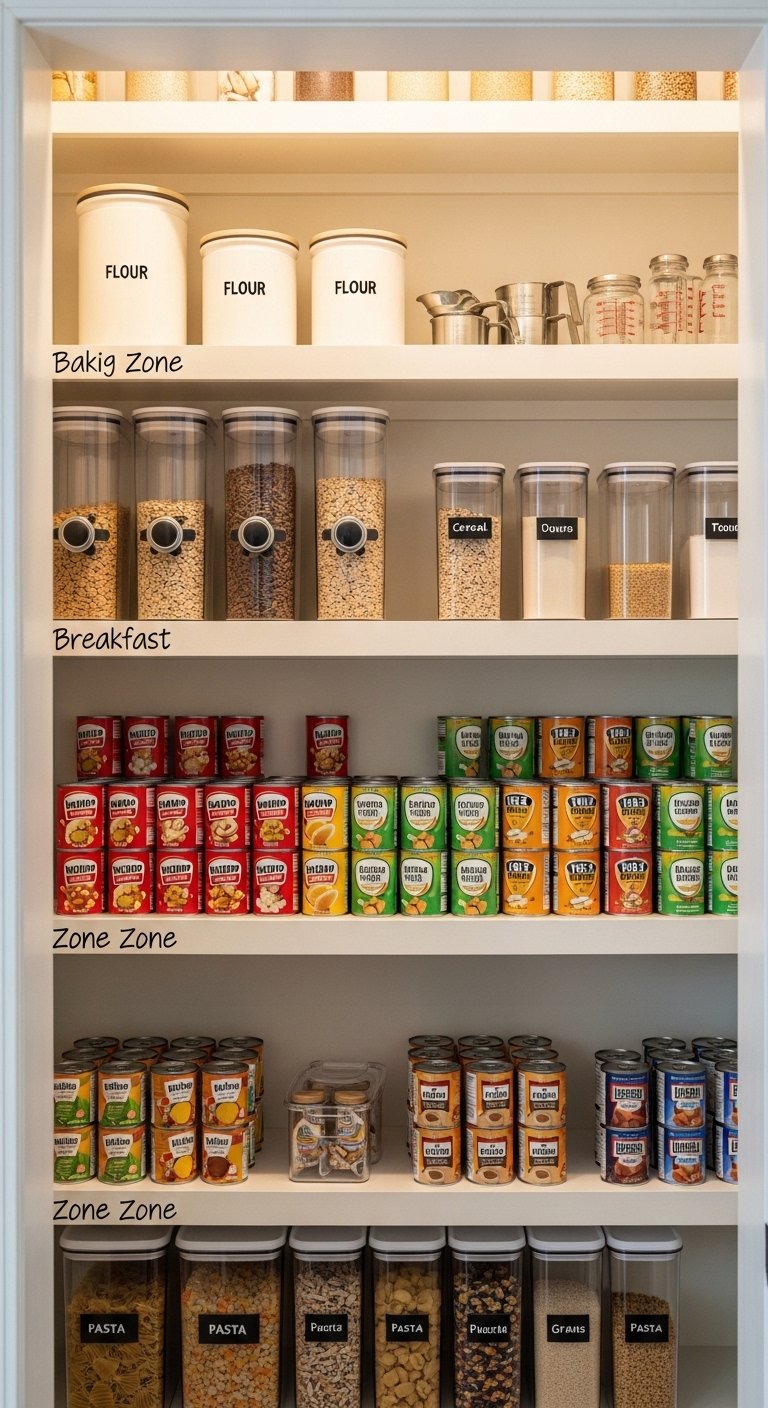
A pantry without zones is a pantry where you spend three minutes finding the cumin every time you cook. Zoning groups items by how you use them so that cooking requires fewer trips and less searching.
Effective pantry zones:
- Baking zone: Flour, sugar, baking powder, vanilla, chocolate chips, rolling pin
- Breakfast zone: Cereals, oats, granola, nut butters, honey, jam
- Snack zone: Chips, crackers, nuts, dried fruit, bars
- Canned goods zone: Tomatoes, beans, broth, coconut milk, soups
- Pasta and grains zone: All dried starches together
- Oils and sauces zone: Cooking oils, vinegars, soy sauce, hot sauce
Place the zones you access most at eye level. Baking supplies you use once a week belong higher up than pasta you reach for three times a week.
6. Add Door-Mounted Storage
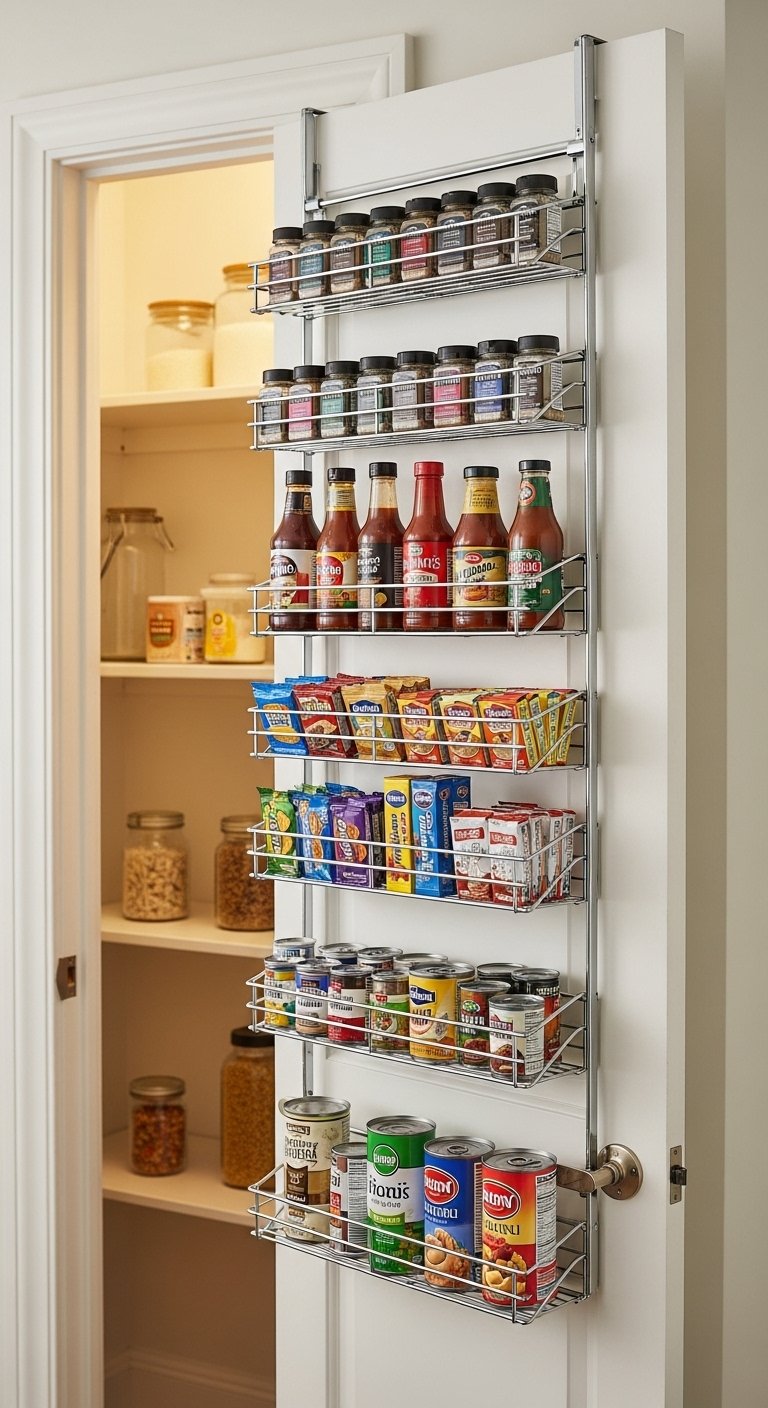
The inside of a pantry door is a storage surface most people completely ignore. In a standard pantry door, you have room for 15 to 25 additional items without touching a single shelf.
Door storage options:
- Over-door pocket organizers: Clear pockets for small packets, spice packets, snack bars
- Mounted spice racks: Tiered racks that hold 20 to 30 spice jars on one door
- Magnetic strips: Hold metal spice tins flat against the door
- Wire basket door rack: Holds bottles, cans, and larger items on the door surface
Measure your door clearance before buying. Door-mounted storage works only if the shelves inside clear the back of the door rack when the door closes. This is the most common mistake people make with this upgrade. FYI, measure twice before ordering anything.
7. Use Bins and Baskets for Loose Items
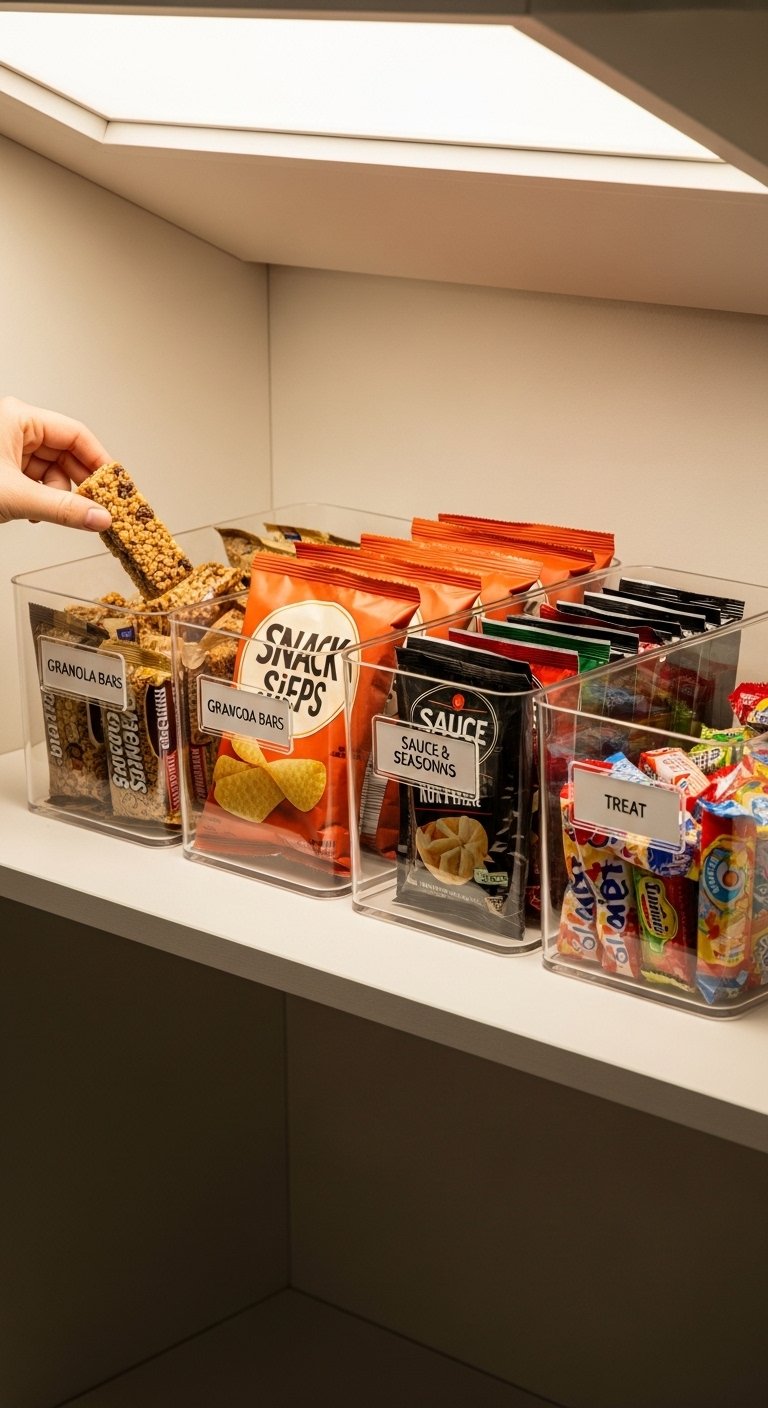
Loose packets, snack bars, sauce packets, and small bags create chaos on open shelves. A bin or basket corrals them into a single contained unit that you pull out, grab from, and push back.
Bin and basket materials compared:
- Wire bins: Good visibility, easy to clean, modern look
- Woven seagrass baskets: Warm and natural, hides clutter well, harder to clean
- Clear acrylic bins: Maximum visibility, very clean look, shows dirt
- Fabric storage bins: Soft, collapsible, works for lighter items
Use bins for things that don’t stack cleanly. Snack bars, sauce packets, granola bars, and small bags all belong in a bin rather than stacked directly on a shelf where they inevitably fall.
8. Create a Dedicated Snack Station
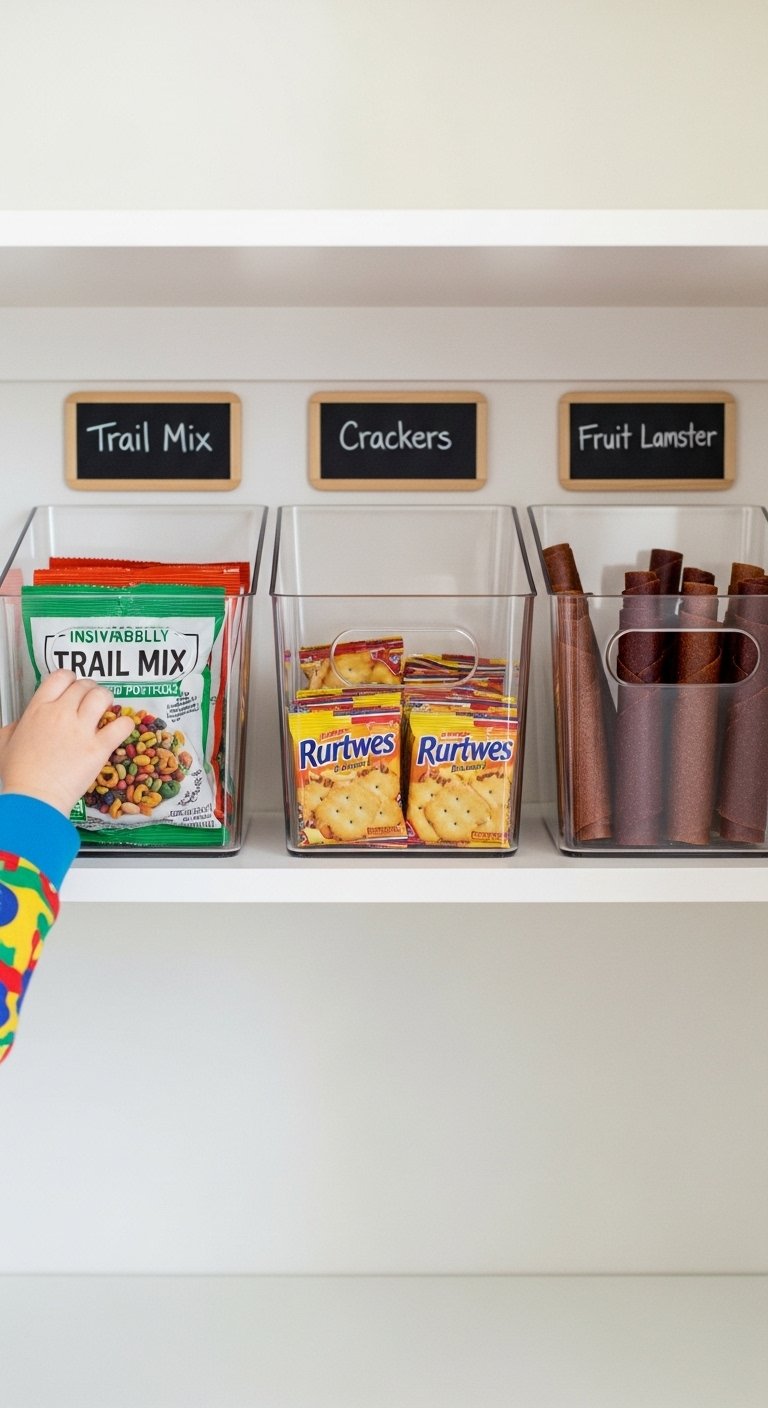
If you have children, a snack station at their height changes the dynamic in your kitchen immediately. They stop asking you where things are because they already know. You stop being a human search engine for goldfish crackers.
A functional snack station includes:
- A low shelf or low bin placement accessible at child height
- Clear containers so kids see options without digging
- Pre-portioned snack bags for grab-and-go convenience
- Limited options so the decision doesn’t take four minutes
The snack station works for adults too. A clearly designated snack area stops the habit of opening every cabinet looking for something to eat. Everything is in one place. Decision made.
9. Install Pull-Out Drawers or Sliding Shelves
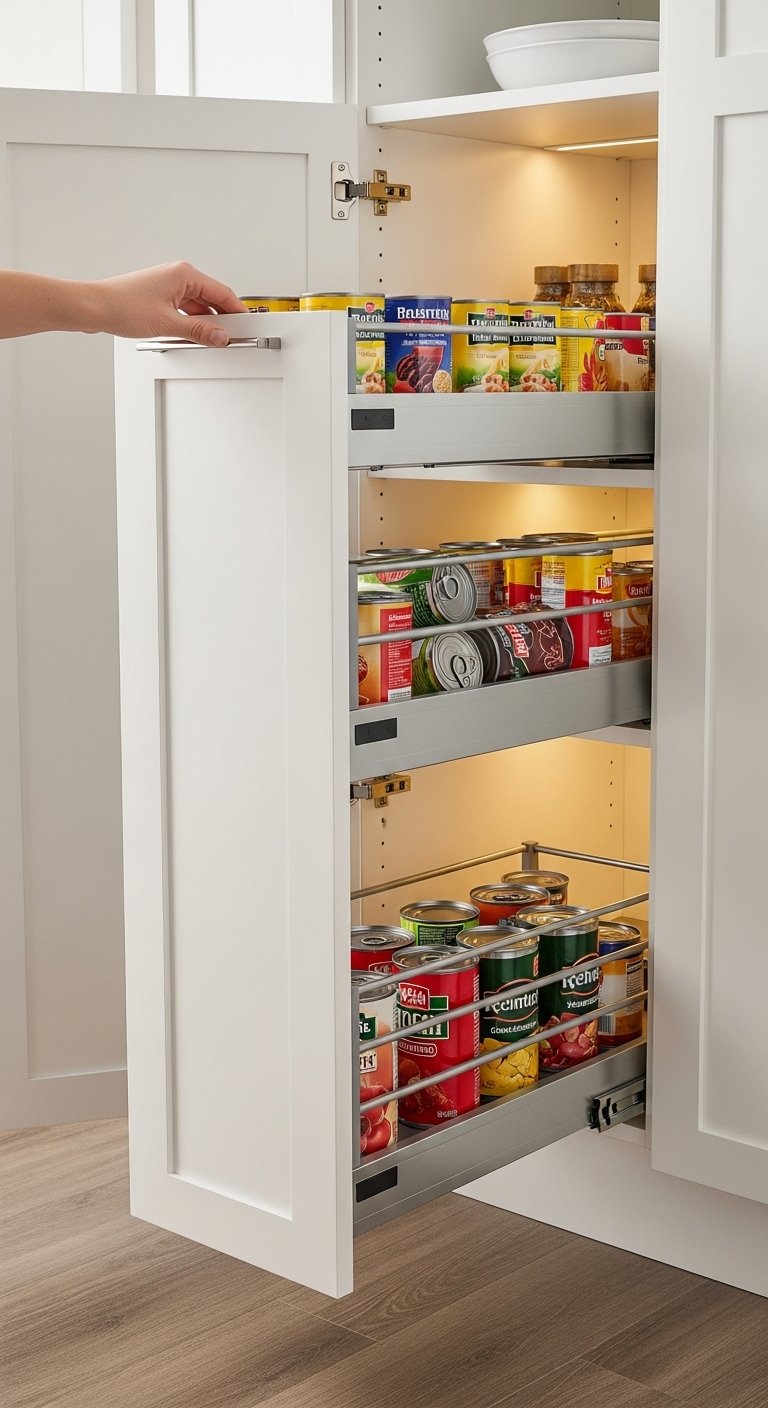
Fixed shelves force you to lift and move items at the front to reach items at the back. Pull-out drawers bring the entire shelf content to you. This is the difference between a pantry you avoid and one you actually use well.
Pull-out options:
- Retrofit sliding shelf kits: Install inside existing cabinets without modification
- Freestanding rolling drawers: No installation required, movable
- Built-in pull-out drawers: Permanent and custom, highest quality result
- Stackable pull-out baskets: Modular, adjustable height between baskets
This upgrade has the highest behavioral impact of any pantry improvement. When everything pulls forward, nothing hides at the back. Expiration dates get checked. Older items get used first. The system maintains itself.
10. Store Baking Supplies Together in One Area
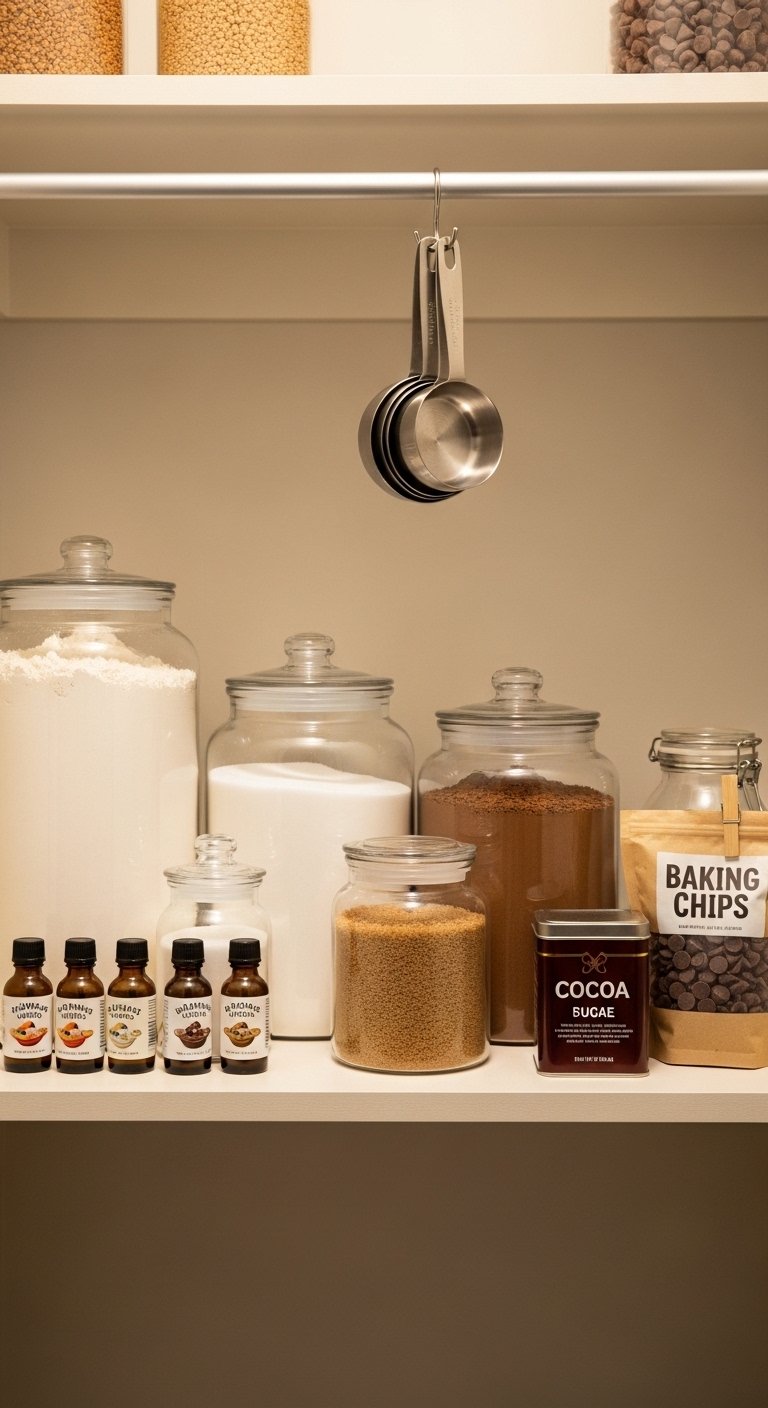
Baking requires multiple ingredients from multiple categories that all need to come out at the same time. Storing them scattered across the pantry means assembling them from four different locations every time you bake.
A dedicated baking station in the pantry holds:
- Flour, sugar, powdered sugar, brown sugar
- Baking powder, baking soda, salt, cornstarch
- Vanilla extract, almond extract, other flavorings
- Chocolate chips, cocoa powder, sprinkles
- Measuring cups and spoons (store them here, not in a drawer)
Having measuring cups in the baking zone eliminates one retrieval trip every single time you bake. Small friction reductions add up to a kitchen you actually enjoy cooking in.
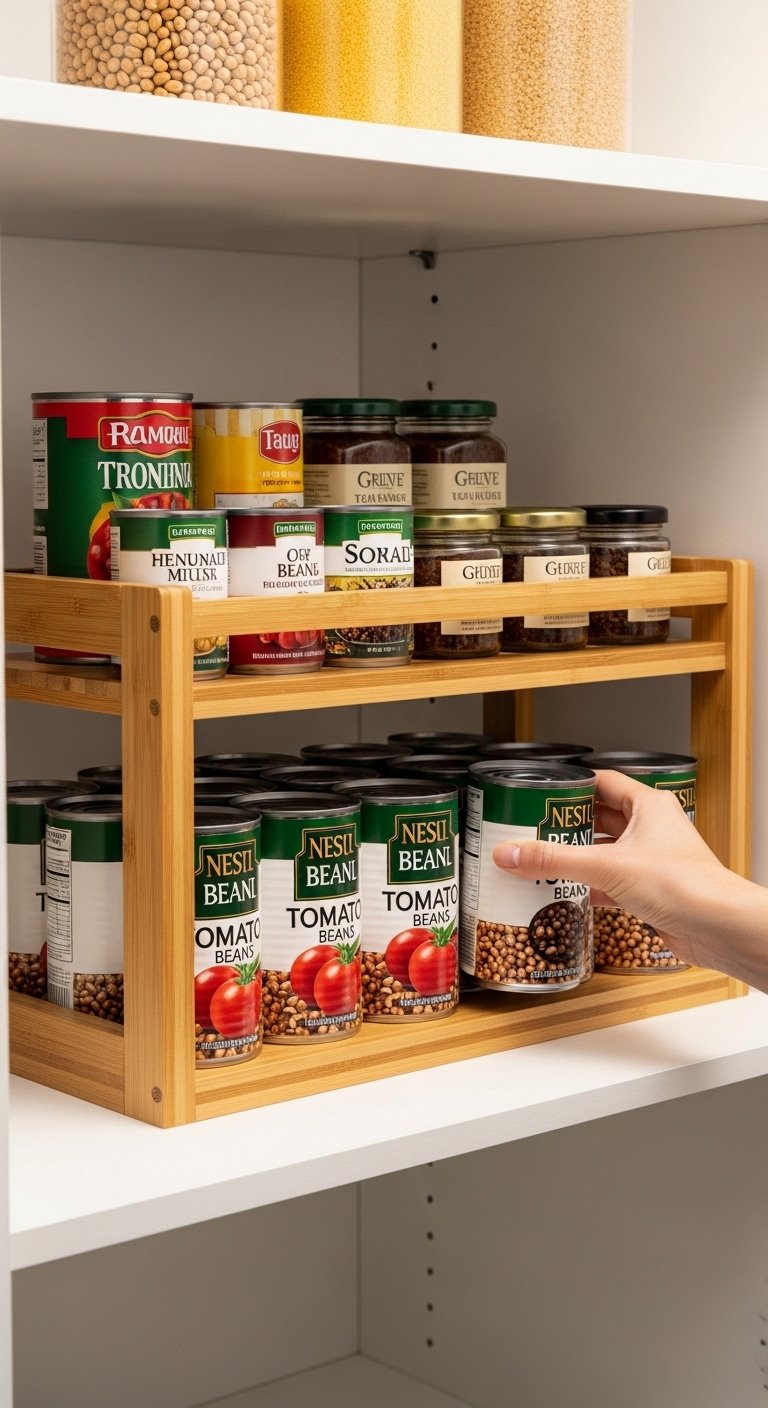
11. Use a FIFO System for Canned Goods
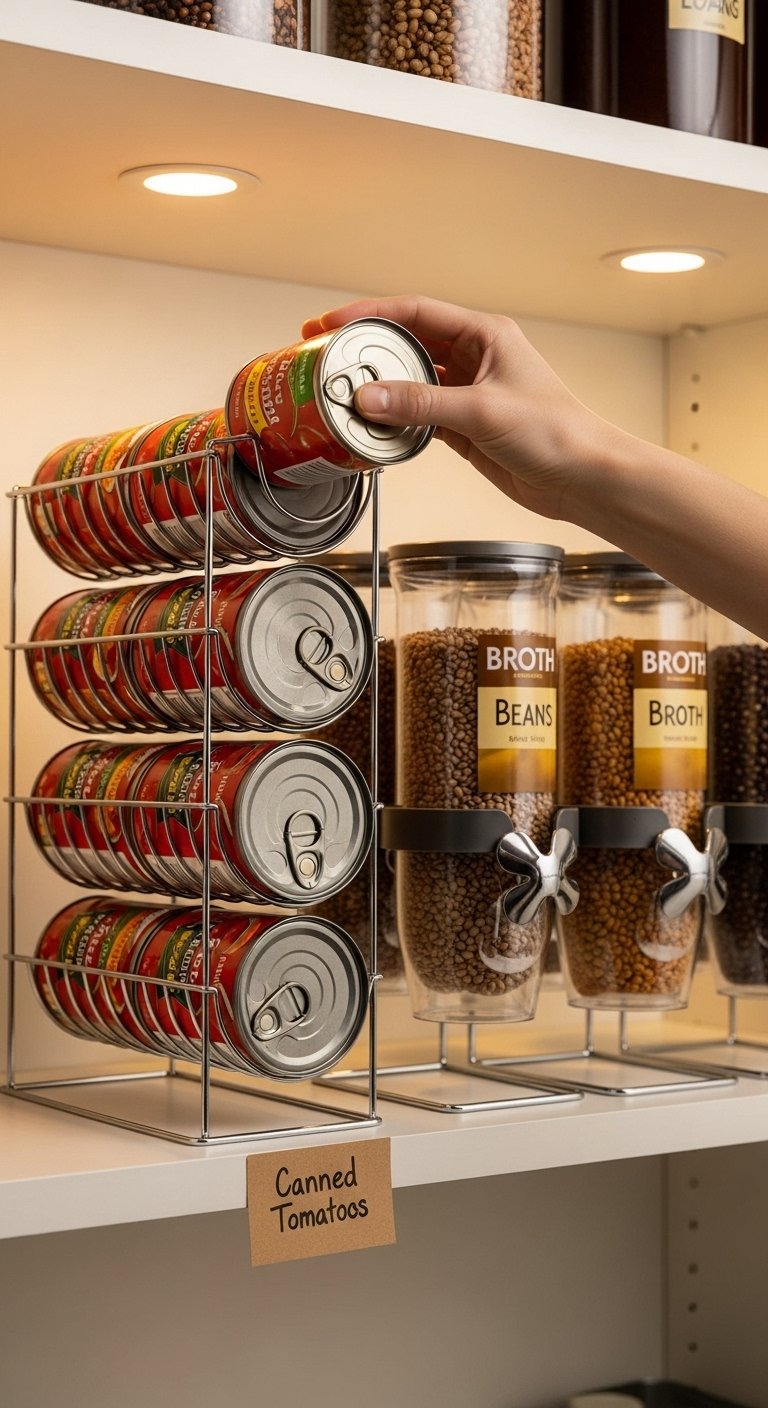
FIFO stands for First In, First Out. It’s the stock rotation system every grocery store and restaurant uses. New cans go to the back. Old cans stay at the front. You always use the oldest item first.
How to implement FIFO in a home pantry:
- Store cans in a single row on a tiered riser or a can dispenser rack
- New purchases load from the back, older stock sits at the front
- A can dispenser rack does this automatically with gravity
- Check dates when loading new stock and remove anything expired
A can dispenser rack costs $15 to $40 and eliminates expired food almost entirely. The payback in food waste reduction alone covers the cost within a few months for most households.
12. Maximize Vertical Space With Stackable Bins
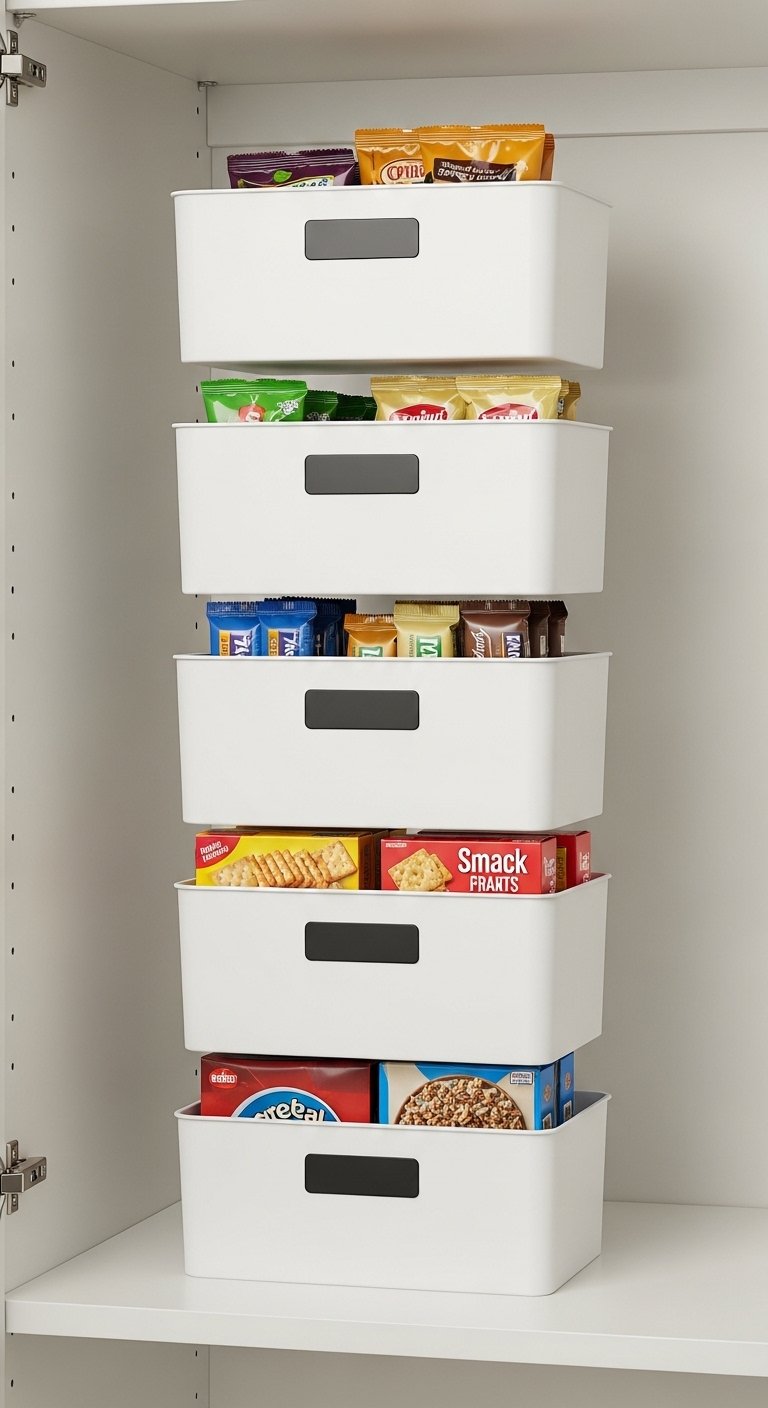
Most pantries have at least one shelf tall enough to fit two layers of storage if the containers are the right height. Stackable bins, stackable canisters, and stackable containers turn that single layer into two without adjusting a single shelf.
Stackable solutions that work:
- Stackable rectangular containers: For dried goods and snacks
- Stackable can organizers: Tier cans in a small footprint
- Stackable wire baskets: For produce and loose items
- Modular drawer systems: Small drawers that stack vertically for spices and packets
Square and rectangular containers stack; round containers don’t. This is the most important container geometry decision you make when organizing a pantry. 🙂
13. Designate a Breakfast Shelf
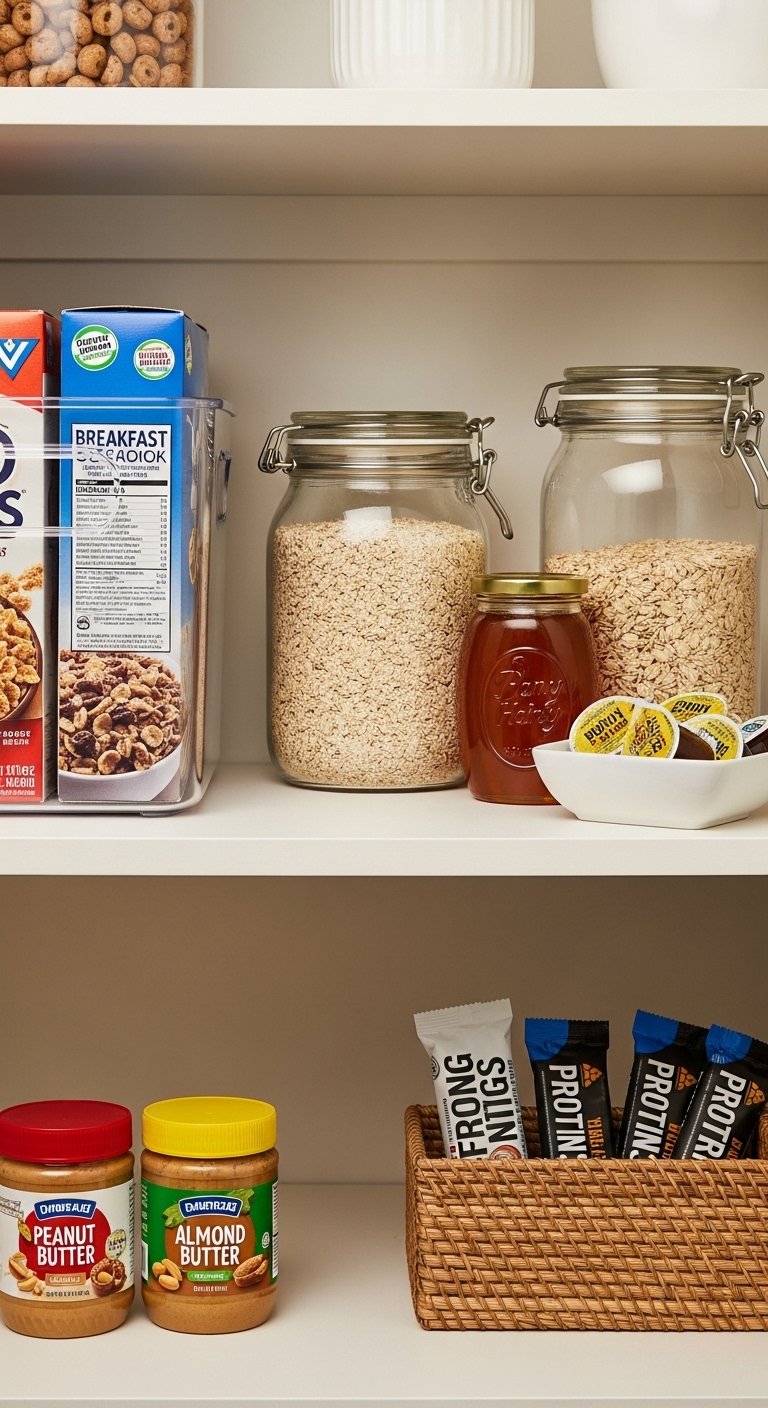
Breakfast is the meal most people make on the least amount of sleep with the most time pressure. A designated breakfast shelf that holds every morning item in one place removes the decision-making and the searching from the equation.
A complete breakfast shelf holds:
- Cereal boxes (decanted into clear bins if you want a cleaner look)
- Oats, granola, and muesli
- Nut butters and honey
- Protein bars and quick snacks
- Coffee supplies if not stored elsewhere
Everything for breakfast in one reach. That’s the goal. No opening three cabinets before your first cup of coffee.
14. Use Clear Bins for the Refrigerator Pantry Items
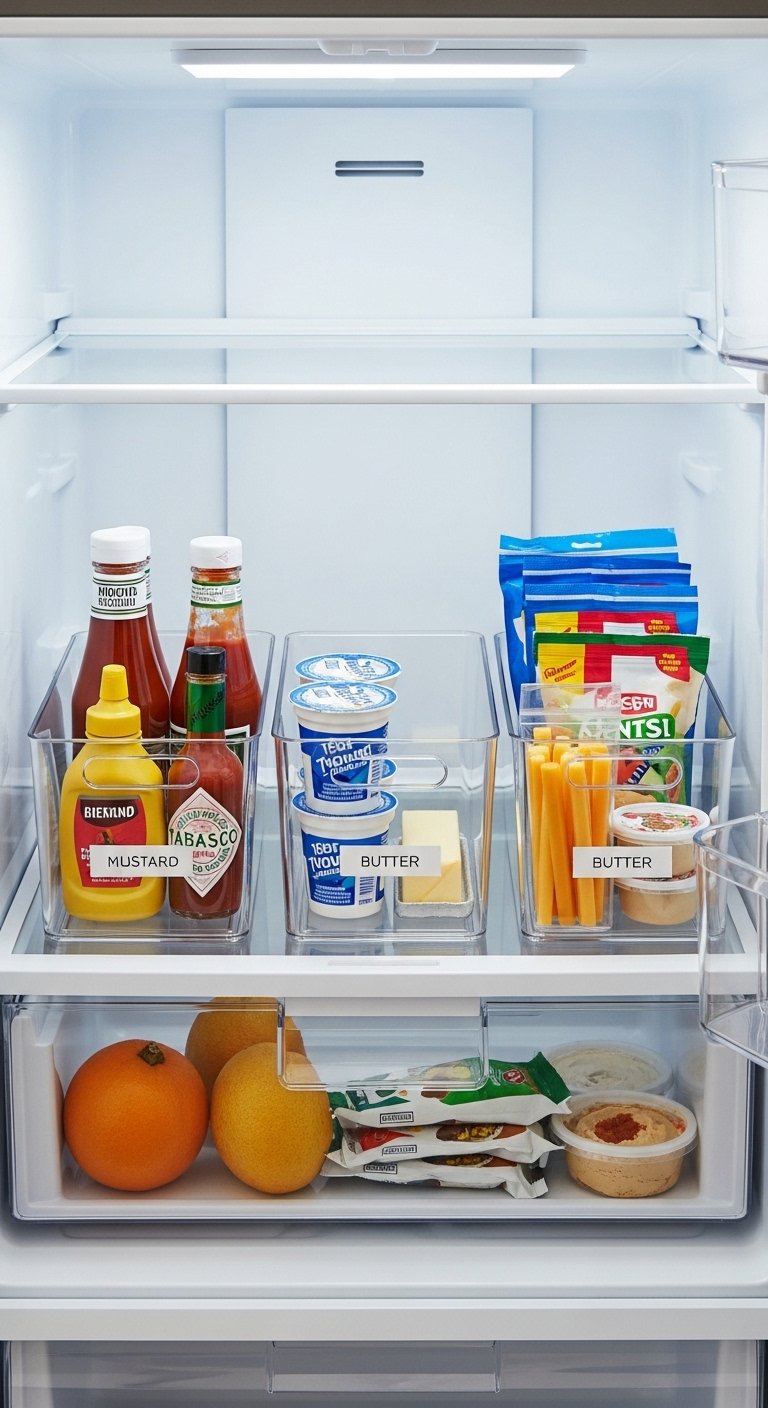
Some pantry items live in the refrigerator: condiments, opened jars, dairy products, leftovers. These areas suffer from the same disorganization as dry pantry shelves. Clear bins inside the refrigerator create zones that function the same way.
Refrigerator bin zones worth creating:
- Condiment bin: All sauces, dressings, and condiments in one pull-out bin
- Snack bin: Pre-portioned snacks and grab-and-go items
- Dairy bin: Butter, cream cheese, and yogurt together
- Leftover shelf: One dedicated shelf with a clear bin so leftovers are visible
Clear bins in the refrigerator reduce food waste measurably. When you see it, you eat it. When it hides behind something else, it goes bad.
15. Create a Meal Planning Station
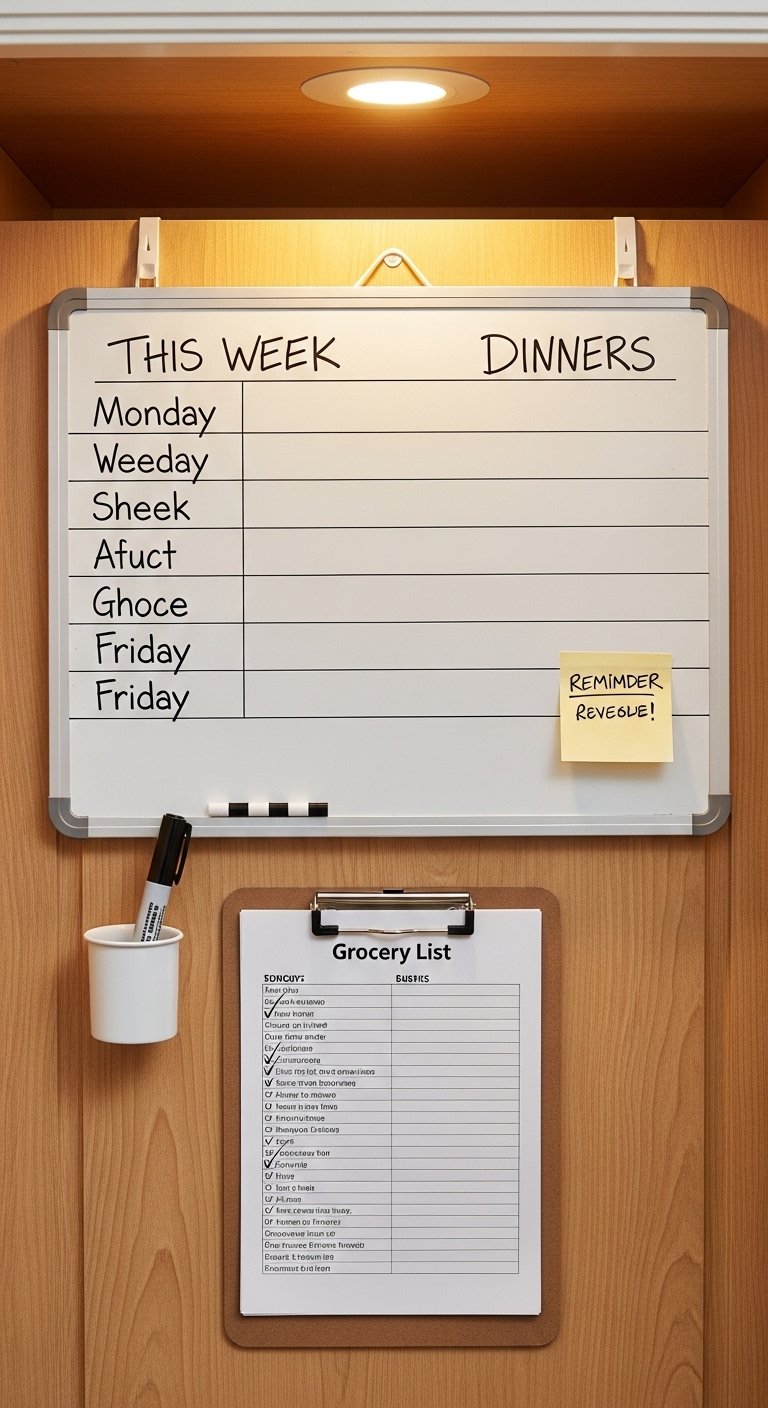
A meal planning station in or beside the pantry connects your food inventory to your weekly cooking plan. It reduces grocery runs, eliminates duplicate purchases, and helps you use what you already have.
A basic meal planning station includes:
- A small whiteboard or chalkboard on the pantry door or wall
- A notepad for ongoing grocery list building
- A folder or clipboard for printed recipes
- A pen on a hook so it never disappears
Write this week’s dinners on the board. When you can see the plan, you cook from the pantry more effectively and order takeout less reflexively. IMO this single habit change saves more money than any container purchase on this list.
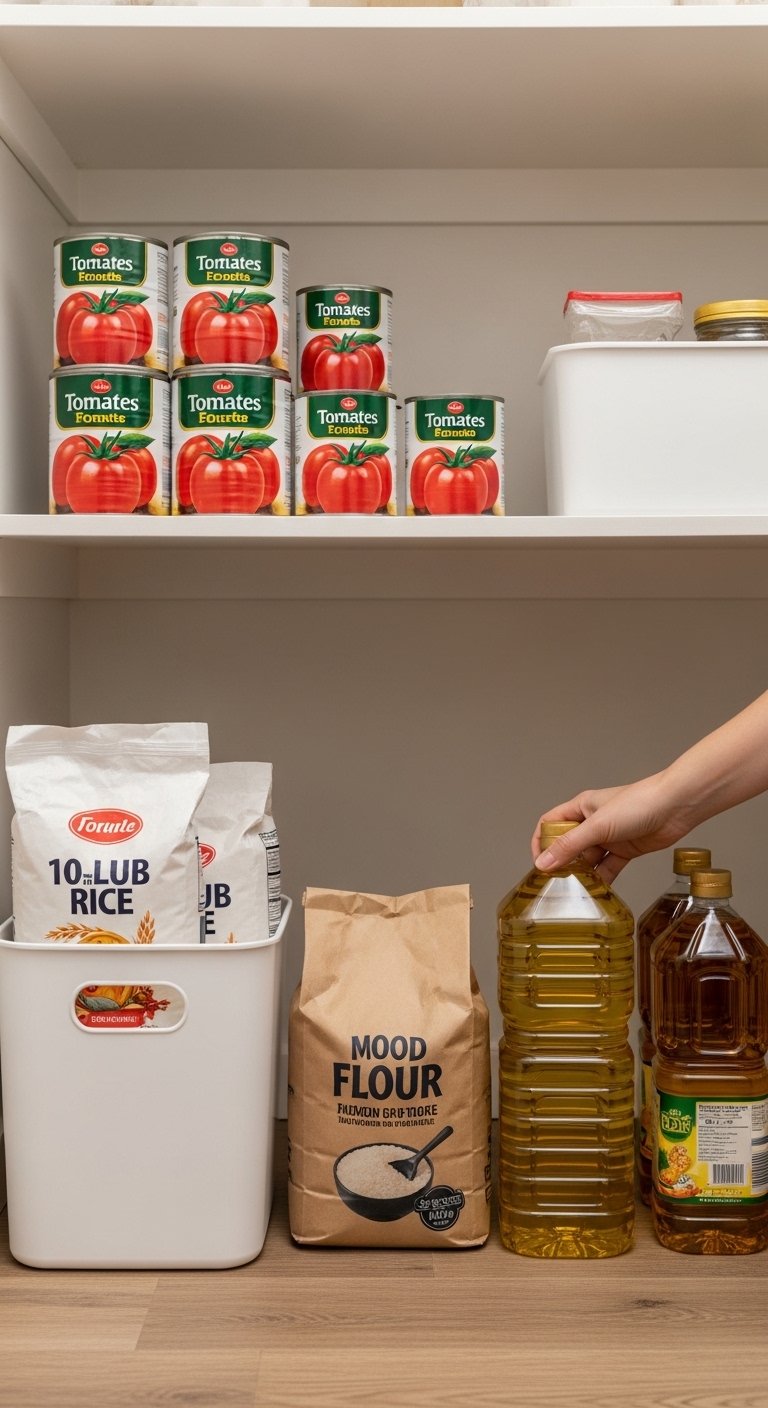
16. Store Heavy Items at the Bottom

This seems obvious. It isn’t practiced nearly as widely as it should be. Heavy items at the top of a pantry create safety hazards, strain your arms every time you access them, and put weight where pantry shelving is structurally weakest.
Heavy items that belong at pantry floor level or on the lowest shelves:
- Large bags of flour, sugar, and rice
- Bulk cooking oils and large vinegar bottles
- Small appliances stored in the pantry
- Heavy canned goods in large quantities
- Pet food stored in pantry-adjacent containers
Light items go high. Heavy items go low. This rule also applies within each shelf: lighter items at the back, heavier at the front where they’re easier to lift out.
17. Add a Chalkboard or Whiteboard to the Pantry
A chalkboard or whiteboard inside the pantry door functions as a real-time inventory and communication tool. When something runs out, it goes on the board. When you plan meals, the board shows what you need.
Uses for a pantry chalkboard or whiteboard:
- Running grocery list visible to the whole household
- Weekly meal plan posted where the food lives
- Reminders about items that are low but not empty yet
- Notes about items with approaching expiration dates
A $20 whiteboard on the pantry door eliminates the “we’re out of X” conversation that happens at the grocery store checkout line every single week for most households.
18. Organize Spices With a Tiered Rack or Drawer Insert
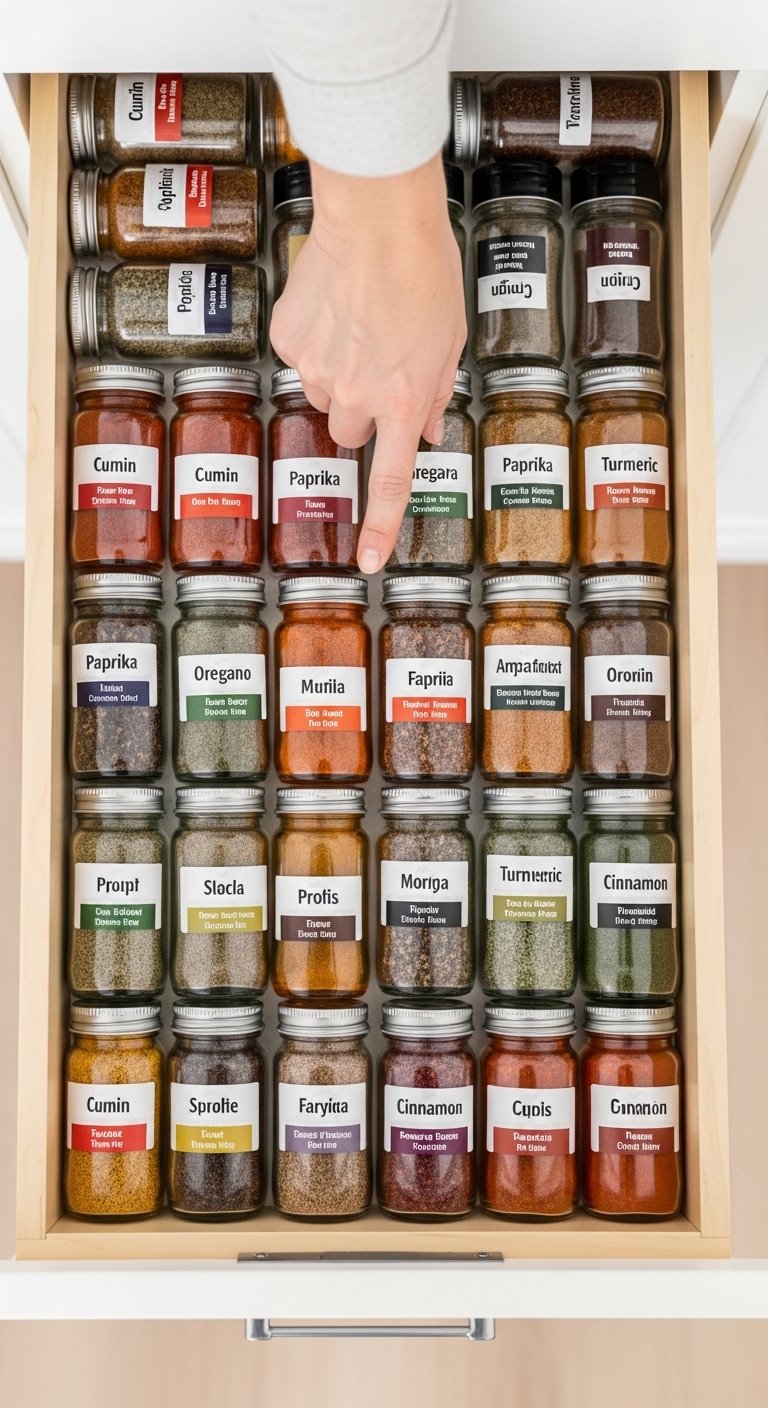
Spices are the most disorganized category in most kitchens. They come in different sized bottles, different brand styles, and they multiply faster than you expect. Without a system, finding the one you need mid-recipe takes longer than it should.
Spice organization options compared:
- Tiered shelf riser: Two or three rows visible at once, works on any shelf
- Spice drawer insert: Lays all spices flat at an angle, labels facing up, fastest access
- Lazy Susan for spices: Spins all bottles to the front, works in deep shelves
- Magnetic door-mounted spice tins: Maximum space efficiency, requires decanting into uniform tins
A spice drawer insert is the most functional option if your pantry has a drawer or you convert one shelf to a pull-out. Seeing every label flat without lifting a single bottle saves real time over months of cooking.
19. Store Produce in Breathable Baskets
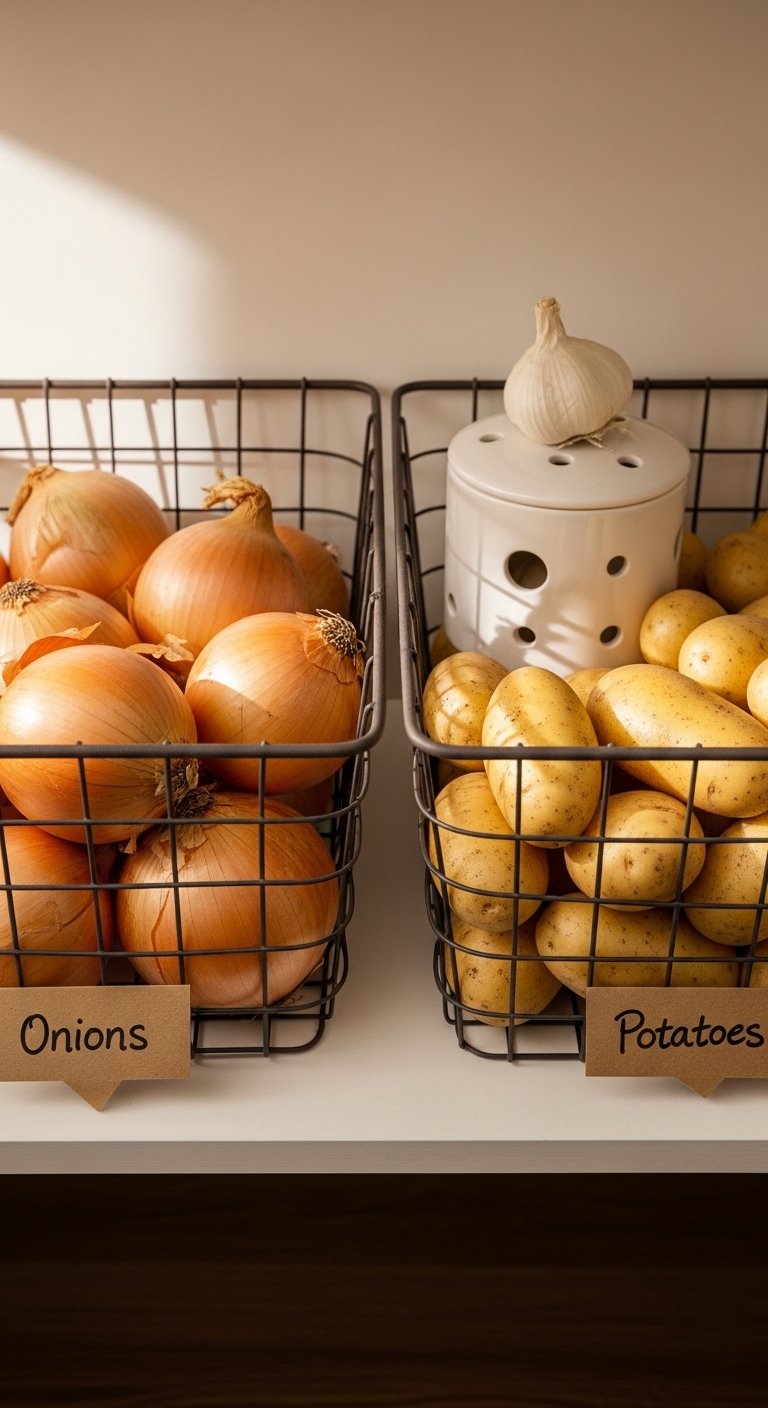
Root vegetables, onions, garlic, and potatoes belong in the pantry rather than the refrigerator. They last longer at room temperature with good airflow. A breathable basket or wire bin on a low pantry shelf handles this correctly.
Produce storage rules in the pantry:
- Keep potatoes and onions separate. They release gases that accelerate each other’s spoilage.
- Use wire or woven baskets for maximum airflow rather than closed containers
- Store garlic in a small open ceramic pot or a mesh bag
- Keep a small amount accessible and store bulk quantities in a cool, dark lower cabinet
Proper produce storage in the pantry extends shelf life by days to weeks compared to refrigerator storage for the wrong items. It also frees up refrigerator space for items that actually need it.
20. Use Over-Shelf Baskets to Create Hidden Storage
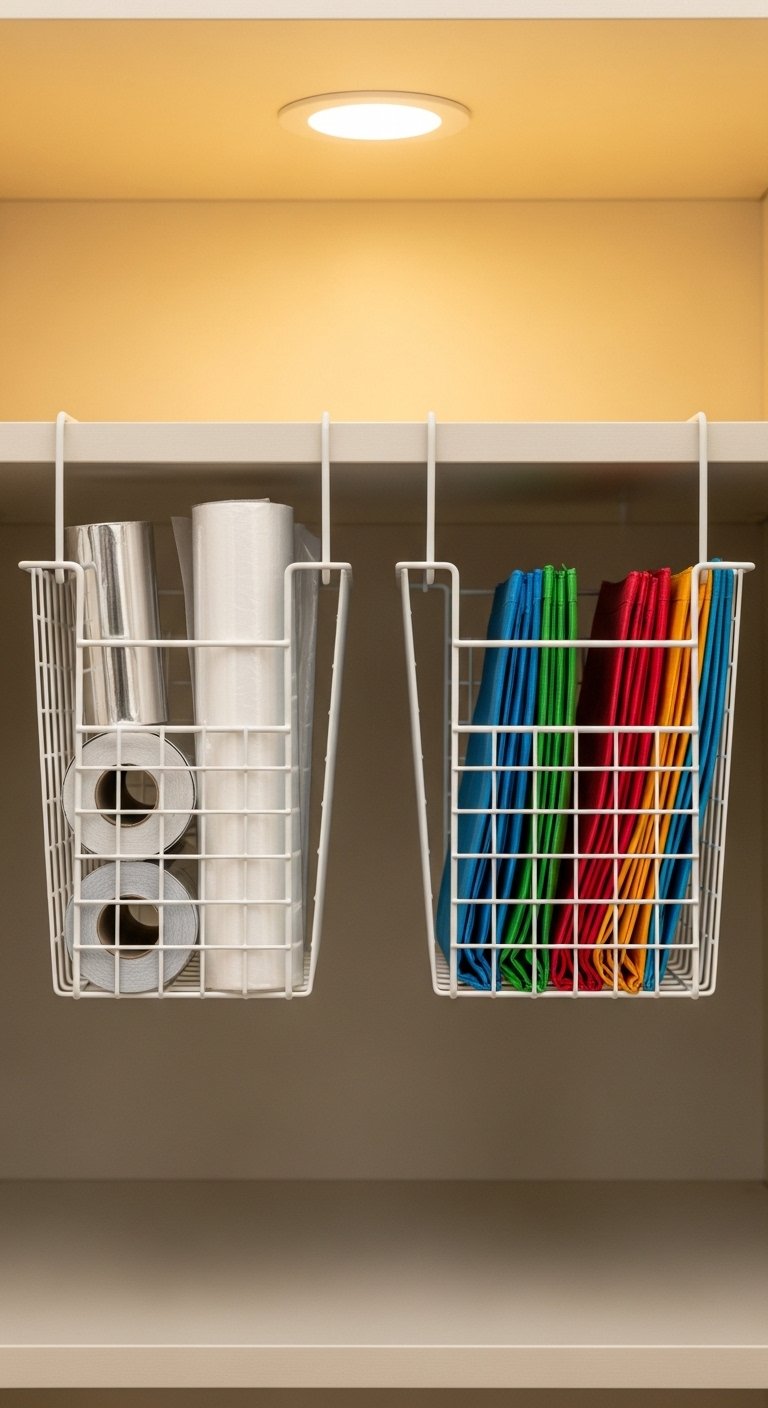
An over-shelf basket clips onto an existing shelf from below and creates a hanging storage zone beneath it. This adds storage without adding shelves, hardware, or any permanent changes.
Best uses for over-shelf hanging baskets:
- Aluminum foil, plastic wrap, and parchment paper rolls
- Snack packets and small flat bags
- Kitchen towels and dish cloths stored in the pantry
- Reusable bags folded flat
- Sauce packets and small condiment packets
Each over-shelf basket costs between $10 and $25 and adds meaningful storage from space that previously held nothing but air. Stack two baskets under one shelf if the clearance allows.
21. Do a Full Pantry Audit Every Three Months
The most beautifully organized pantry in the world reverts to chaos without maintenance. A quarterly audit takes 30 minutes and prevents the slow drift back to disorder that undoes every system you build.
A complete pantry audit includes:
- Remove everything from every shelf
- Check expiration dates and discard anything past its date
- Wipe down all shelves before putting anything back
- Reorganize zones that have shifted or merged incorrectly
- Update labels where contents have changed
- Restock containers that have run low
Schedule the audit on your calendar like any other appointment. An unscheduled audit never happens. A scheduled one takes 30 minutes and keeps your system working for another three months.
Before You Start Organizing
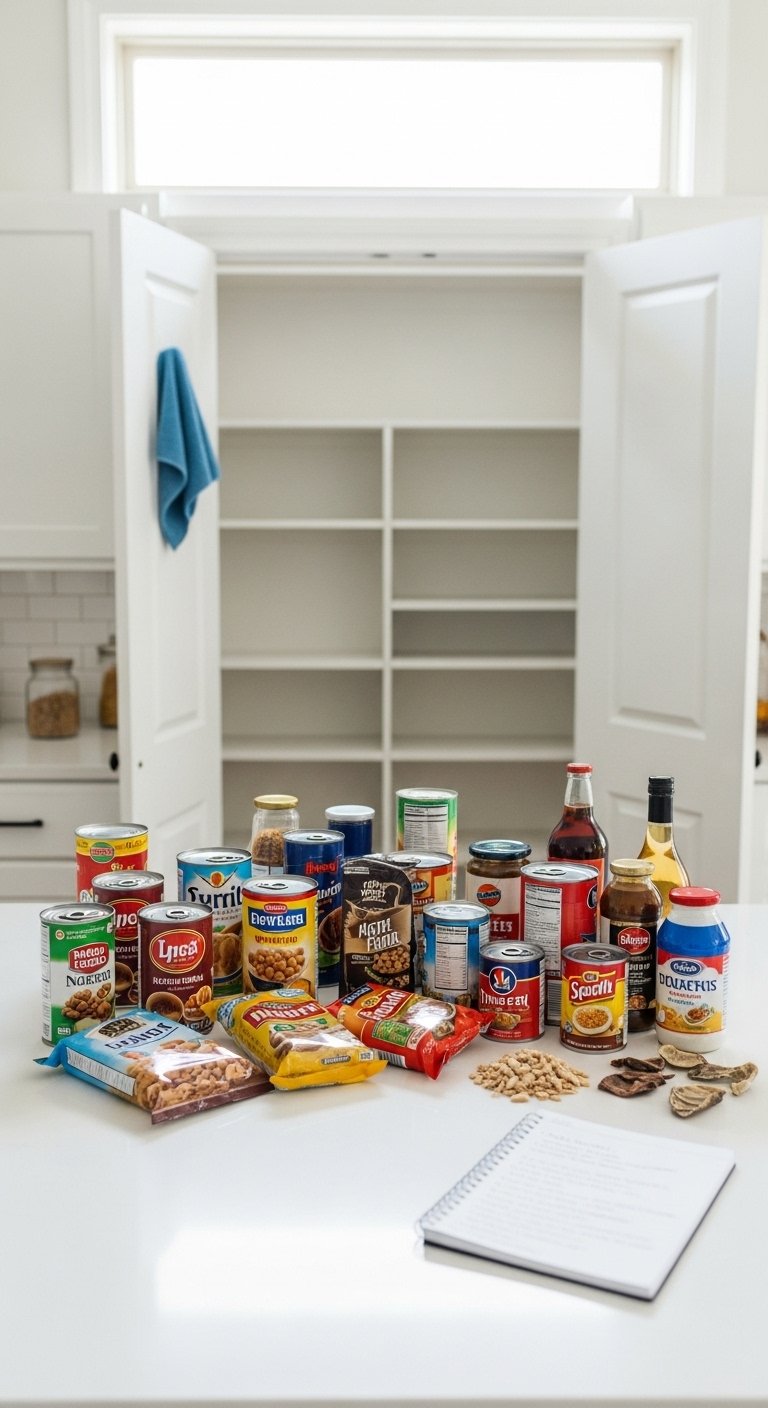
Before buying a single bin or label, do these three things:
- Empty the pantry completely first. You cannot organize around existing chaos. Start from zero.
- Measure your shelves. Depth, width, and height between shelves all determine which containers actually fit.
- Categorize before you contain. Know what you have and how much of each category before purchasing bins and containers sized for the wrong quantities.
- Throw away expired items without guilt. The pantry you’re building has no room for 2022 stock.
- Buy containers in one system. Mixing container brands and shapes creates visual chaos that undermines the whole effort.
Final Thoughts
An organized pantry is not about making your kitchen look good for guests. It’s about removing daily friction from the act of cooking and eating at home.
Every item on this list serves a function. The clear containers show you what you have. The zones reduce search time. The labels put things back in the right place. The quarterly audit keeps the system alive.
Start with three ideas from this list, not all 21. Empty the pantry, categorize what’s in it, and build the system from the ground up. Your future self, standing in the kitchen at 6pm trying to figure out dinner, will genuinely thank you.
Even if the pantry looked like a crime scene yesterday.