25 Outdoor Pergola Ideas to Create Your Dream Backyard
You look at your backyard and see wasted potential. A pergola fixes that faster than almost any other outdoor structure, and you don’t need a contractor or a $10,000 budget to make it happen. I built my first freestanding pergola over a weekend with $400 in lumber and a drill. It became the most-used spot in my entire yard within two weeks. Whether you want a shaded dining area, a plant-covered retreat, or a full outdoor living room, a pergola delivers structure, shade, and style in one shot. Here are 25 ideas that work for real budgets and real backyards.
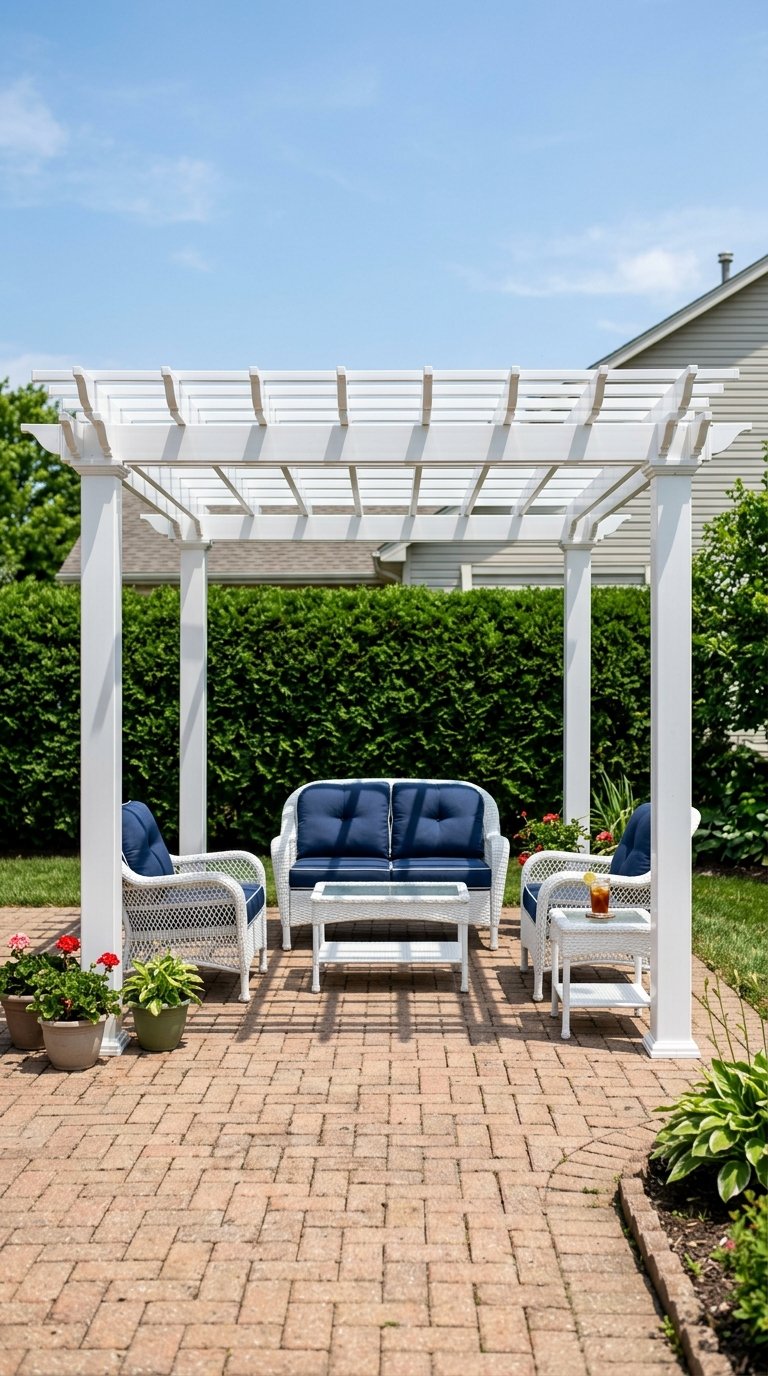
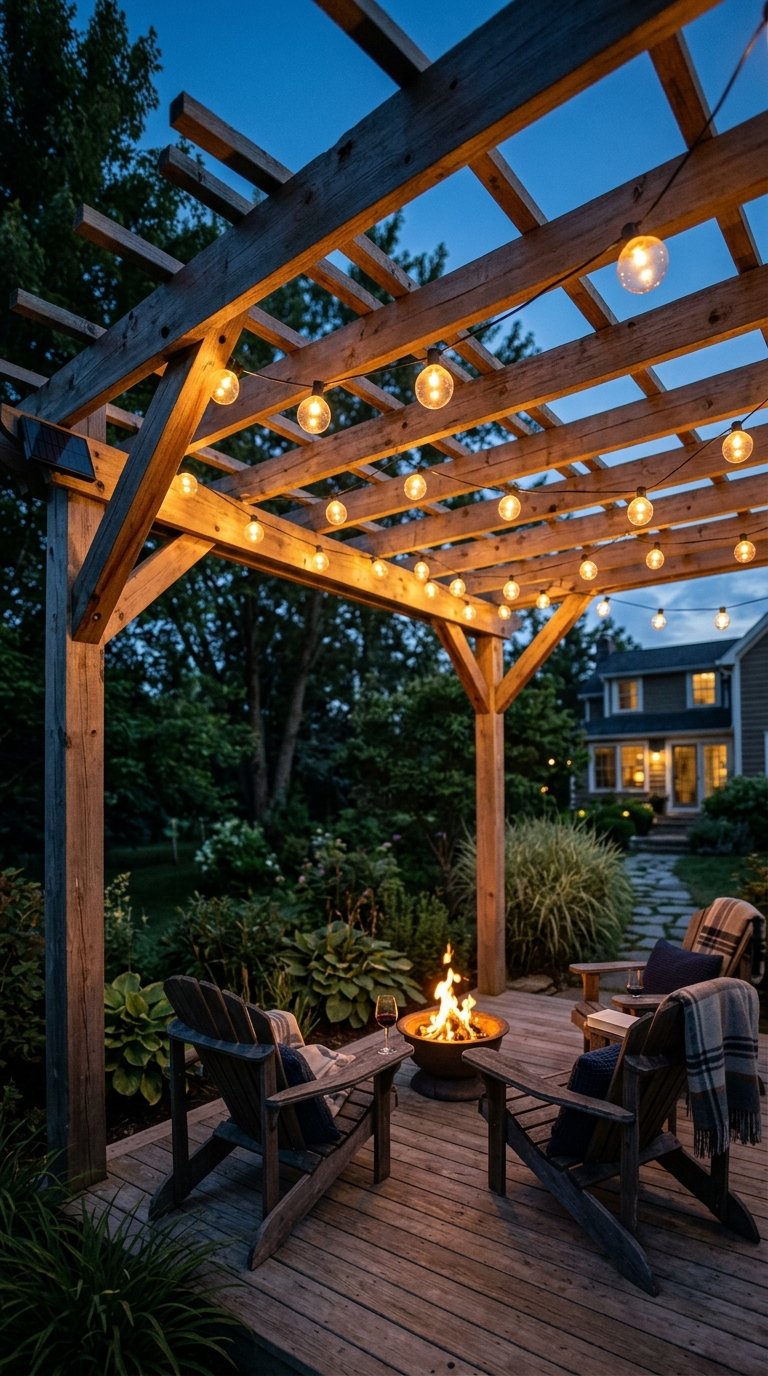
1. Build a Simple Freestanding 4-Post Pergola
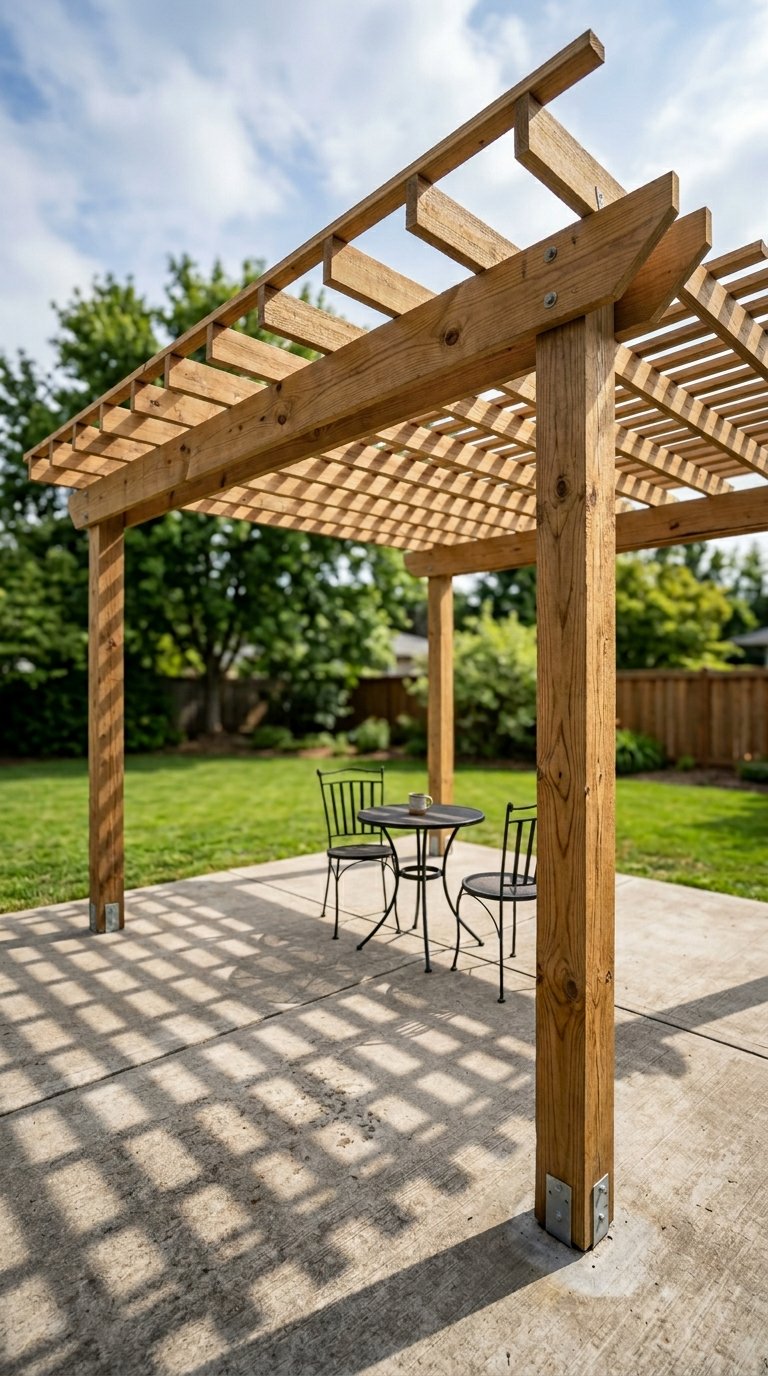
A four-post freestanding pergola is the foundation of every backyard transformation, and you build one for under $500 in materials from any home improvement store. The design works because it needs no wall attachment, no permits in most municipalities, and no professional installation.
What You Need to Build It
- Four 4×4 or 6×6 pressure-treated posts, 8 to 10 feet tall
- Two 2×8 beams running the length of the structure
- 2×6 rafters spaced 16 to 24 inches apart across the top
- Post base anchors to secure posts without digging concrete footings
A 10×12 freestanding pergola built with pressure-treated pine costs roughly $350 to $500 in lumber. Cedar costs more at $600 to $800 but resists rot and insects without any staining or sealing for years. Pick cedar if you want a low-maintenance build you don’t think about again for a decade.
2. Attach a Lean-To Pergola to Your House
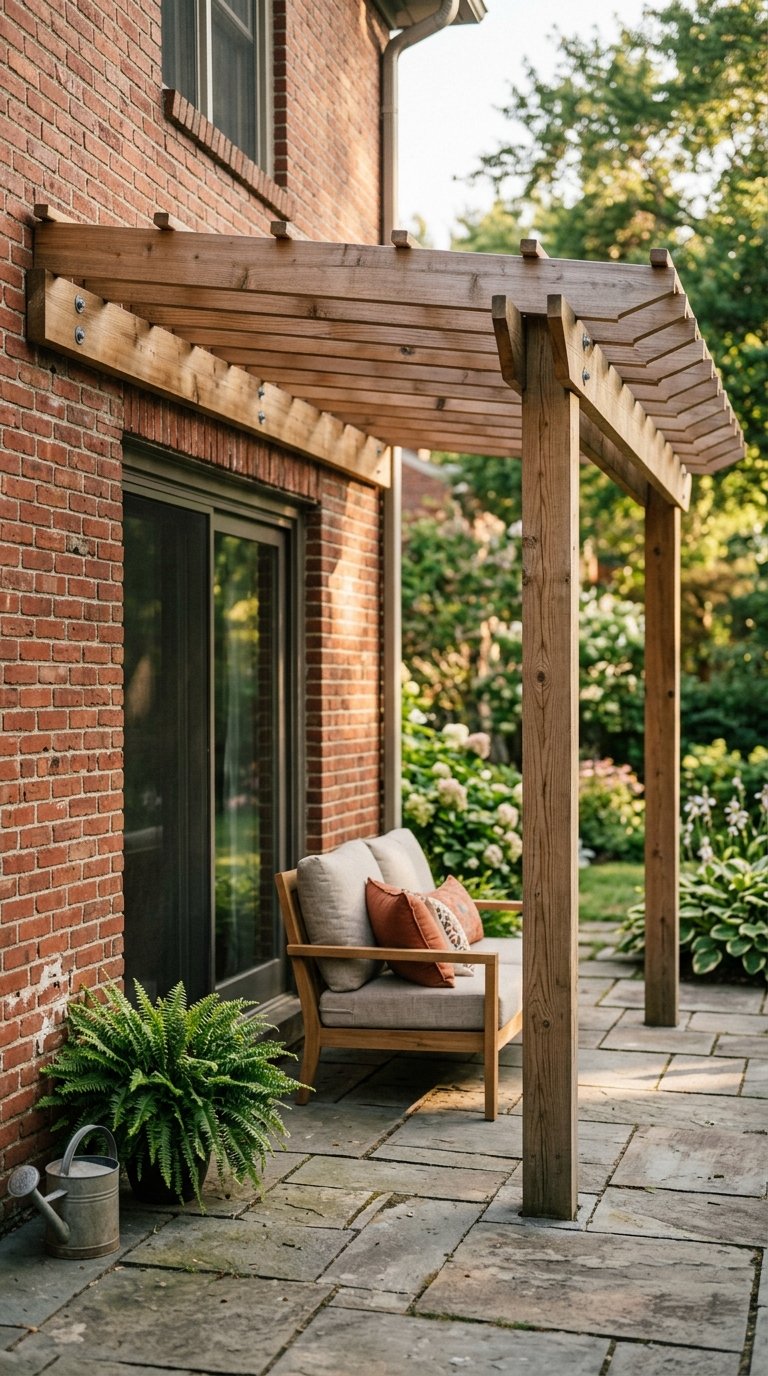
A lean-to pergola attaches directly to your home’s exterior wall, which means you only need two posts instead of four and cut your material cost almost in half. The structure shares your home’s wall as one side, so the build time drops to a single afternoon.
Why This Design Works for Small Yards
- Uses dead space directly outside a back door or sliding glass door
- Creates a covered transition zone between indoors and outdoors
- Requires only a ledger board attachment to the house, no foundation work
Attach the ledger board into wall studs with 3-inch structural screws, not just into siding. This is the one step where most DIYers cut corners and regret it. A properly anchored ledger holds a pergola through years of wind, snow load, and added features like string lights or climbing plants.
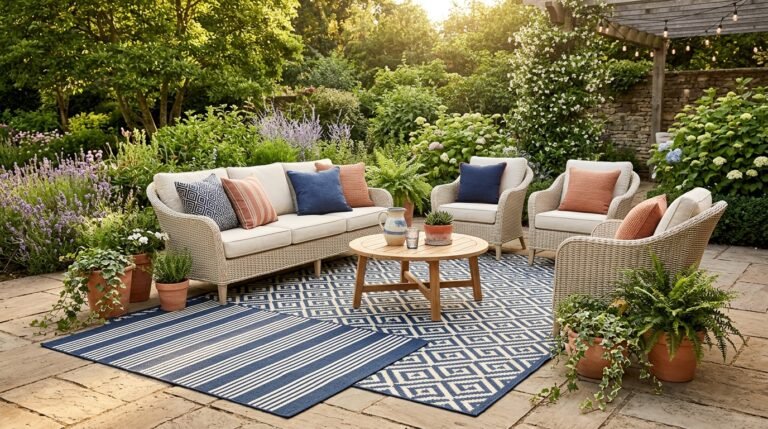
3. Add a Retractable Canopy for Instant Shade Control
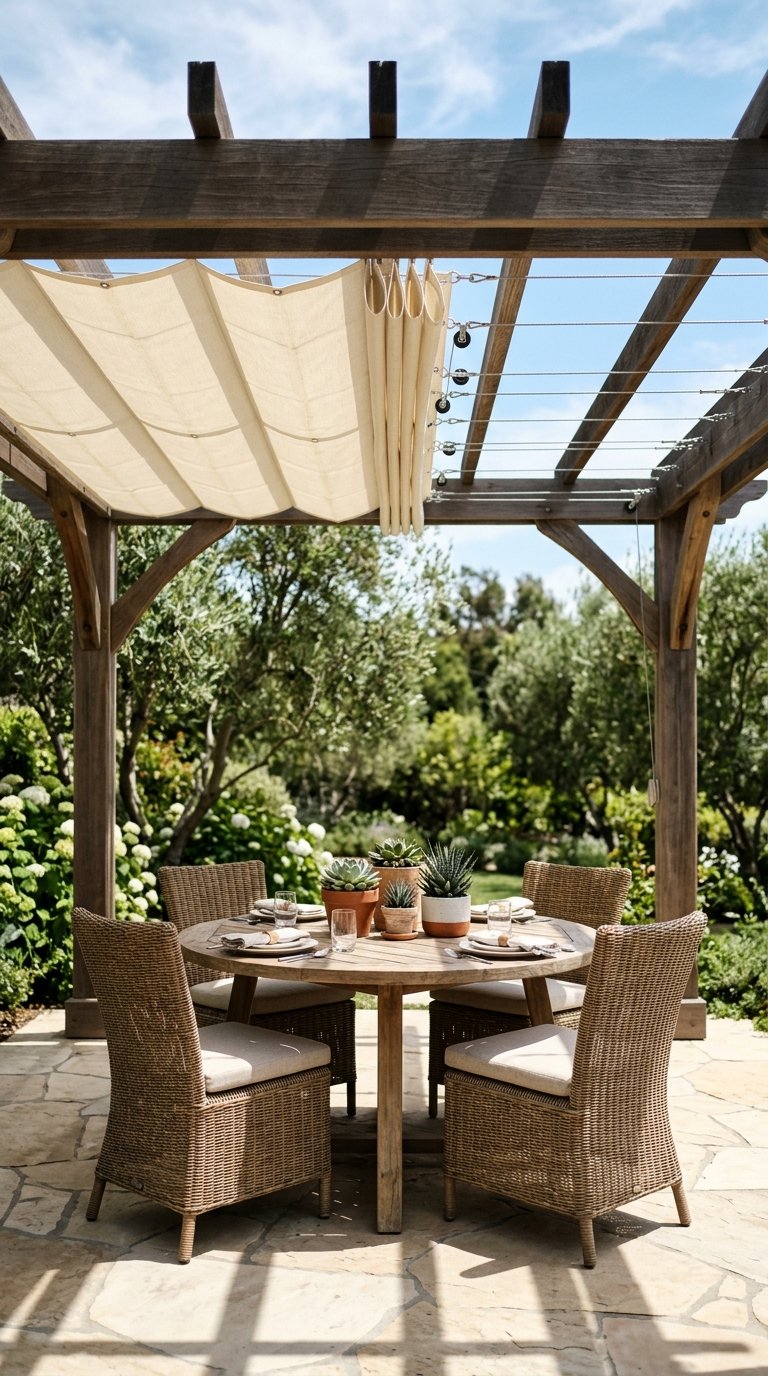
A basic pergola gives you filtered shade from the rafter gaps. A retractable shade canopy fabric between the rafters gives you full sun control on demand. You pull it open on cool days and close it when the afternoon sun turns your patio into an oven.
Outdoor shade sail fabric or pergola canopy replacement panels from brands like Coolaroo or Shade&Beyond run $30 to $80 depending on size. They attach with grommets and S-hooks directly to your existing rafters with zero modification to the structure. IMO, this is the single most cost-effective upgrade you add to any pergola after it’s built.
4. Build a Pergola Over an Existing Concrete Patio
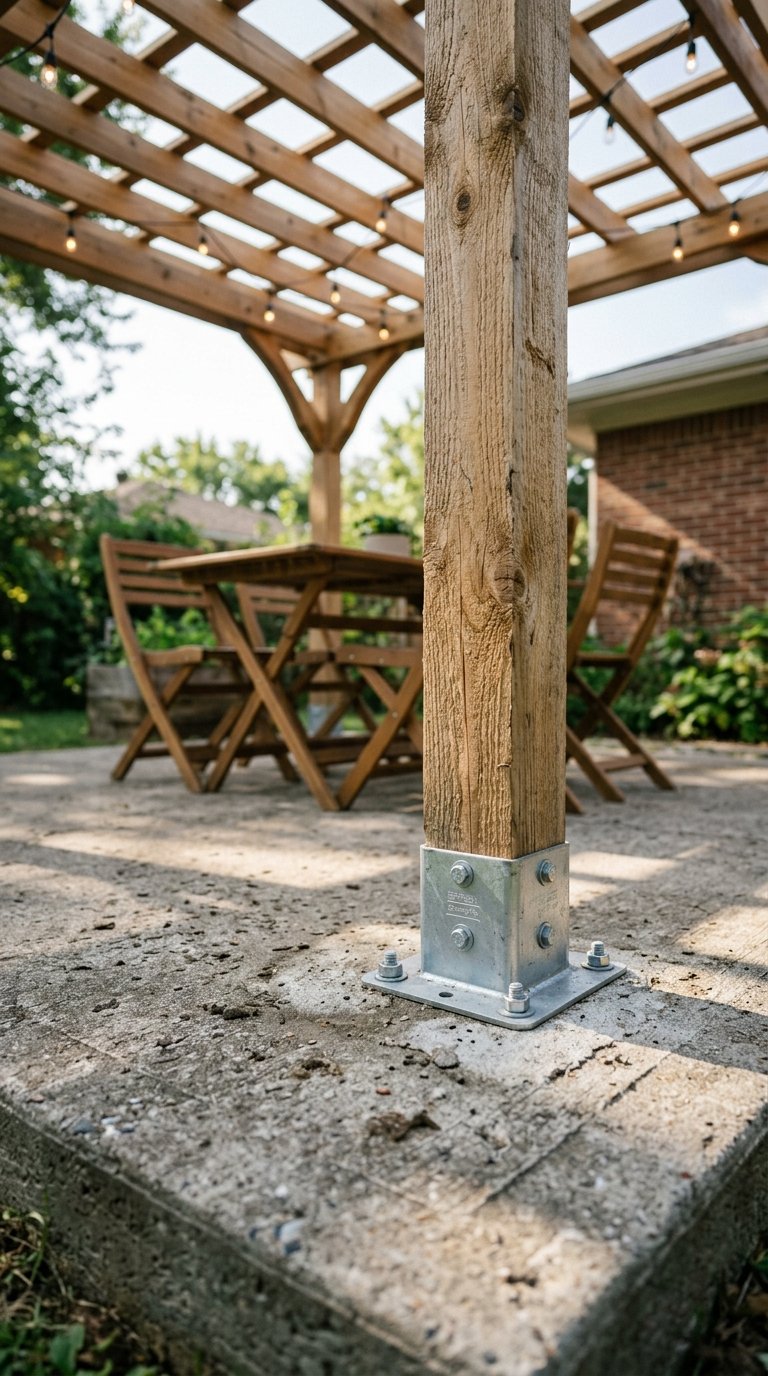
Your concrete patio is already the foundation. Post base anchors bolt directly into concrete with expansion bolts, which means you skip digging, pouring footings, or renting equipment entirely. Simpson Strong-Tie post bases rated for outdoor use cost about $12 each and handle everything a 6×6 post throws at them.
A 12×14 pergola over an existing concrete slab takes one person a full day or two people about four hours. The concrete does the structural work. You focus on building upward, not downward. This approach works for renters in some situations too if the landlord approves surface-mount hardware.
5. Use Vinyl Pergola Kits to Skip the Cutting
Vinyl pergola kits come pre-cut, pre-drilled, and ready to bolt together without a single saw cut. Brands like Palram and New England Arbors sell complete kits in the $400 to $900 range that two people assemble in a day.
Vinyl won’t rot, won’t splinter, and never needs painting or staining. The tradeoff is that vinyl looks slightly less natural than wood, and you can’t customize the dimensions beyond what the kit offers. If your patio is a standard size (10×10, 10×12, 12×14), a vinyl kit is honestly the smartest budget move on this list.
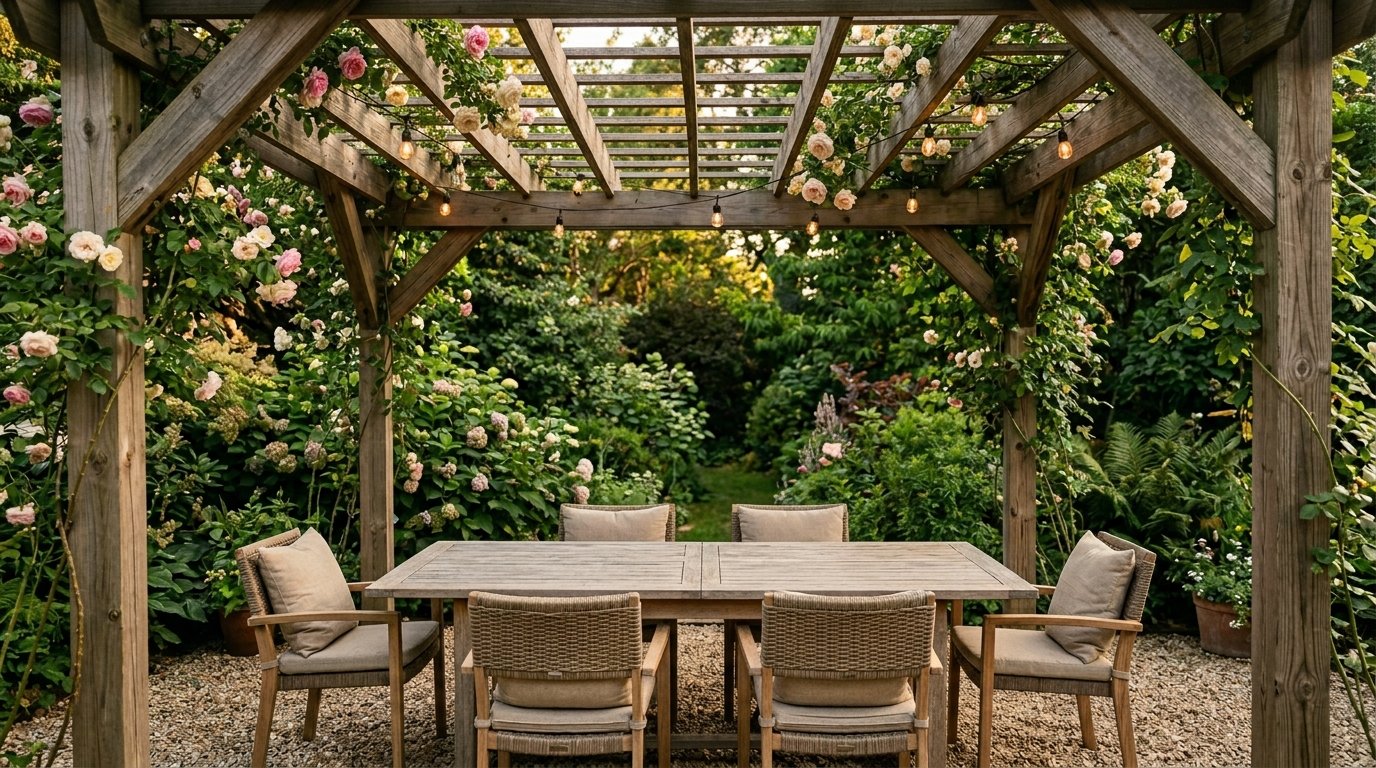
6. Grow a Living Roof With Climbing Plants

Train climbing plants up your pergola posts and across the rafters and within one growing season you get a dense, living canopy that provides more shade than any fabric cover. Wisteria, climbing roses, trumpet vine, and fast-growing clematis all work brilliantly for this.
Best Climbing Plants by Growth Speed
- Wisteria: grows 10 feet per season, extremely dense canopy
- Clematis: grows 6 to 8 feet per season, lower maintenance
- Trumpet vine: grows 25 to 40 feet per season, native to North America and attracts hummingbirds
- Climbing roses: slower at 3 to 5 feet per season but gives you flowers and fragrance
Attach garden twine or wire mesh to the posts and rafters before planting. The plants need something to grab. This living canopy approach costs $20 to $60 in plants and creates a pergola feature that looks like it belongs in a magazine.
7. Create a Pergola Dining Room Outside
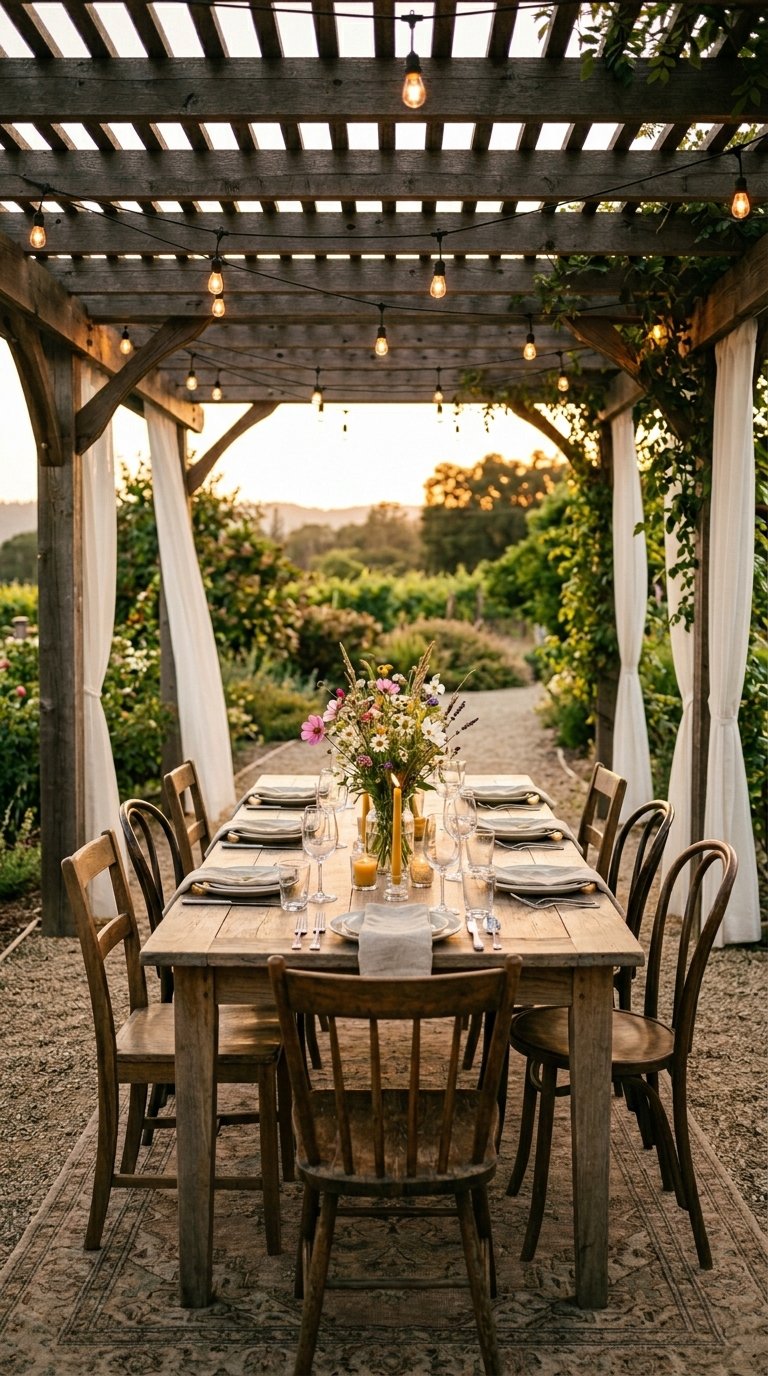
Position your pergola directly over your outdoor dining table and treat it like a dedicated outdoor dining room with walls you haven’t built yet. Add string lights overhead, hang a small pendant light from the center rafter, and suddenly your backyard has a room.
A 10×10 pergola fits a 6-person rectangular dining table with comfortable clearance on all sides. Add outdoor curtain panels on two sides using tension rods or curtain wire, and you block wind and afternoon glare without enclosing the space permanently. The whole setup from pergola to table to lights runs $600 to $900 if you build it yourself and shop smart.
8. Build a Pergola Around Your Hot Tub
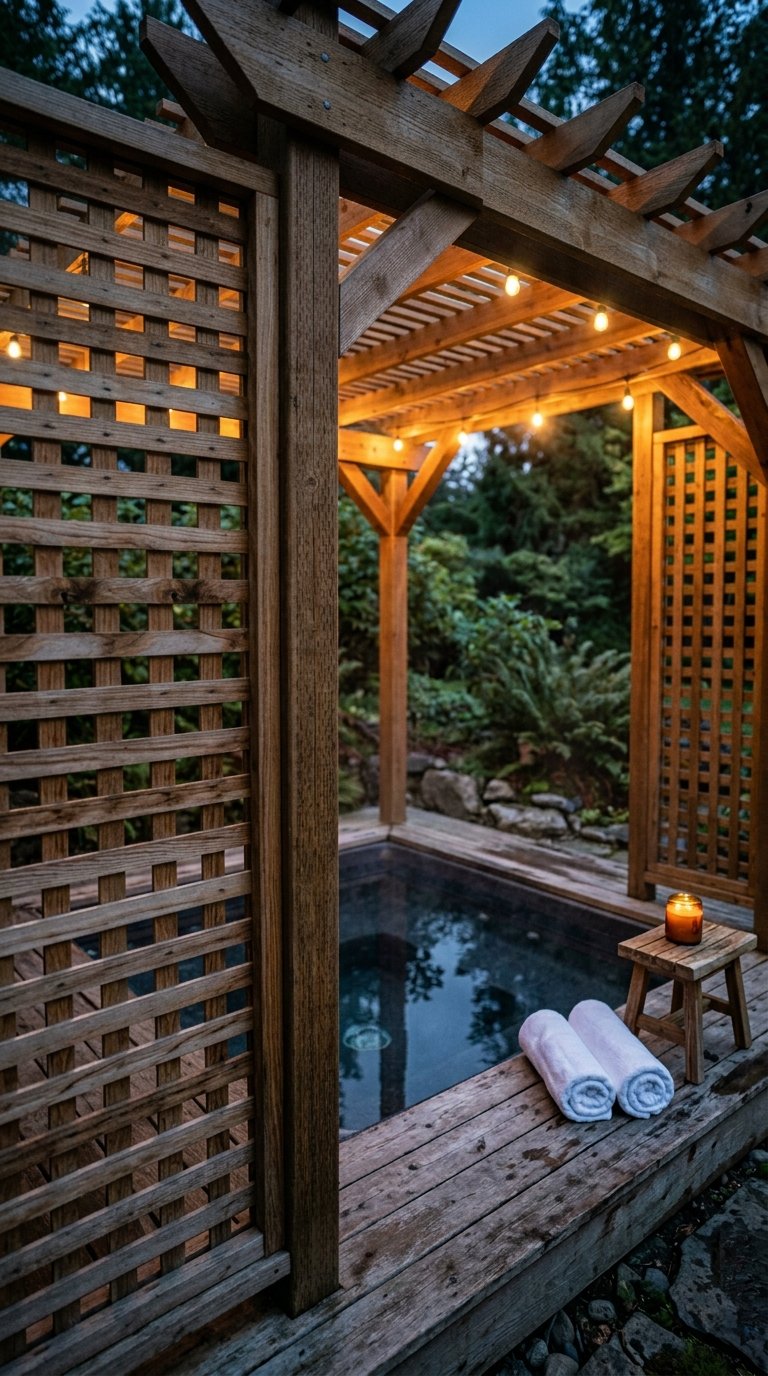
A hot tub sitting in the open is fine. A hot tub inside a pergola is a private outdoor retreat. The structure provides overhead coverage for light rain, blocks sightlines from neighbors, and gives you anchor points for curtains, string lights, or lattice privacy screens.
Build the pergola with 6×6 posts at least 2 feet outside the hot tub perimeter so you have room to step out comfortably. Use pressure-treated lumber for everything near the water, and seal all cut ends before assembly. A hot tub pergola with lattice side panels on two sides costs around $700 to $1,000 in materials and looks like a purpose-built spa structure.
9. Add Outdoor Curtains for Privacy on a Budget
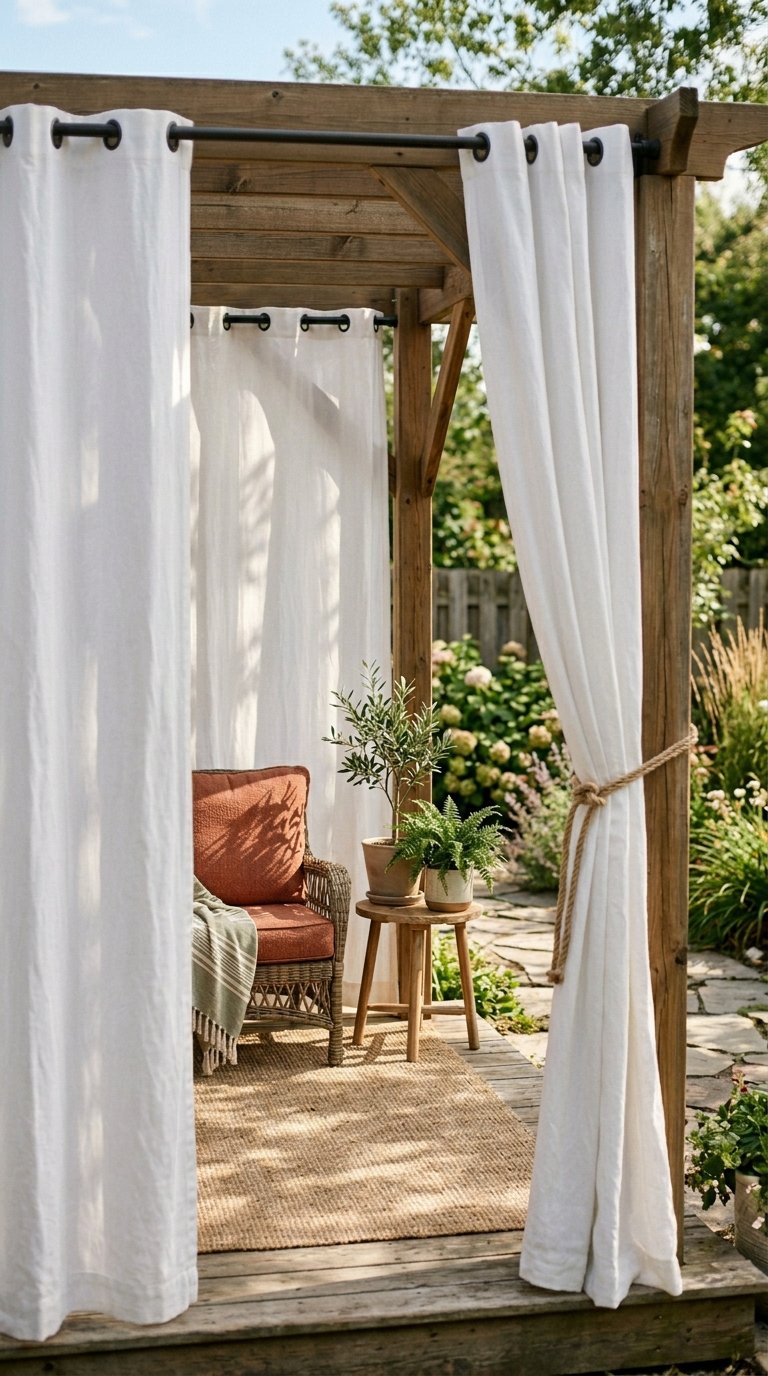
Outdoor curtain panels solve the privacy problem without building solid walls. IKEA’s HILJA curtain panels in outdoor-safe fabric cost $15 per pair. Hang them from a curtain wire or tension rod strung between pergola posts and you get movable privacy screens that cost a fraction of lattice or fence panels.
Choose curtain fabrics rated for outdoor use. Regular indoor curtains mildew, fade, and fall apart in one season outside. Sunbrella fabric panels cost more at $40 to $80 per panel but last five to seven years in direct weather without losing color or structure.
10. Install a Pergola Over Your Deck
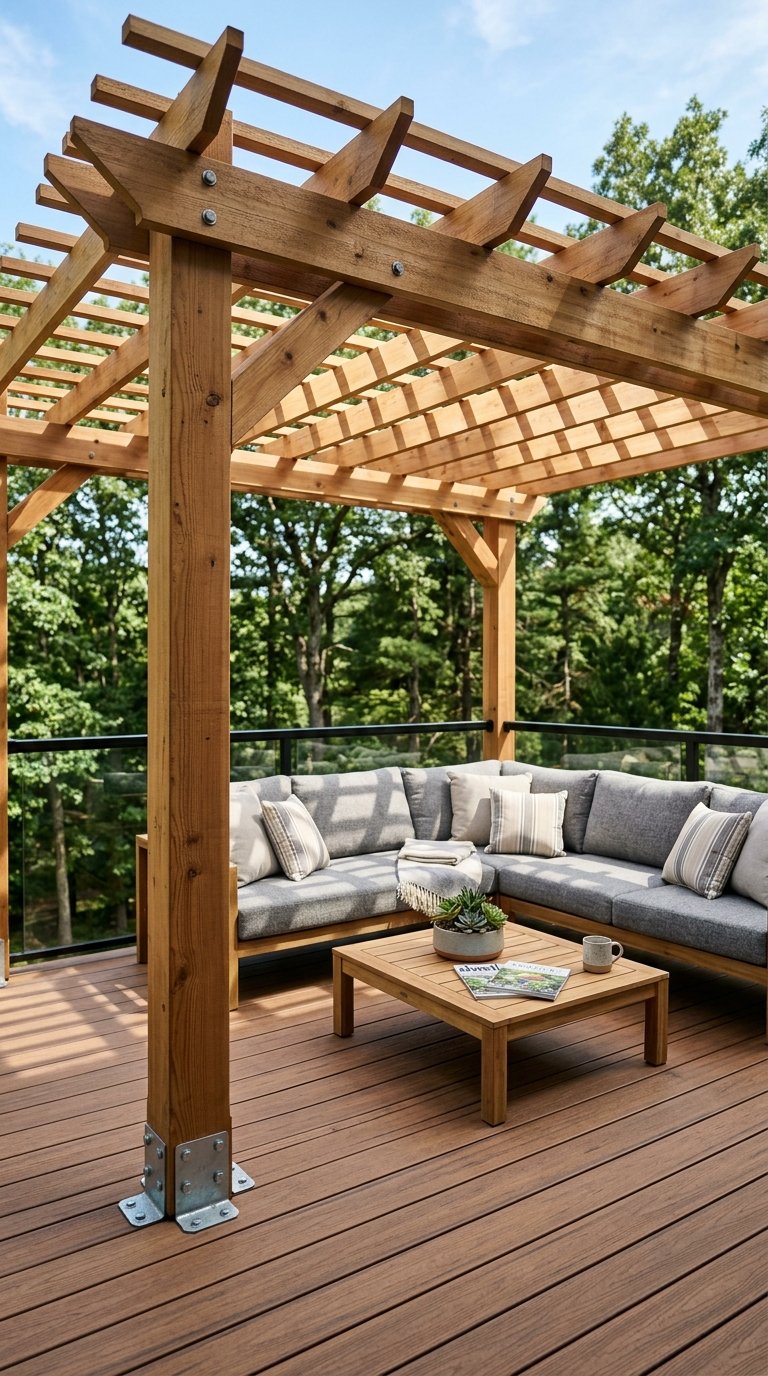
A deck-mounted pergola uses your existing deck structure as the foundation, which removes the need for independent post footings entirely. You bolt post bases directly into deck joists through the decking surface for a rock-solid connection.
This works best on decks with 2×8 or larger joists that handle the added load without reinforcement. Consult a structural engineer if your deck is older or you’re unsure of the joist sizing. The $100 to $200 consultation fee saves you from a collapsing structure and a much larger repair bill later.
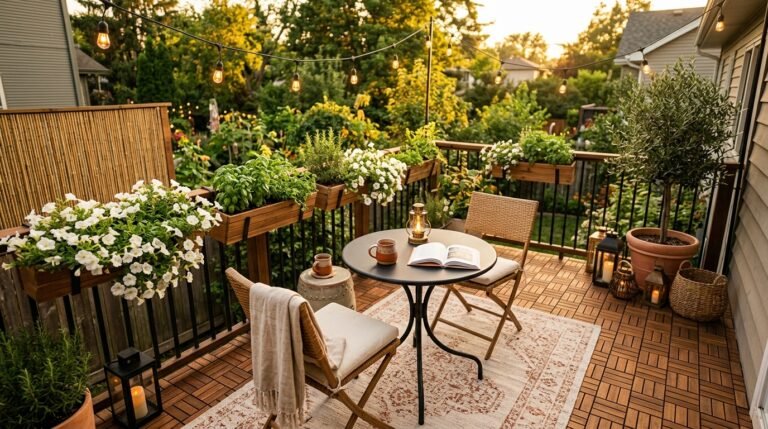
11. Build a Small Pergola for a Side Yard
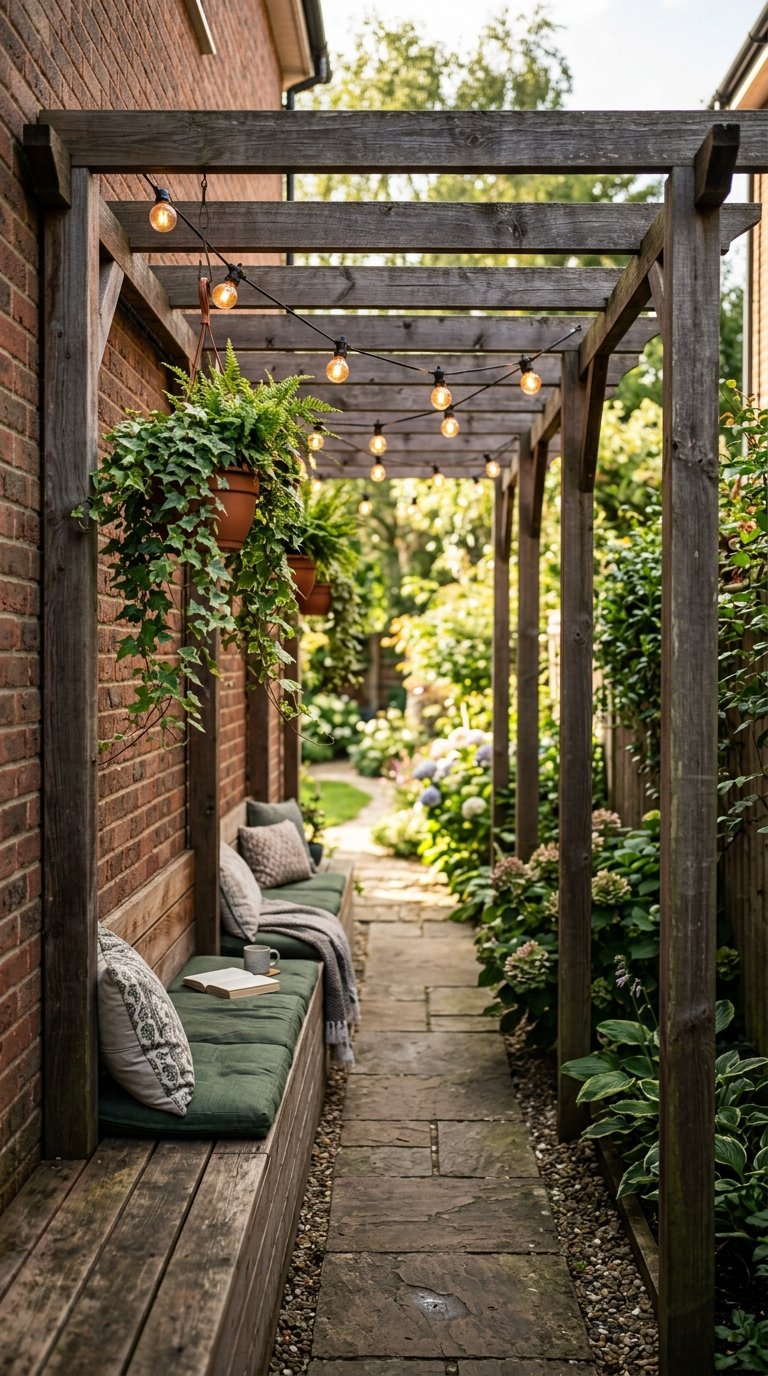
Most homeowners forget about the side yard completely. A narrow 6×10 or 8×12 pergola turns a forgotten side passage into a functional outdoor space. Add a bench along one wall, hang some planters, and string lights overhead, and you have a private garden corridor that most guests won’t even know exists.
Side yard pergolas work especially well for townhouses and urban homes where backyard space is limited. The narrow footprint fits in spaces as tight as 6 feet wide. Use a lean-to design on the house side to reduce the width requirement even further.
12. Try a Metal Pergola Kit for Maximum Durability
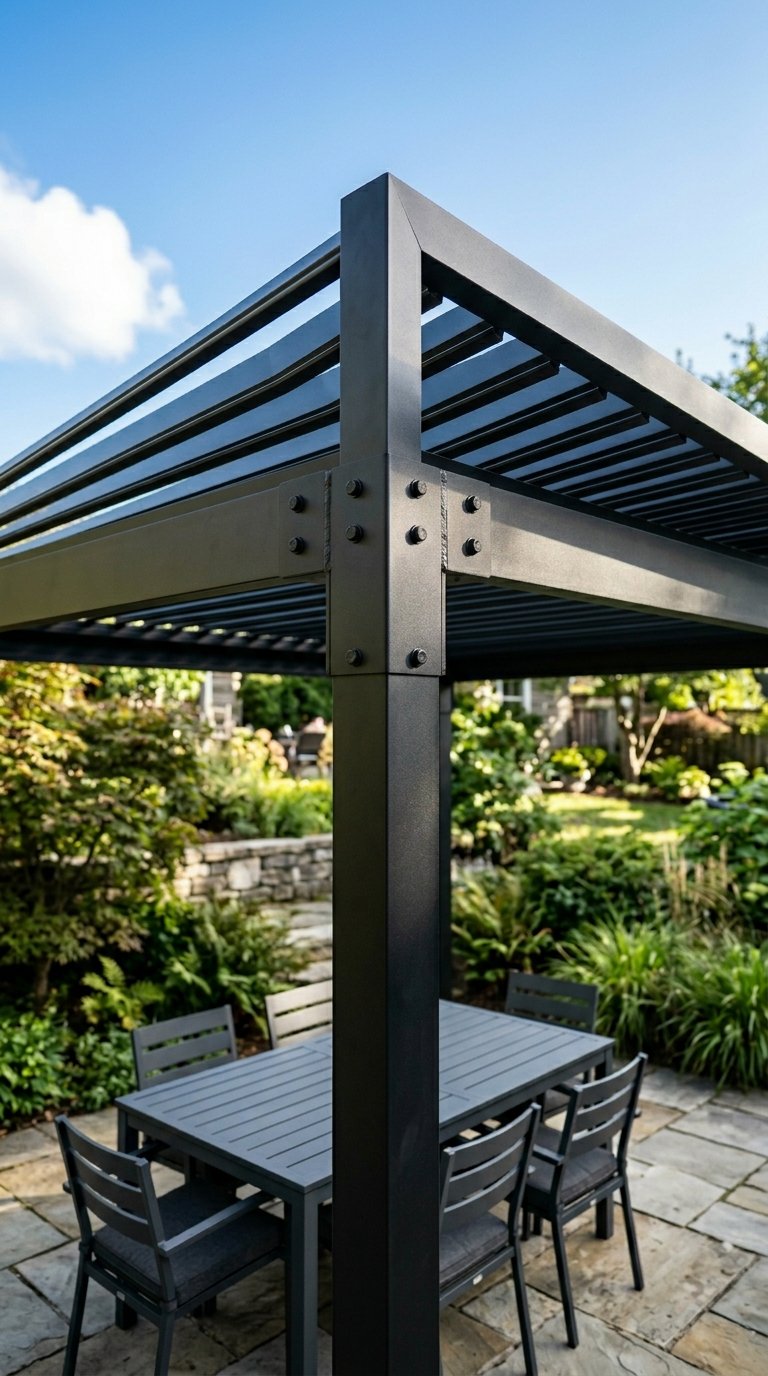
Steel and aluminum pergola kits outlast wood by decades without the rot, insect damage, or annual sealing that wood requires. Brands like Yardistry and VITA Outdoor offer powder-coated aluminum pergola kits in the $500 to $1,200 range that go up in a day and handle everything weather throws at them.
The visual difference between aluminum and wood is minimal from 10 feet away, especially once you add plants, lights, and fabric. If you’re building something you want to last 20 years without maintenance headaches, a metal kit is worth the higher upfront cost.
13. Add a Corrugated Metal Roof for Full Rain Coverage
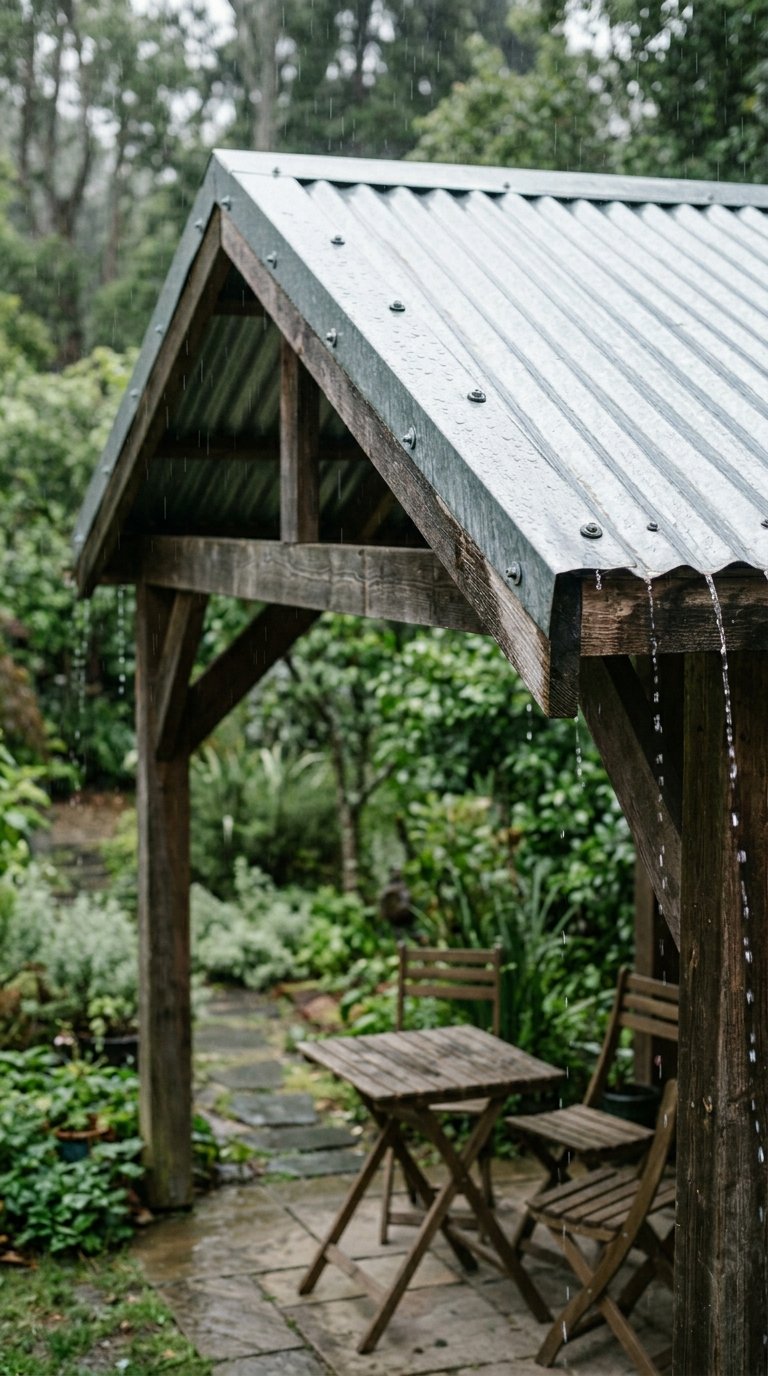
Corrugated metal roofing panels on a pergola turn an open structure into a fully weather-protected outdoor room. Home Depot sells corrugated metal roofing panels for $20 to $35 each, and a 10×12 pergola needs six to eight panels to cover completely.
Screw the panels directly into your existing rafters with self-tapping roofing screws and rubber washers to seal each penetration. Slope the panels slightly (at least 1 inch of drop per 12 inches of run) so rain sheds off the edge rather than pooling. This upgrade costs $150 to $250 in materials and extends your outdoor season by months.
14. Create a Pergola Bar and Entertainment Zone
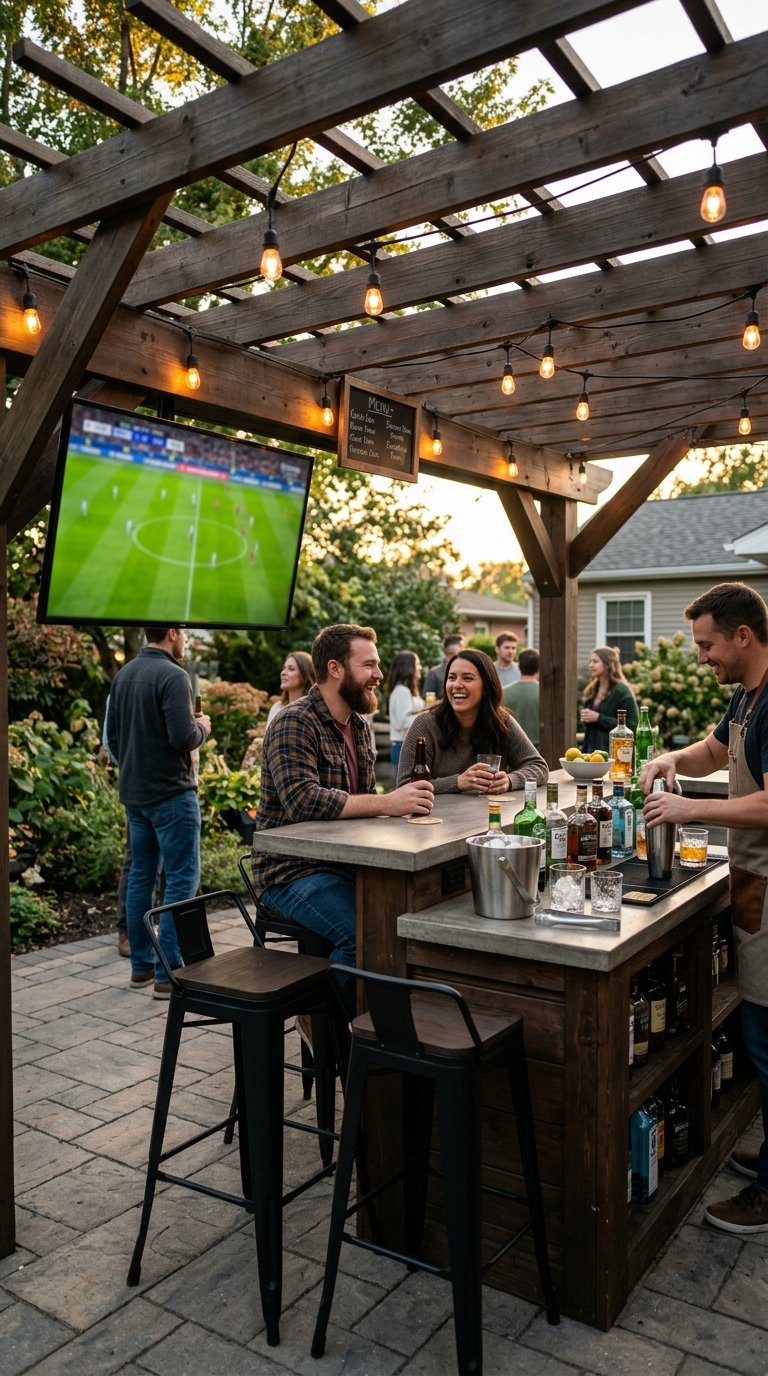
Build your pergola around a bar counter and entertainment setup and your backyard becomes the gathering spot every summer weekend. A simple bar counter runs along one side of the pergola at 42 inches height (standard bar height), with a pergola-mounted TV bracket on the opposite side for game days.
Outdoor-rated TVs from brands like SunBriteTV start at $700, but a standard indoor TV inside a weatherproof outdoor TV enclosure from Amazon costs under $100 and works in covered spaces. The pergola handles the coverage. The enclosure handles the weather. Your outdoor bar handles the rest.
15. Build a Pergola With a Built-In Planter Box
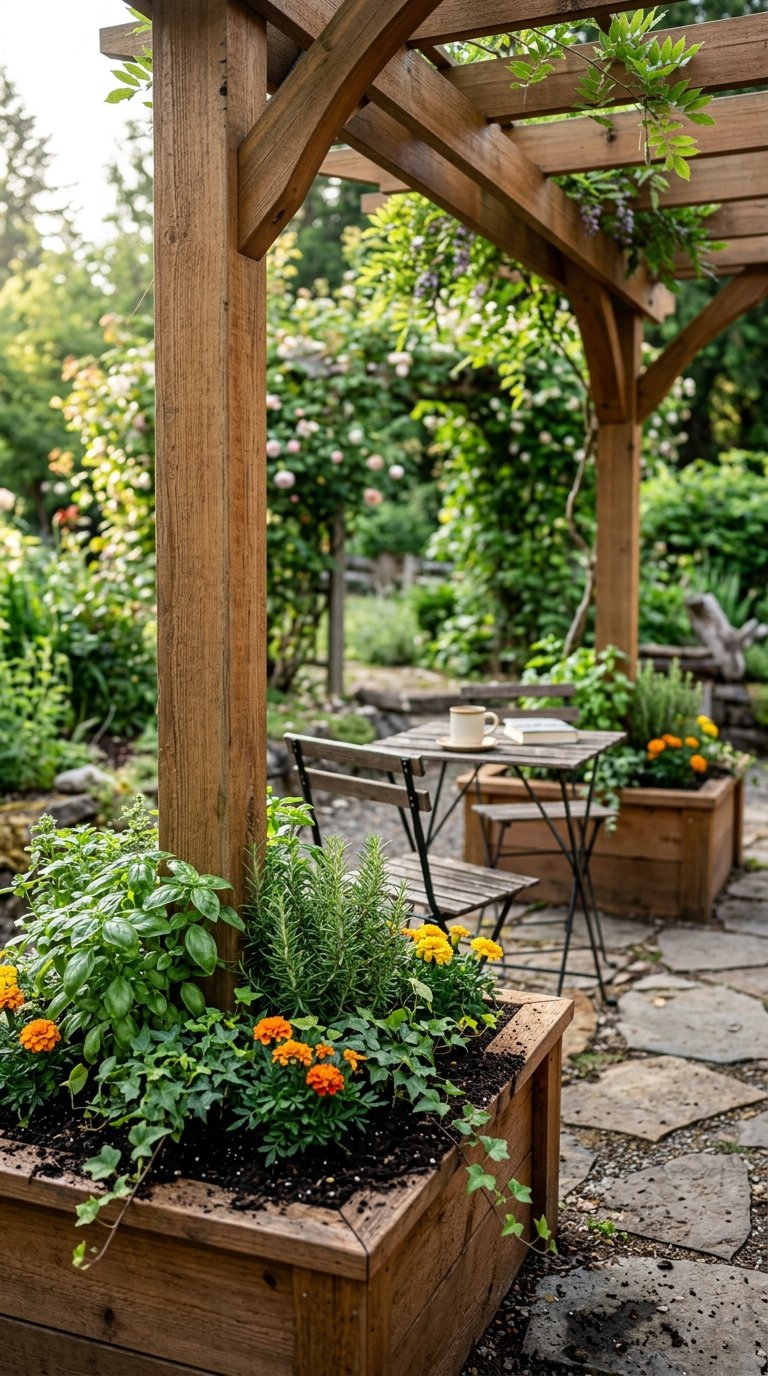
Planter boxes integrated into the pergola base posts anchor the structure visually and let you grow herbs, flowers, or trailing plants directly from the pergola frame. A simple planter box built around two base posts costs $40 to $60 in lumber and takes a few hours to build.
Line the planter boxes with landscape fabric before filling with soil to prevent moisture damage to the wood posts. Fill them with herbs for a functional kitchen garden, trailing ivy for a lush, green base, or flowering annuals to add seasonal color without spending more than $30 per season on plants.
16. Add a Ceiling Fan to Keep Air Moving
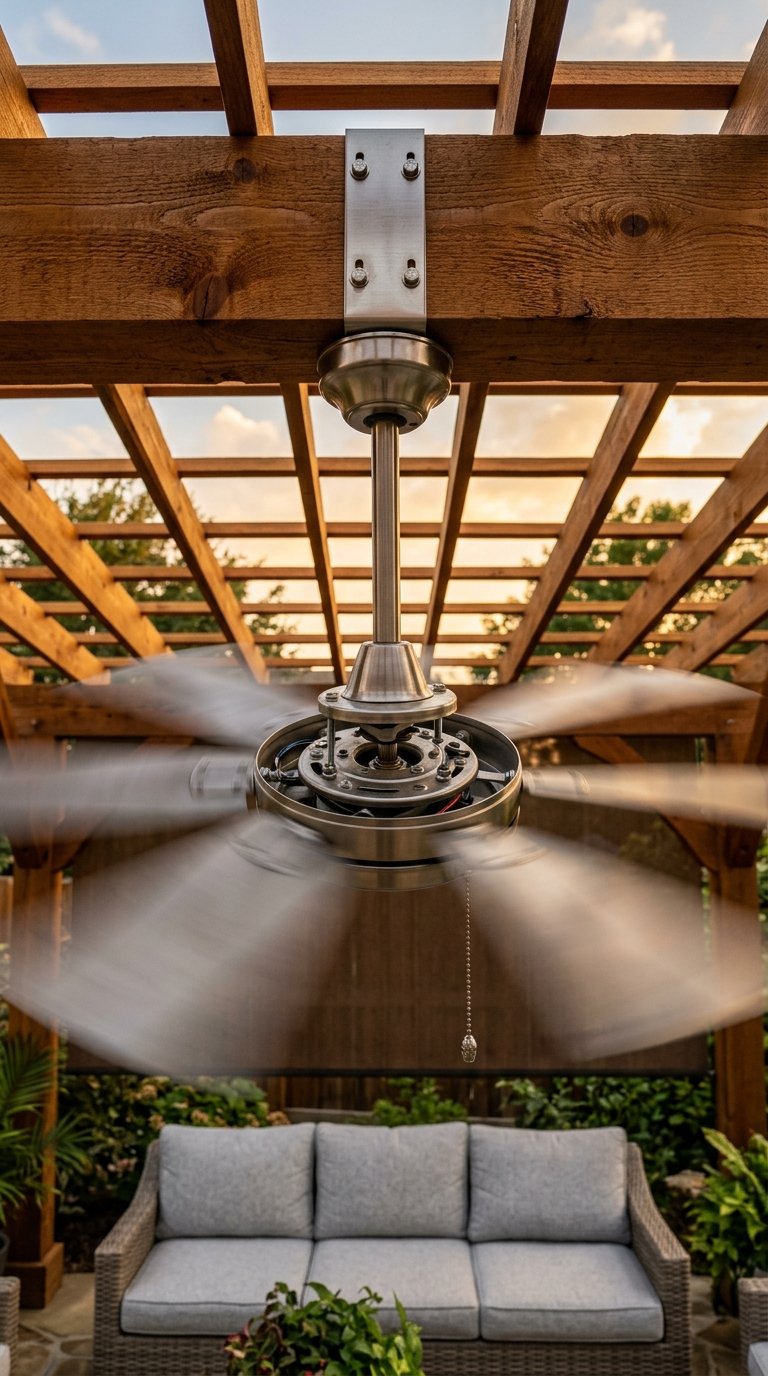
A pergola-mounted outdoor ceiling fan makes a shaded outdoor space genuinely comfortable even on humid days when shade alone isn’t enough. Hunter and Harbor Breeze both make outdoor-rated ceiling fans in the $80 to $150 range with UL-listed wet or damp ratings for pergola installation.
Mount the fan to a central rafter using a fan brace rated for ceiling fan use, not just a standard electrical box. Run the wiring through the rafter before mounting for a clean, professional look. A ceiling fan on a pergola drops the perceived temperature by 4 to 8 degrees Fahrenheit, which makes a real difference from June through September.
17. Build a Pergola Over a Gravel Patio
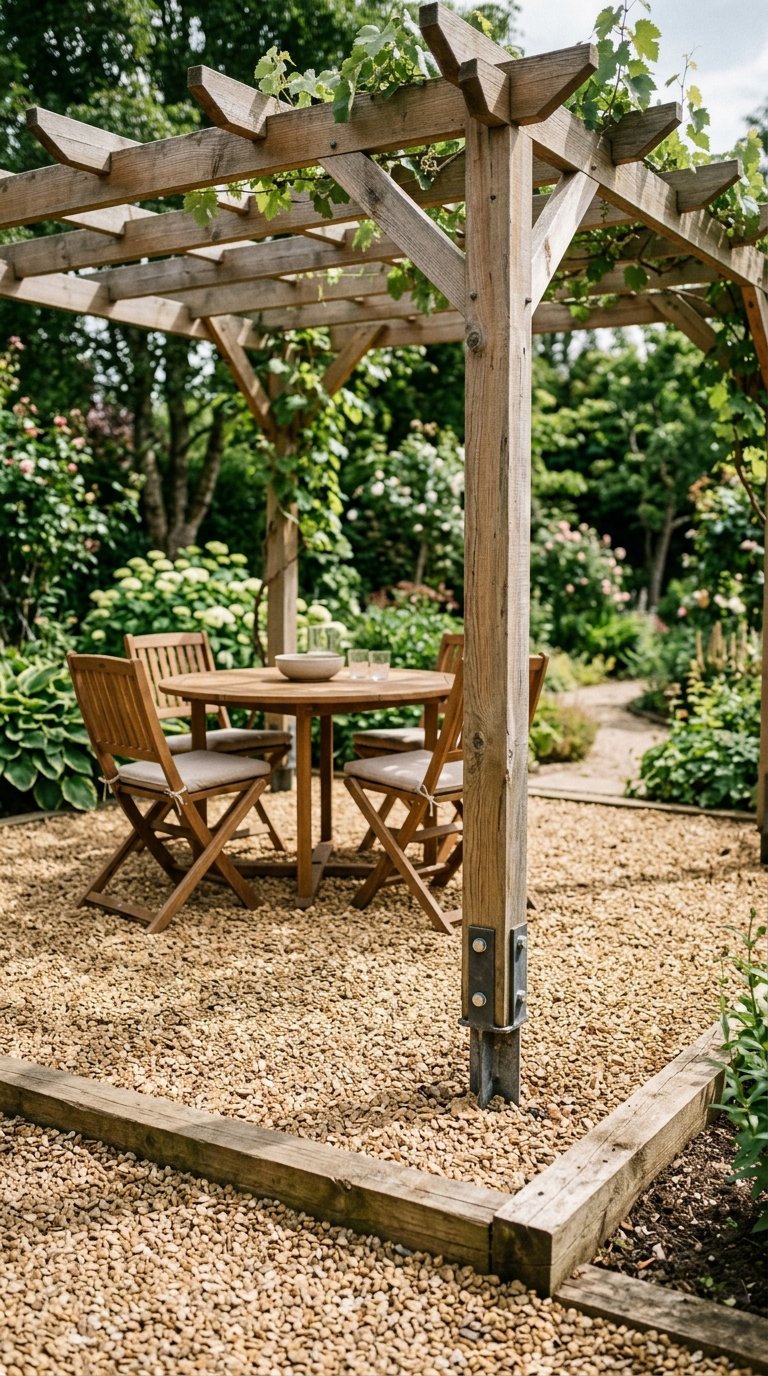
No concrete slab? No problem. A gravel patio costs $100 to $300 to install and serves as a perfect pergola base when paired with buried concrete footings or surface-mount spike anchors. Lay landscape fabric, add 4 inches of compacted gravel, and use 24-inch ground spike anchors for each post.
Gravel drains faster than concrete, stays cooler underfoot in summer, and costs a fraction of a poured slab. The combined cost of a gravel patio plus a DIY pergola runs $500 to $800 for a 10×12 space, which rivals what you’d spend on a basic poured concrete pad alone.
18. Build a Pergola With Side Lattice Panels
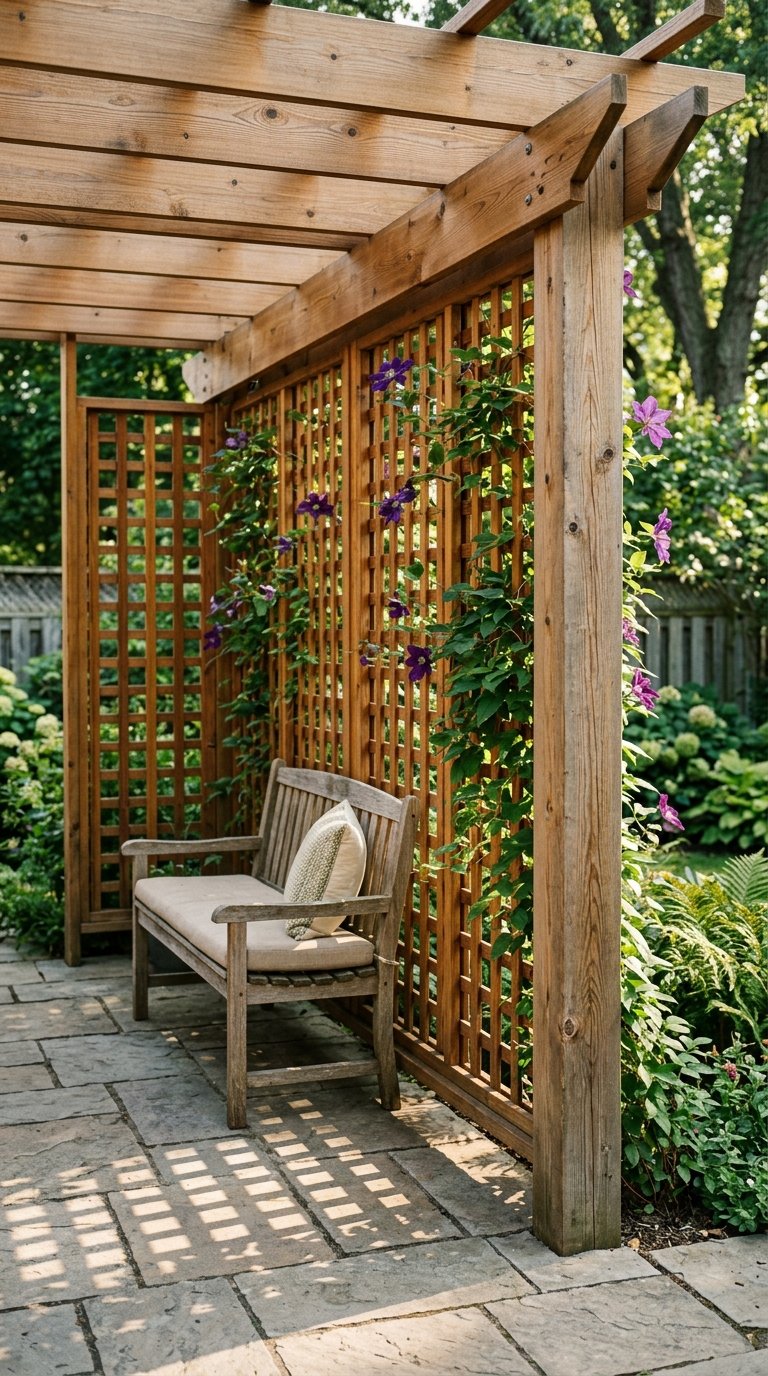
Lattice panels on one or two sides of a pergola add privacy, support climbing plants, and define the space without making it feel enclosed or claustrophobic. Cedar lattice panels from a home improvement store cost $30 to $50 per 4×8 sheet and screw directly into your pergola posts.
A 10×12 pergola with lattice on two sides and open on the remaining two hits the sweet spot between privacy and airflow. Paint the lattice the same color as your house trim for a built-in, intentional look rather than an afterthought addition.
19. Light the Whole Thing With Solar String Lights
Solar string lights on a pergola eliminate the need for outlet access or extension cords entirely. Brands like Brightech and Litom make solar string lights with 8 to 10 hours of runtime on a full day’s charge. Position the solar panel on the sunniest side of the pergola roof and the lights handle the rest automatically every night.
Run the strands in a grid pattern across the rafters for full overhead coverage. A 10×12 pergola needs about 100 to 150 feet of string lights to look intentionally lit rather than sparse. Three 50-foot solar strands connected end to end cover the entire structure on a single solar panel.
20. Add a Pergola to a Sloped Yard
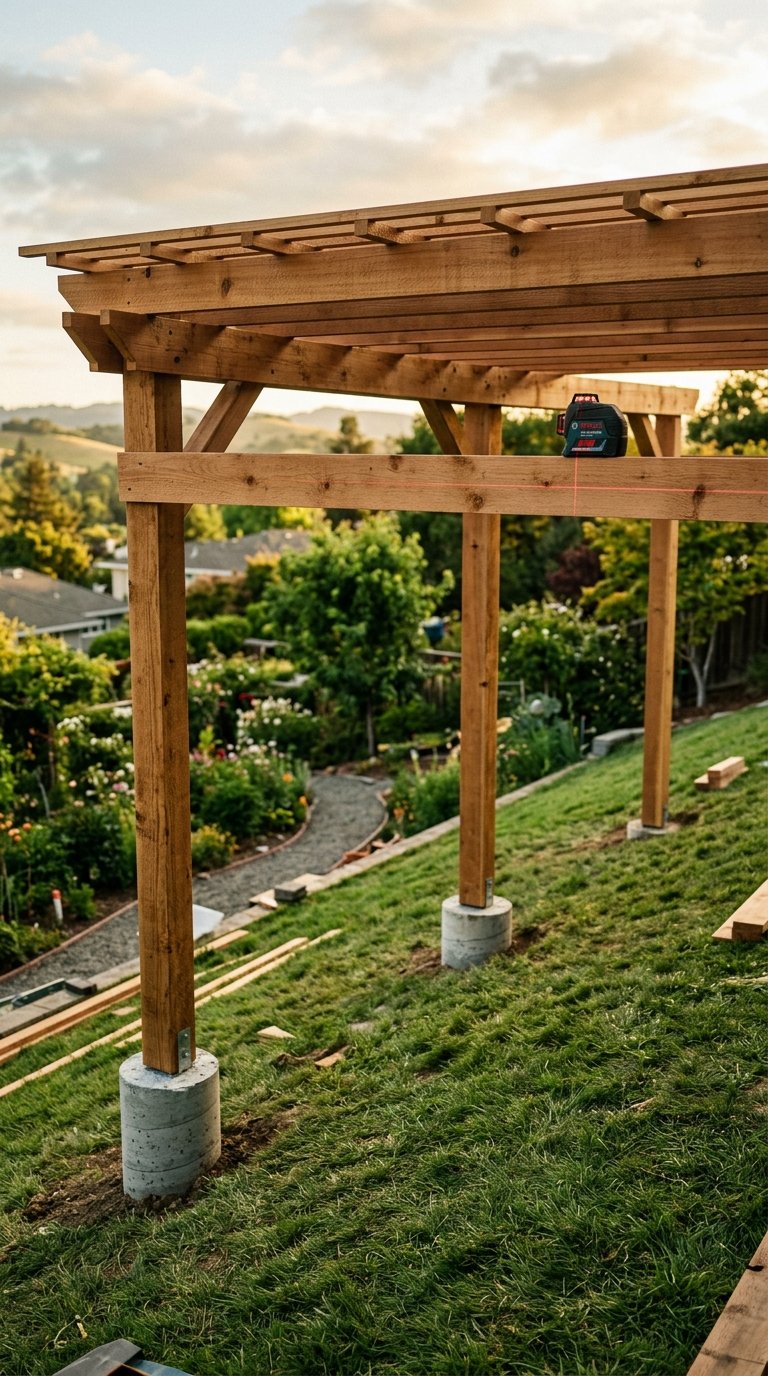
Sloped yards make outdoor structures tricky but not impossible. Adjustable post base anchors compensate for grade changes up to 4 inches, and concrete footings poured at different depths handle steeper slopes. The key is setting all four post tops at the same height, not the same footing depth.
Use a laser level to mark consistent post top heights across all four posts before cutting. This is the step where most DIYers lose accuracy and end up with a tilted pergola. A $30 laser level from Amazon saves you from having to redo the entire project.
21. Build a Pergola Over Your Front Entry
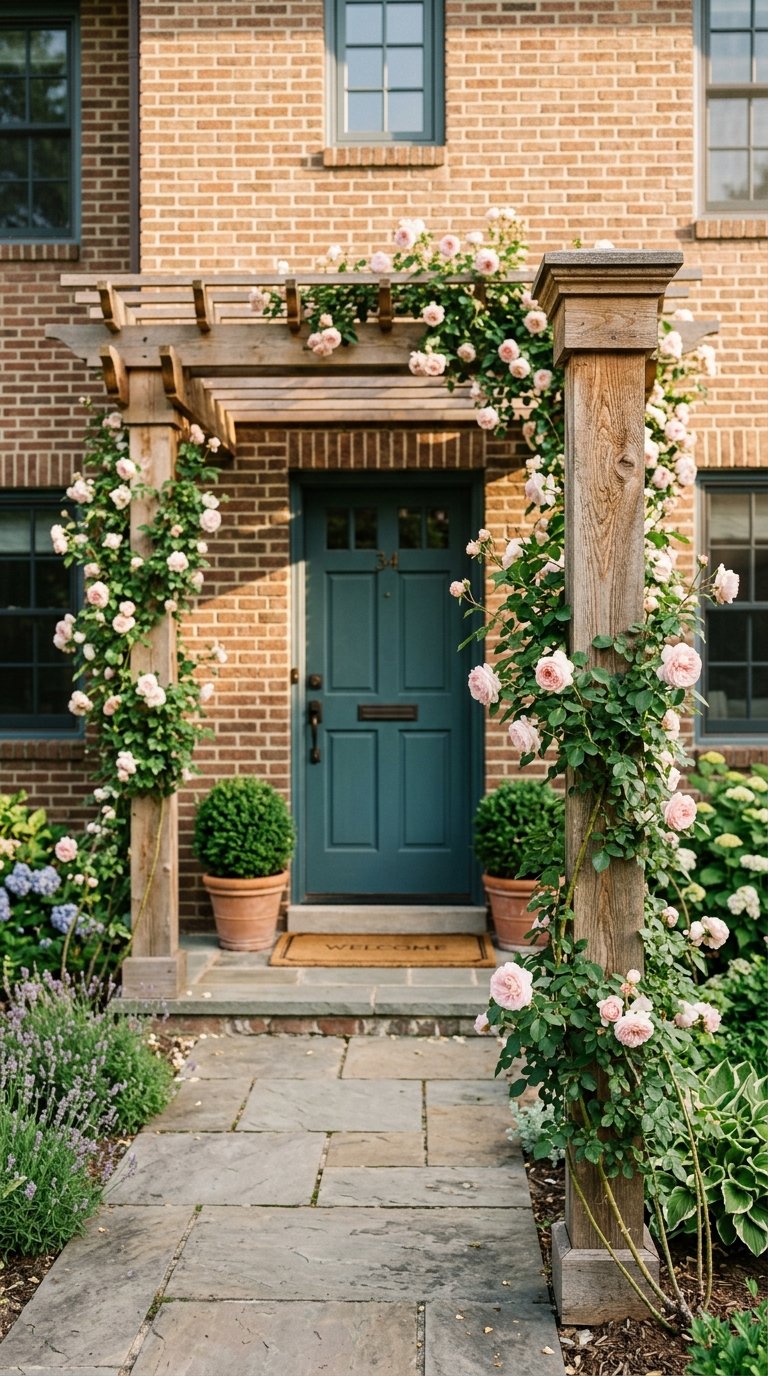
Front entry pergolas do two jobs at once. They add curb appeal and provide a covered landing zone where guests stand while you answer the door in the rain. A simple 6×6 or 8×8 entry pergola with decorative post caps and a climbing rose up each post costs $300 to $500 in materials.
Keep the design proportional to your home’s facade. A tiny pergola on a large house looks like an afterthought. A well-proportioned entry pergola, scaled to match your door width and ceiling height, looks like an architectural feature the house was designed with from day one.
22. Use a Pergola to Define a Play Area
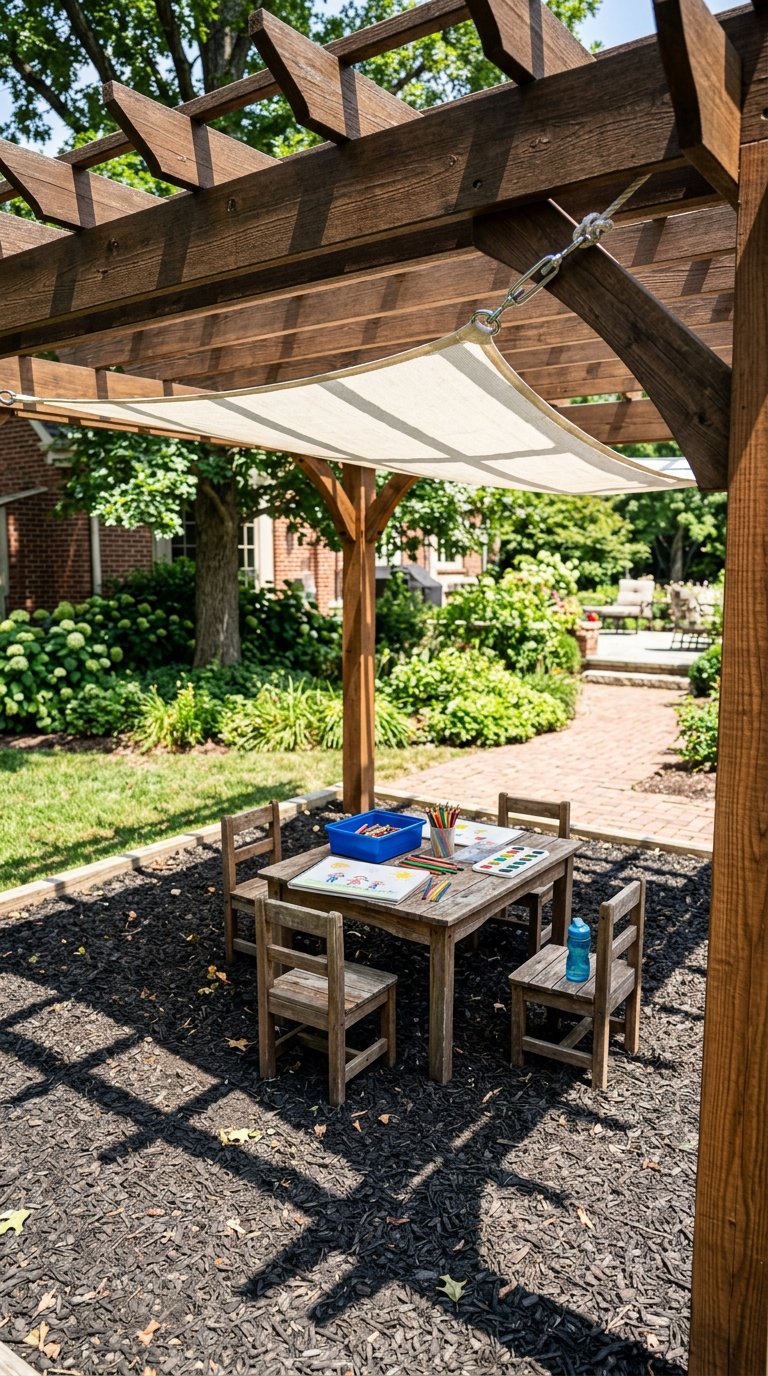
A pergola over a play area gives kids a shaded zone for outdoor activities on hot summer days without trapping heat the way a solid roof does. The open rafter design lets air move freely while blocking 40 to 60 percent of direct UV exposure.
Add a shade sail fabric under the rafters for full UV protection during peak afternoon hours, then remove it on cooler days. The play area pergola doubles as an outdoor classroom space, a reading nook, or a craft table zone as kids grow out of swing sets and sandboxes.
23. Install a Pergola With a Swing or Daybed
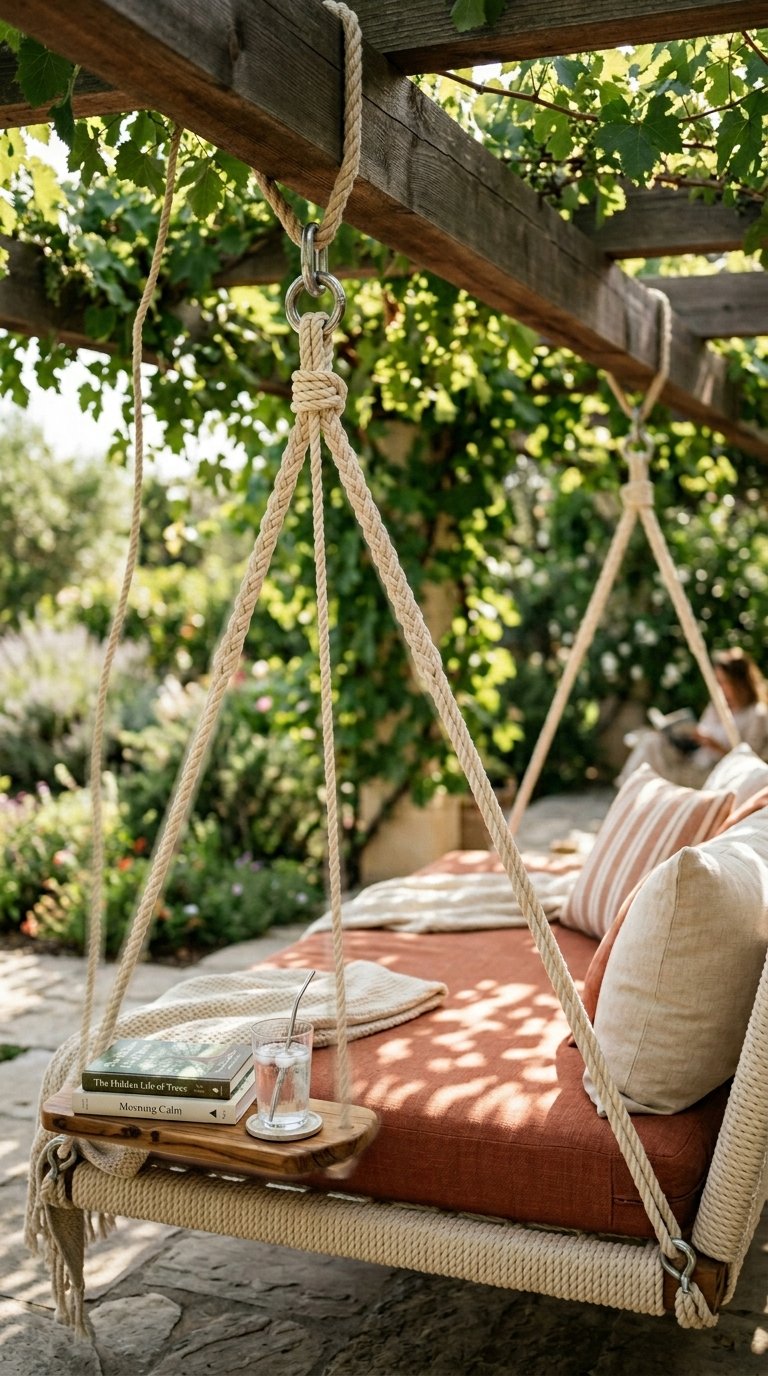
A pergola-mounted swing or hanging daybed turns a standard structure into a destination. Hang a two-person porch swing from two central rafters using 3/8-inch galvanized eye bolts rated for at least 500 pounds, and you get a feature that every single guest wants to try within 30 seconds of seeing it.
Hanging daybeds follow the same mounting principle but use four attachment points for stability. A hanging rope bed frame from Amazon or Wayfair runs $150 to $300 and hangs from standard eye bolt hardware. Add an outdoor cushion and you have the best seat in your entire yard.
24. Build a Pergola That Connects Two Structures
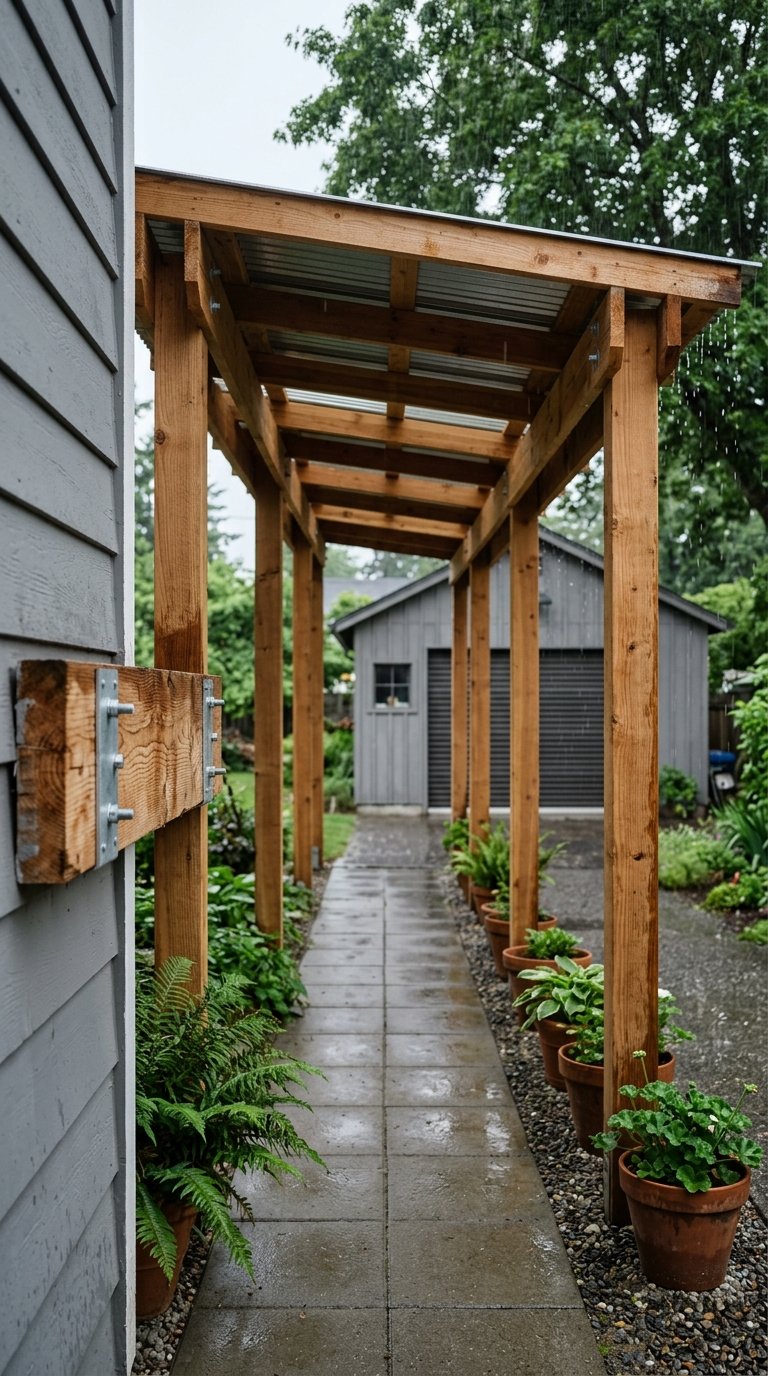
A pergola walkway connecting your house to a detached garage, guest room, or outdoor kitchen creates a covered passage that keeps you dry and ties two structures together visually. This is called a breezeway pergola, and it works on any property with two buildings within 20 to 40 feet of each other.
The breezeway pergola follows the same construction as a standard lean-to, using ledger board attachments on both ends. Add a corrugated metal roof for full rain coverage, or leave the rafters open for a lighter, more decorative feel. Material costs for a 6-foot-wide by 20-foot-long breezeway pergola run $400 to $600.
25. Go Permanent With a Treated Wood Pergola Stained to Last
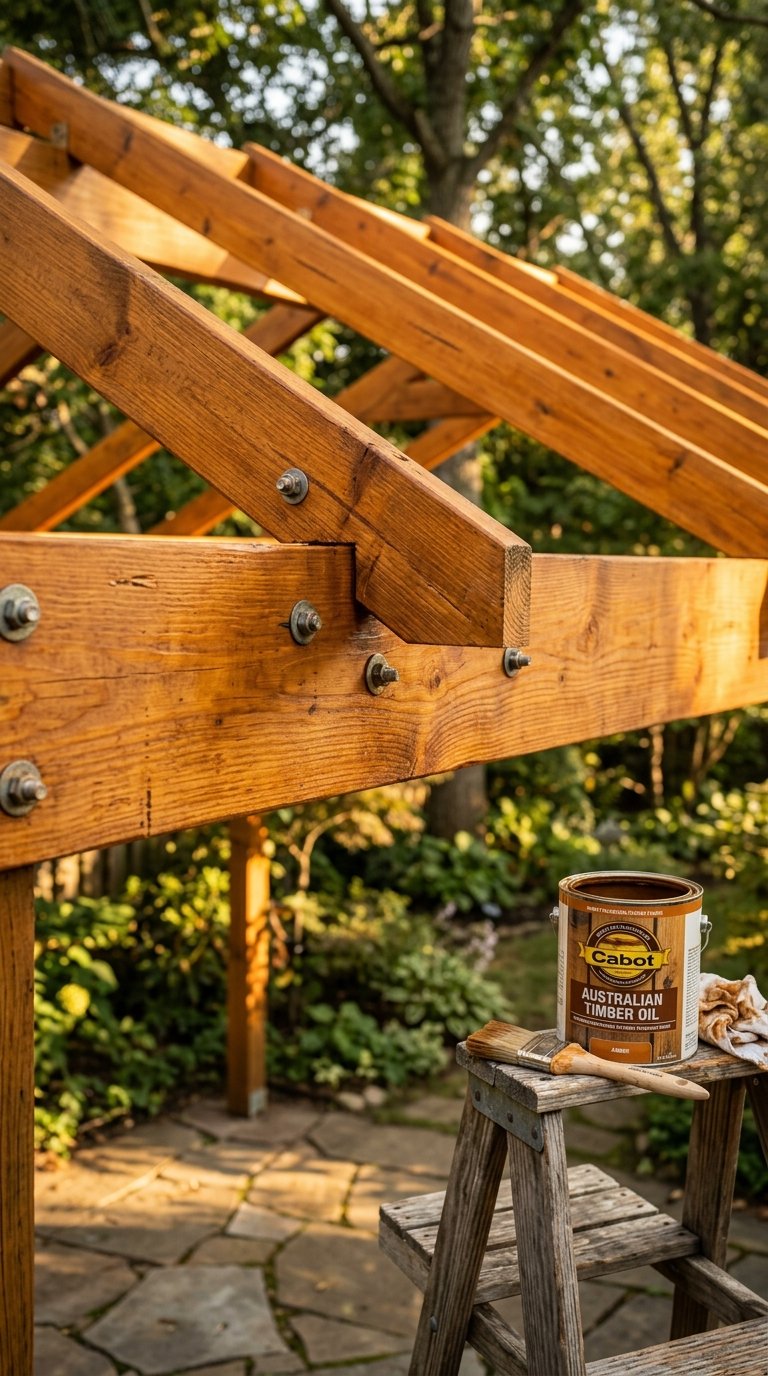
Cheap pergolas rot within five years. Pressure-treated lumber with a quality exterior stain applied every two to three years lasts 20 to 30 years without structural compromise. Cabot Australian Timber Oil and Ready Seal are the two stain brands that outdoor builders recommend consistently for wood pergolas in harsh climates.
What to Do Before Your First Winter
- Apply stain or sealer within 30 days of building
- Check all hardware connections for tightening after the first season
- Clear debris from rafter tops to prevent moisture retention
- Inspect post bases annually for ground contact moisture
A well-built, well-maintained pressure-treated pergola outlasts vinyl kits and aluminum frames in terms of repairability. You replace one board, not the whole structure. That’s the argument for wood, and it’s a strong one.
Final Thoughts
A pergola is the highest-return outdoor project most homeowners never get around to building. You spend $400 to $1,000 in materials, one weekend in labor, and walk away with an outdoor space that adds real value to your home and real hours to your time outside. Start with the idea on this list that solves your biggest outdoor problem right now. Small yard? Go lean-to. No shade? Add a canopy or climbing plants. No privacy? Hang curtains or build lattice panels. Pick one, build it this weekend, and your backyard becomes a completely different place by Sunday evening.