21 DIY Birthday Decorations at Home That Look Better Than Store-Bought
Store-bought birthday decorations share one quality: they look exactly like store-bought birthday decorations. The same metallic balloon sets, the same printed banners, the same color schemes you have seen at every party for the past five years. DIY birthday decorations cost less, look more personal, and take less time than most people assume.
These 21 ideas work in any home, for any age, with supplies you either already own or can find at any craft store for under $30.
1. Make a Paper Tassel Garland
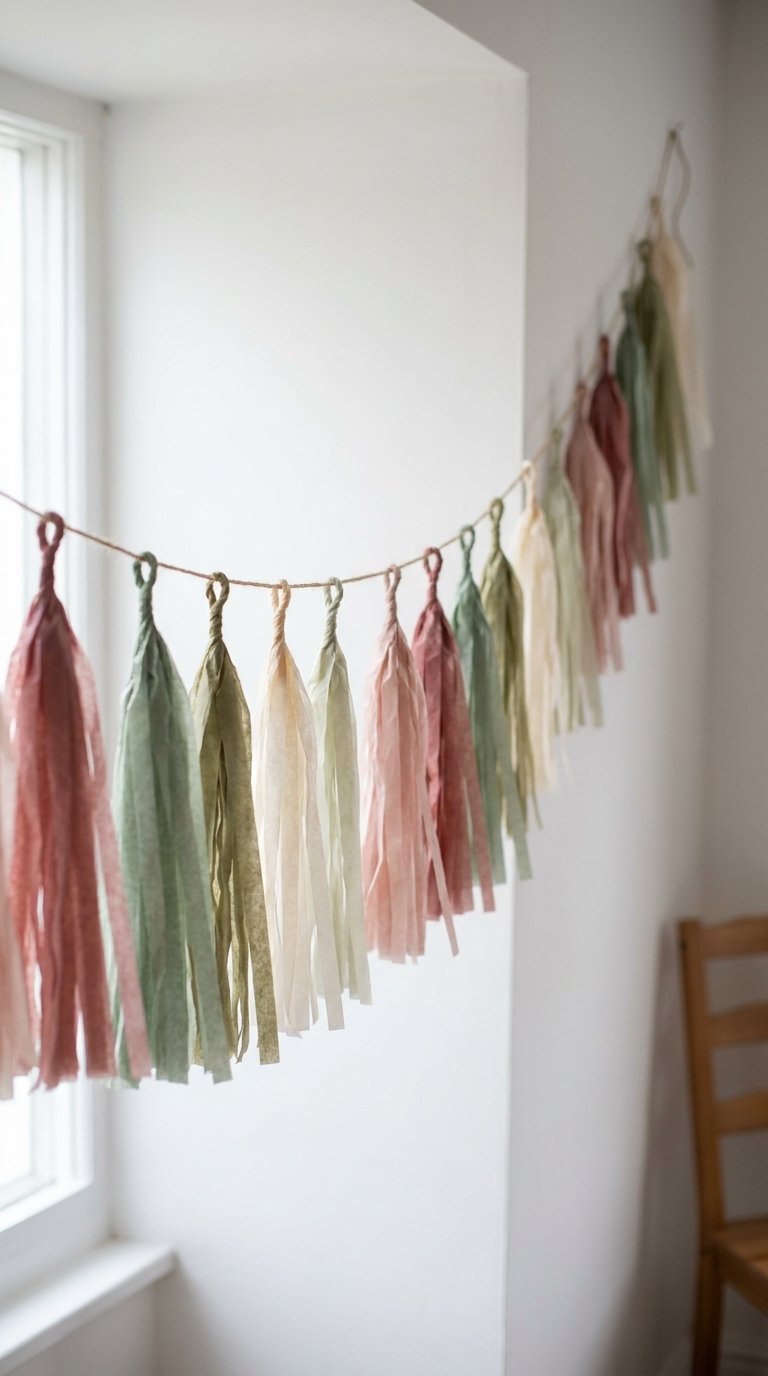
A paper tassel garland uses tissue paper cut into strips, twisted into tassels, and strung on twine or string. A garland of twenty tassels in three coordinating colors spans six to eight feet and creates an immediate party backdrop on any wall.
Cut tissue paper into sheets measuring 15×30 centimeters. Fold each sheet in half lengthwise, cut strips from the folded edge to within 3 centimeters of the open edge, then twist the uncut top section and fold it over a length of twine. Repeat until the garland reaches the length you need.
What you need:
- Tissue paper in two to three coordinating colors
- Scissors
- Twine or string
- Tape or removable wall hooks for hanging
2. Create a Balloon Arch Without a Frame
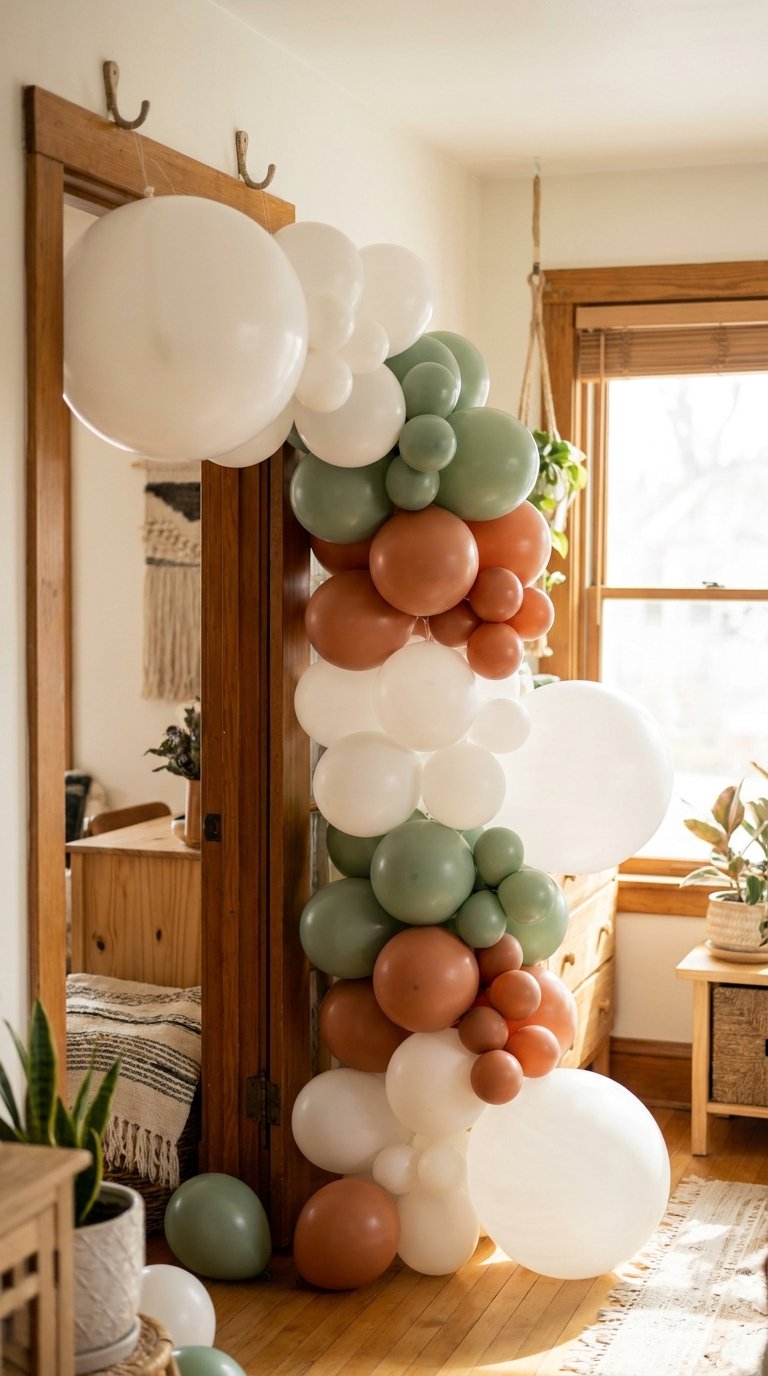
A balloon arch without a frame uses fishing line and a balloon pump to create a freeform organic arch that mounts between two fixed points. No frame, no expensive kit, no professional installer required.
Inflate balloons in three sizes using a hand pump: large, medium, and small. Tie each balloon closed, then tie pairs of balloons together at their knots. Twist pairs together to form clusters of four. Thread fishing line through each cluster and hang the line between two command hooks or doorframe hooks. Adjust cluster positions until the arch fills the space evenly.
Balloon color combinations that photograph well:
- White, sage green, and terracotta for an adult birthday
- Pink, gold, and cream for a feminine celebration
- Navy, white, and silver for a classic look
- Bright primary colors for a children’s party
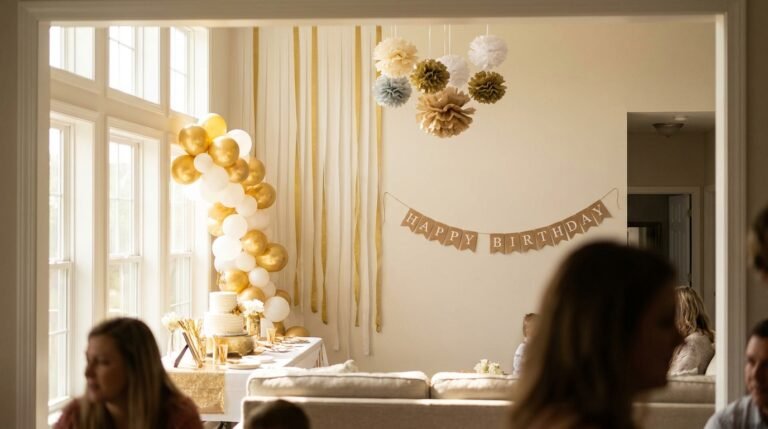
3. Build a Photo Backdrop with Streamers

Crepe paper streamers stapled or taped to a wall in vertical rows create a full photo backdrop in under twenty minutes. Use three coordinating colors in alternating rows. The streamers hang floor to ceiling and create a textured, colorful wall that makes every photo taken in front of it look intentional and well-styled.
Cut streamers to the ceiling height of your room. Apply a strip of tape or a staple at the top of each streamer and work across the wall from left to right in your chosen color sequence. A backdrop that is six feet wide provides enough space for two to three people to stand comfortably in a photo.
Best streamer color combinations:
- All white: clean, suits any party theme
- Gold and white alternating: elegant adult birthday
- Rainbow sequence: children’s party, maximalist impact
- Two tones in the birthday person’s favorite colors
4. Make a Birthday Banner from Kraft Paper
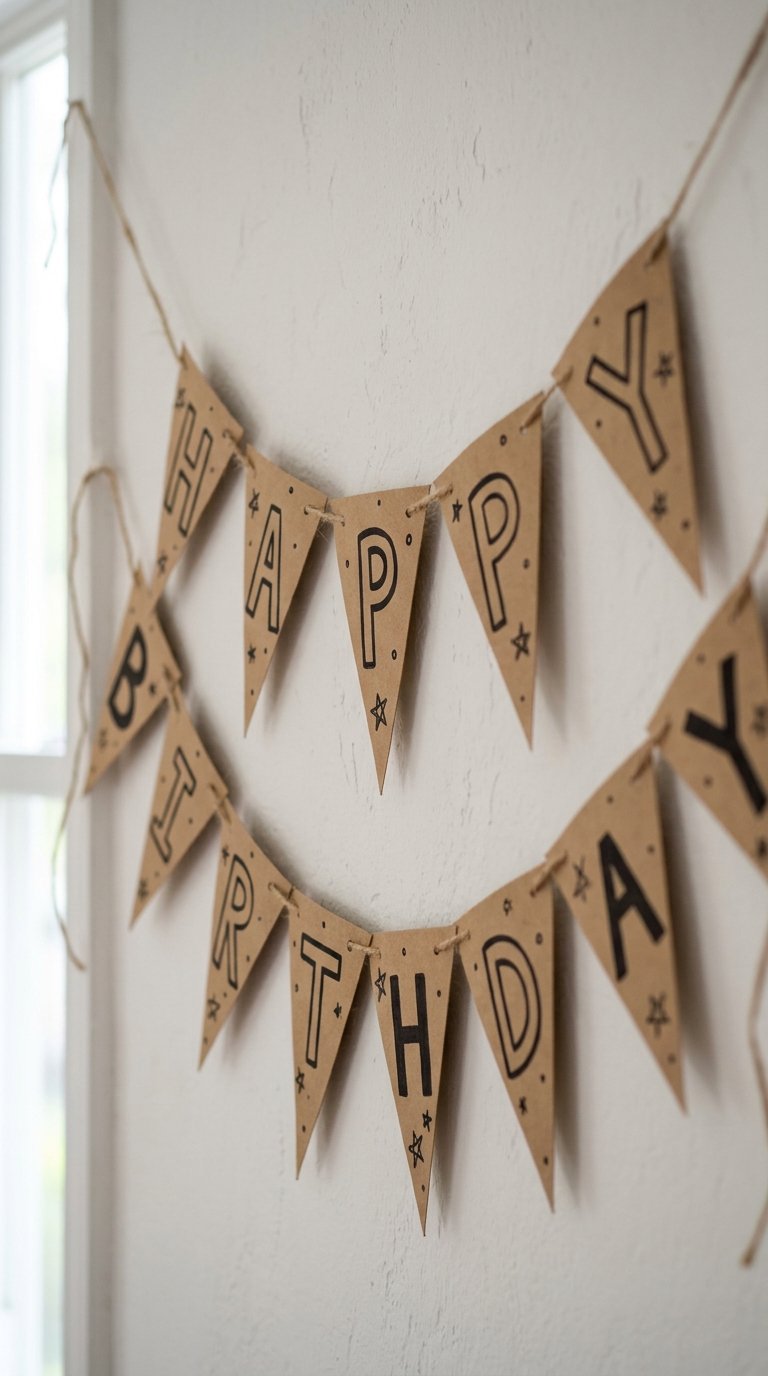
Cut triangle pennants from kraft paper, write one letter of HAPPY BIRTHDAY on each pennant with a black marker, punch a hole in each top corner, and thread twine through the holes. The entire banner takes fifteen minutes and costs less than $3 in materials.
Use a ruler to keep the letter sizing consistent across all pennants. Vary the letter style slightly, some block, some outlined, some filled, for a hand-lettered look that reads as deliberate rather than inconsistent. Add small drawings between letters for extra character.
Kraft paper banner variations:
- Gold marker on black card stock for an elegant look
- White paint pen on black pennants for a moody aesthetic
- Watercolor washes on white card stock pennants for a soft look
- Stamp letters using a letter stamp set for a more uniform finish
5. Inflate and Cluster Balloons at Different Heights
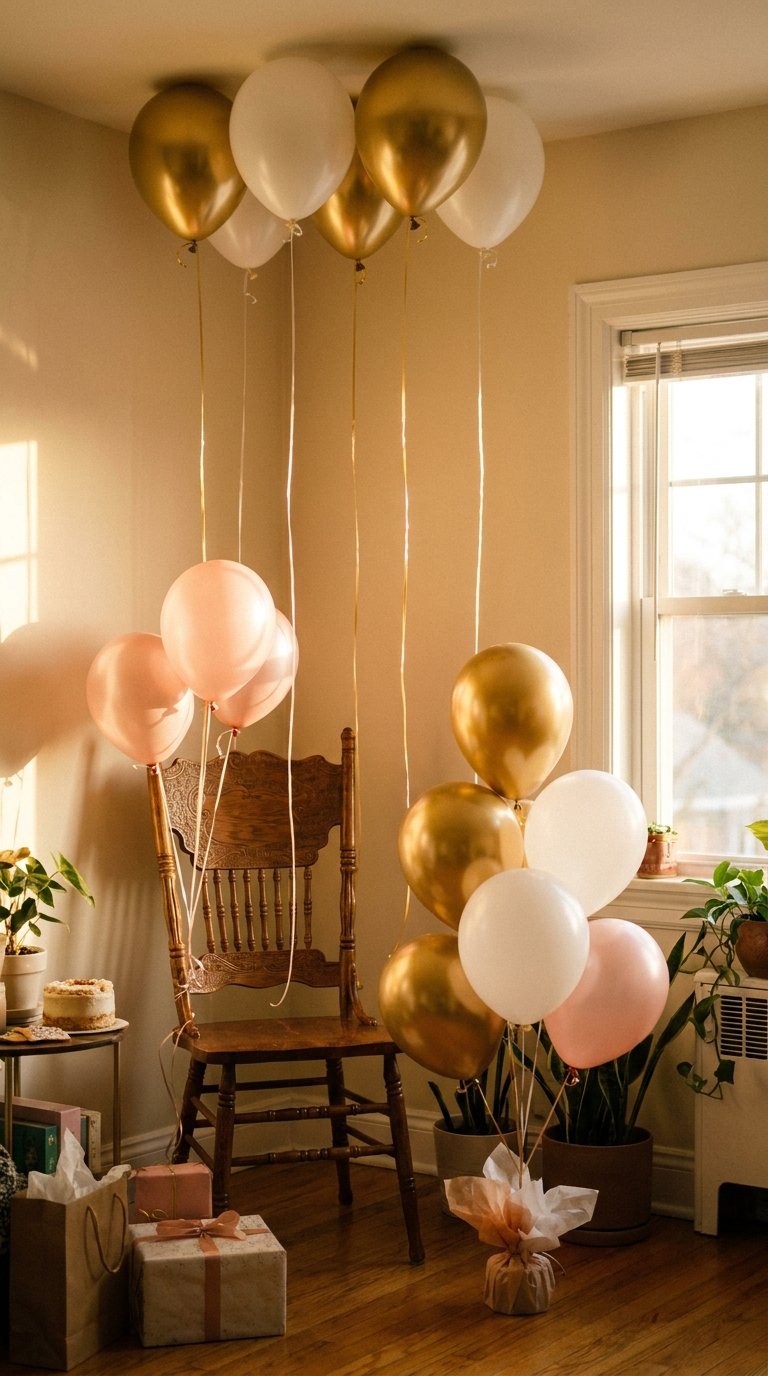
A cluster of balloons at different heights, some at ceiling level on strings, some at mid-height tied to a chair or doorknob, and some weighted on the floor, fills a room with color without requiring any specific balloon arrangement skill.
Use a balloon weight on the floor cluster: fill a small paper bag with rice, tie the balloon strings to it, and cover the bag with tissue paper. The weighted cluster holds its position and adds a grounded element to the room’s overall balloon arrangement.
Balloon height distribution:
- Ceiling level: five to seven helium balloons on long strings
- Mid-height: three to four balloons tied to chair backs or door handles
- Floor level: a weighted cluster of five to six balloons as the room anchor
6. Create a Number Balloon Display
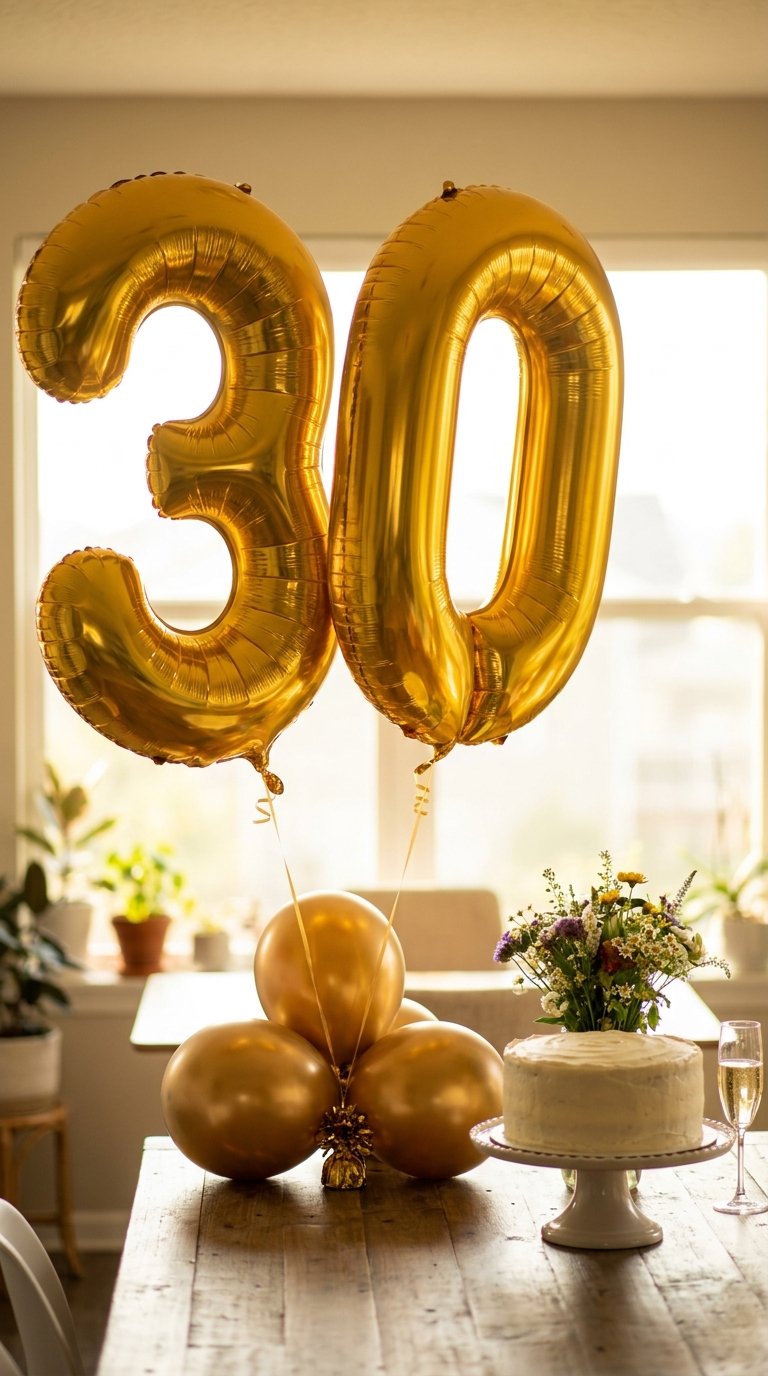
Large foil number balloons spelling the birthday person’s age create an immediate focal point that requires zero additional decoration around them. A single foil number balloon on a weight, or two numbers side by side for double-digit ages, reads as a complete decoration on its own.
Position the number balloons beside the cake table or in front of the photo backdrop. Surround the base with a few regular latex balloons in the same color as the foil number to complete the display. The number does the work. Everything else supports it.
Where to buy large foil number balloons: Party City, Amazon, and most dollar stores stock foil number balloons in gold, silver, rose gold, and multicolor finishes for $3 to $8 per number.
7. Make a Flower Wall with Paper Flowers
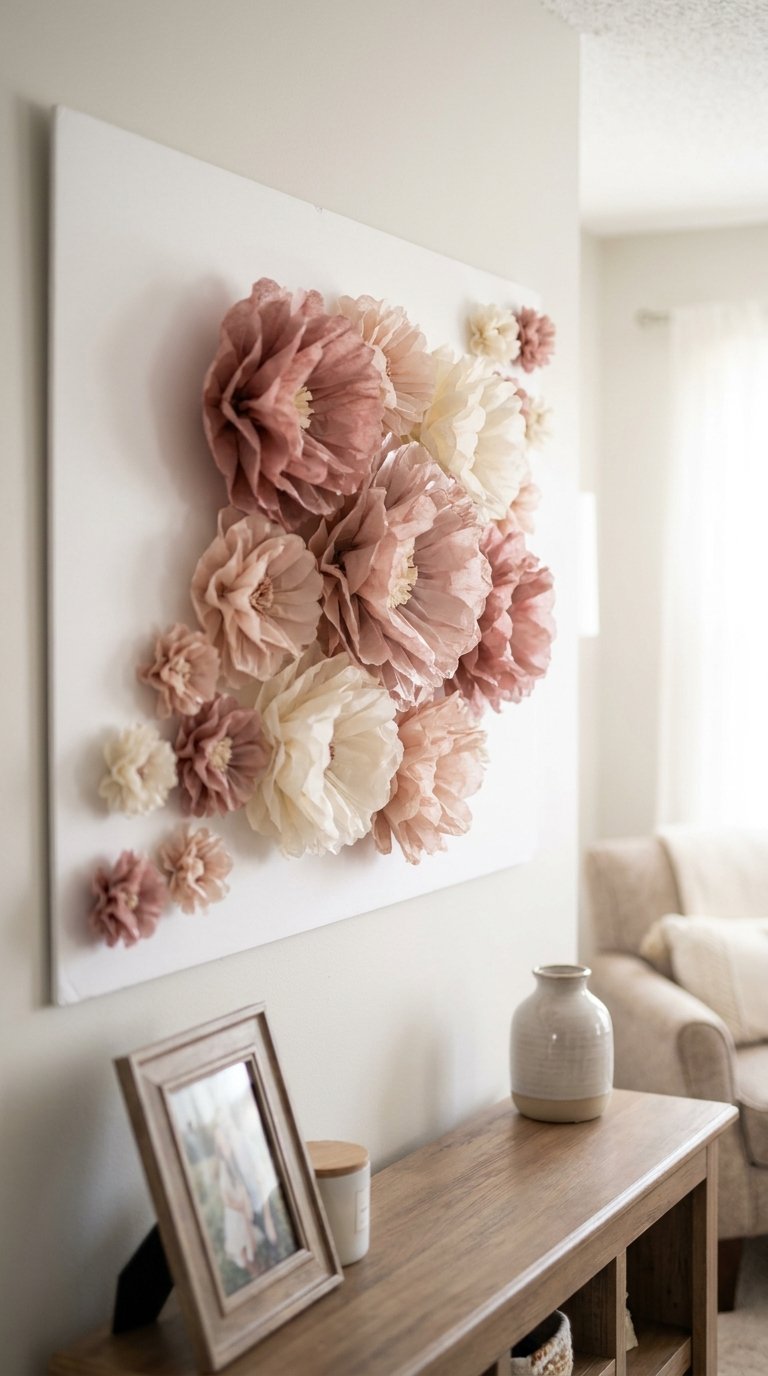
Paper flowers in various sizes pinned or taped to a foam board or directly to a wall create a flower wall backdrop that costs a fraction of the real flower version. Giant paper flowers in tissue paper or cardstock take ten to fifteen minutes each and hold their shape for days.
How to make a simple tissue paper flower:
- Stack eight to ten sheets of tissue paper on top of each other
- Fold the stack accordion-style in 3-centimeter folds
- Tie the center with a pipe cleaner or thin wire
- Fan out both sides into a circular shape
- Gently separate each layer upward toward the center
Make ten to fifteen flowers in three sizes and three coordinating colors. Arrange them across the backdrop from largest at the center to smallest at the edges.
8. Use String Lights as the Primary Decoration

String lights draped across a wall, along a mantelpiece, or hung from the ceiling create a warm, celebratory atmosphere that no other single decoration replicates as effectively. A single strand of warm white string lights on an otherwise plain wall transforms the space into a party environment.
Drape the lights in horizontal rows across the wall using removable hooks. Space rows 20 centimeters apart vertically and let the lights sag slightly between hooks for a natural drape. Hang photos, small paper stars, or cardstock cutouts from the light string for extra decoration.
String light types:
- Warm white: suits all party themes, most flattering for photos
- Multi-color: suits children’s parties and outdoor events
- Fairy lights with large globe bulbs: suits adult birthdays and garden parties
- LED strip lights: suits modern, neon-themed parties
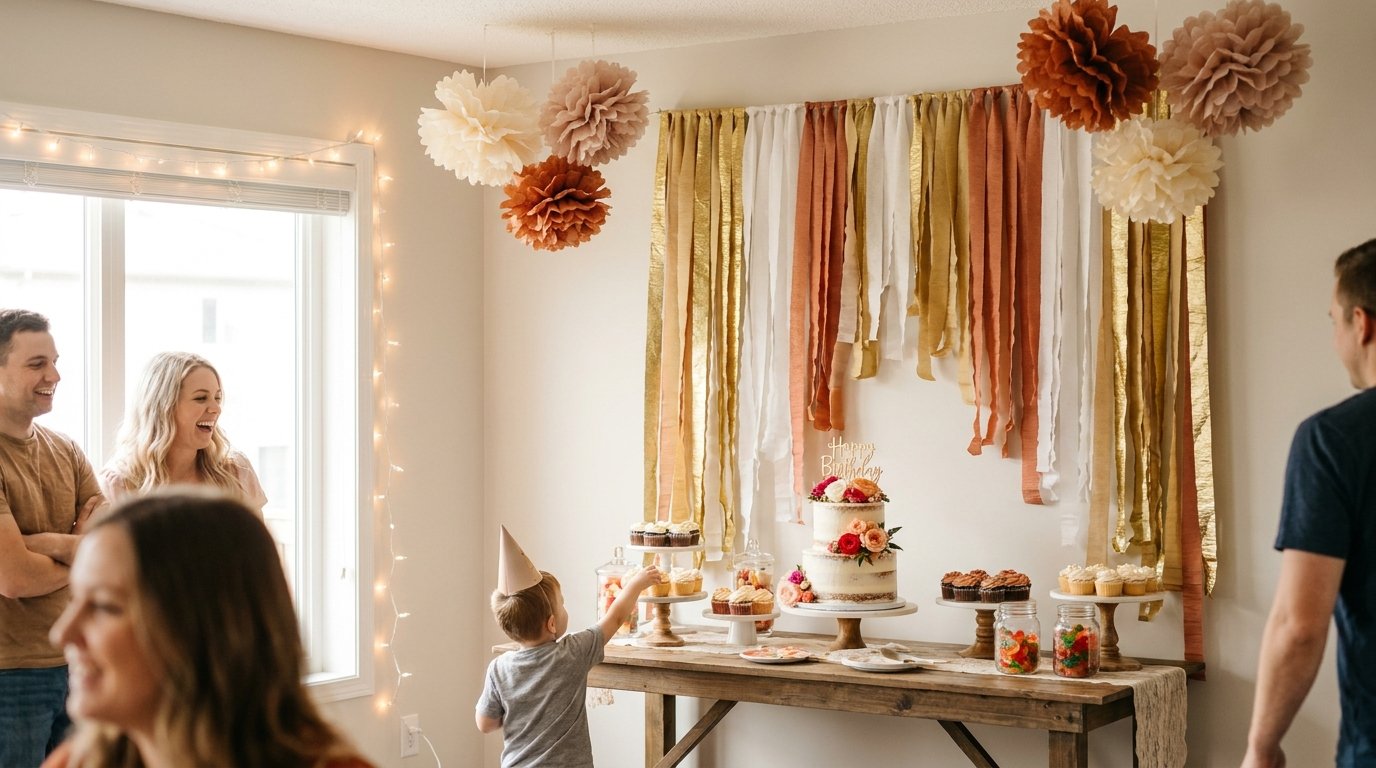
9. Create a Dessert Table Display
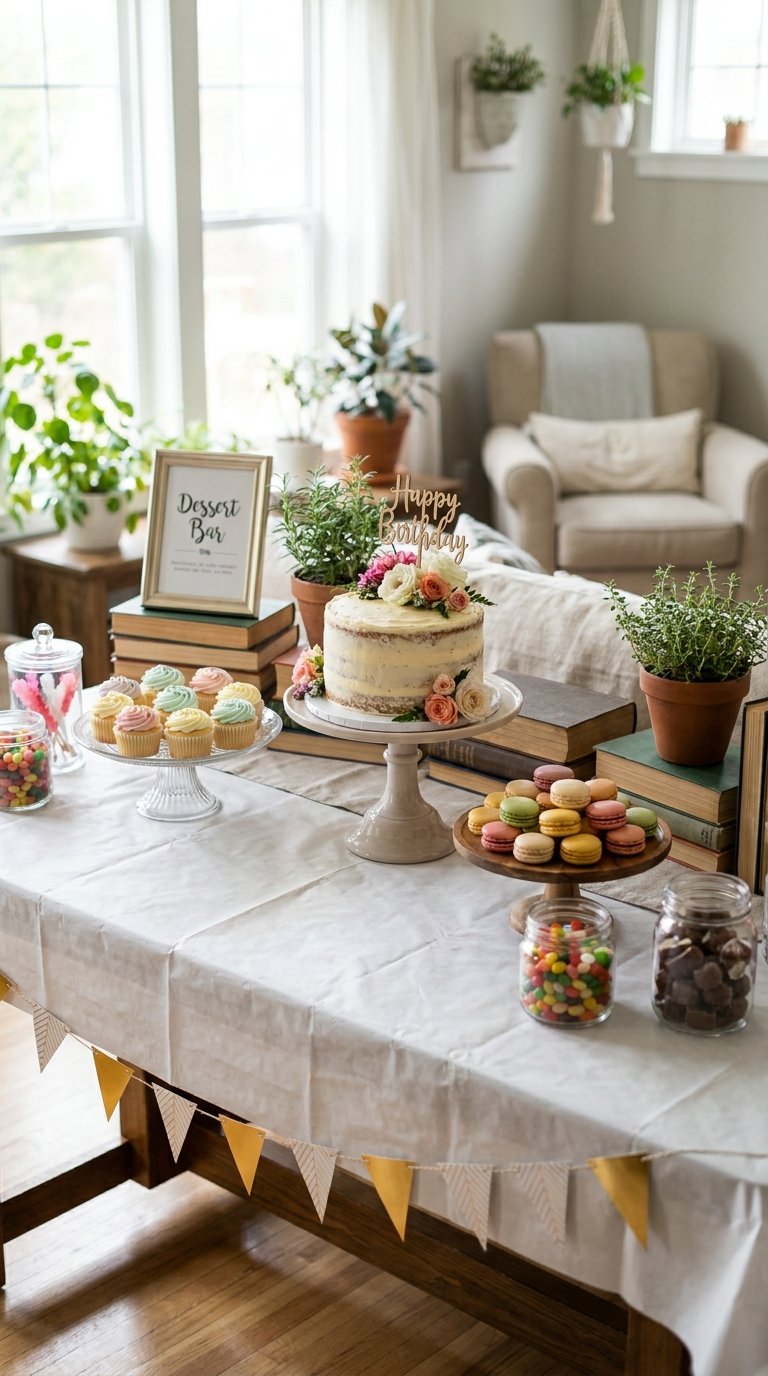
A styled dessert table uses items you already own to create a layered display for the birthday cake, cupcakes, and treats. A cake stand at the center, two smaller stands at different heights on either side, and a scattering of small treats at the table level creates three display layers that draw the eye across the full table.
Cover the table with a paper tablecloth in a solid color or a piece of fabric. Add a small paper garland along the table front edge. Arrange the desserts by height and size: tallest at the back, smallest at the front. Place candles or small decorative objects in the gaps between desserts to fill the table without overcrowding it.
Dessert table essentials you probably already own:
- A cake stand or an inverted bowl under a plate
- A cutting board used as a flat display surface
- Glass jars or vases holding small treats or flowers
- Books or boxes under fabric to create height variation
Along with decorations, don’t forget to add meaningful words—check out creative birthday wishes ideas for every occasion.
10. Make Confetti-Filled Balloons
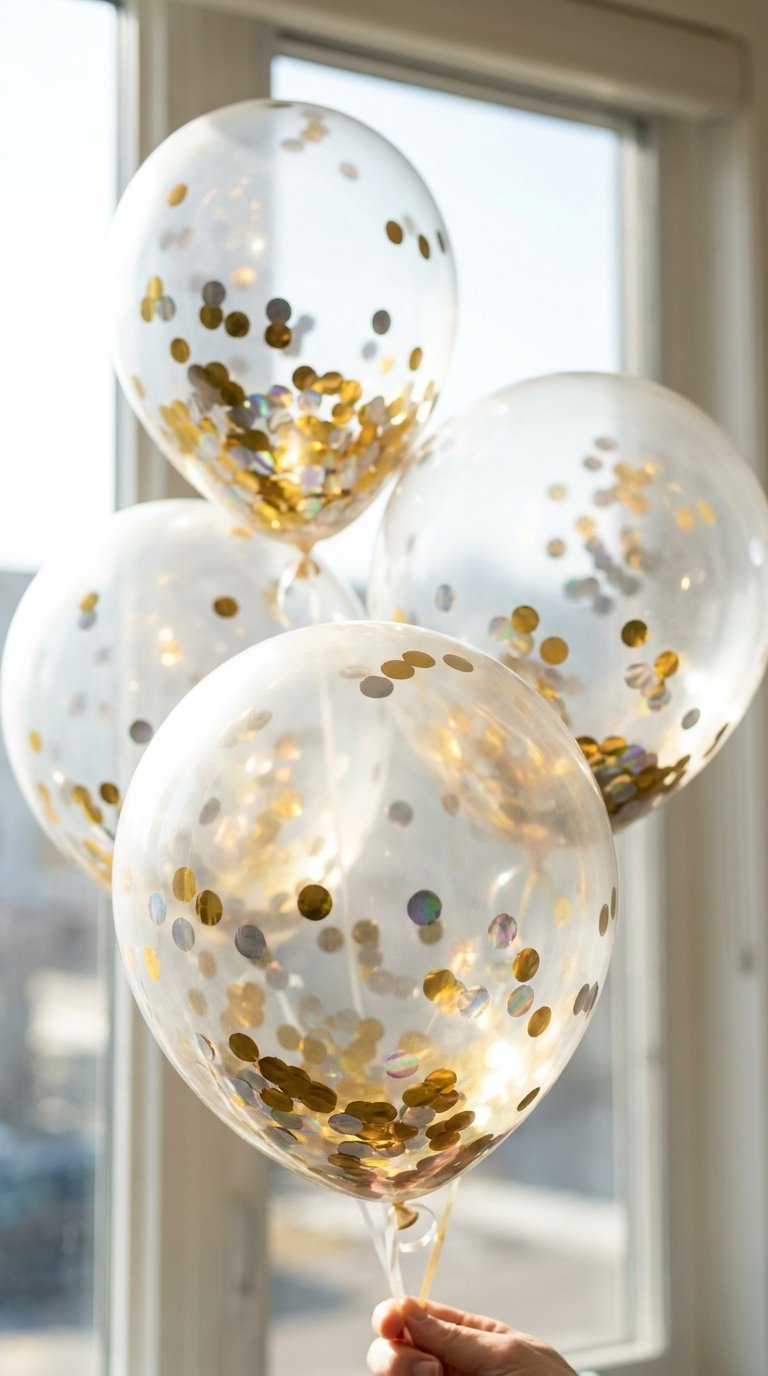
Clear balloons filled with colorful paper confetti before inflating create a decorative effect that standard solid-color balloons cannot achieve. The confetti settles at the bottom of the balloon and shifts with movement, creating a constantly changing interior pattern.
Use a funnel to add confetti to the uninflated balloon before blowing it up. Use tissue paper confetti rather than plastic to avoid static cling on the balloon interior. Gold, silver, or iridescent paper confetti in a clear balloon is one of the most photographed balloon styles at birthday celebrations.
Confetti balloon tips:
- Use tissue paper confetti, not plastic, to avoid static
- Inflate slightly less than full capacity so confetti has room to move
- Rub the inflated balloon against fabric to add static and make confetti stick to the sides
- Use clear latex balloons only, colored latex blocks the confetti visibility
11. Build a Balloon Centerpiece for the Table
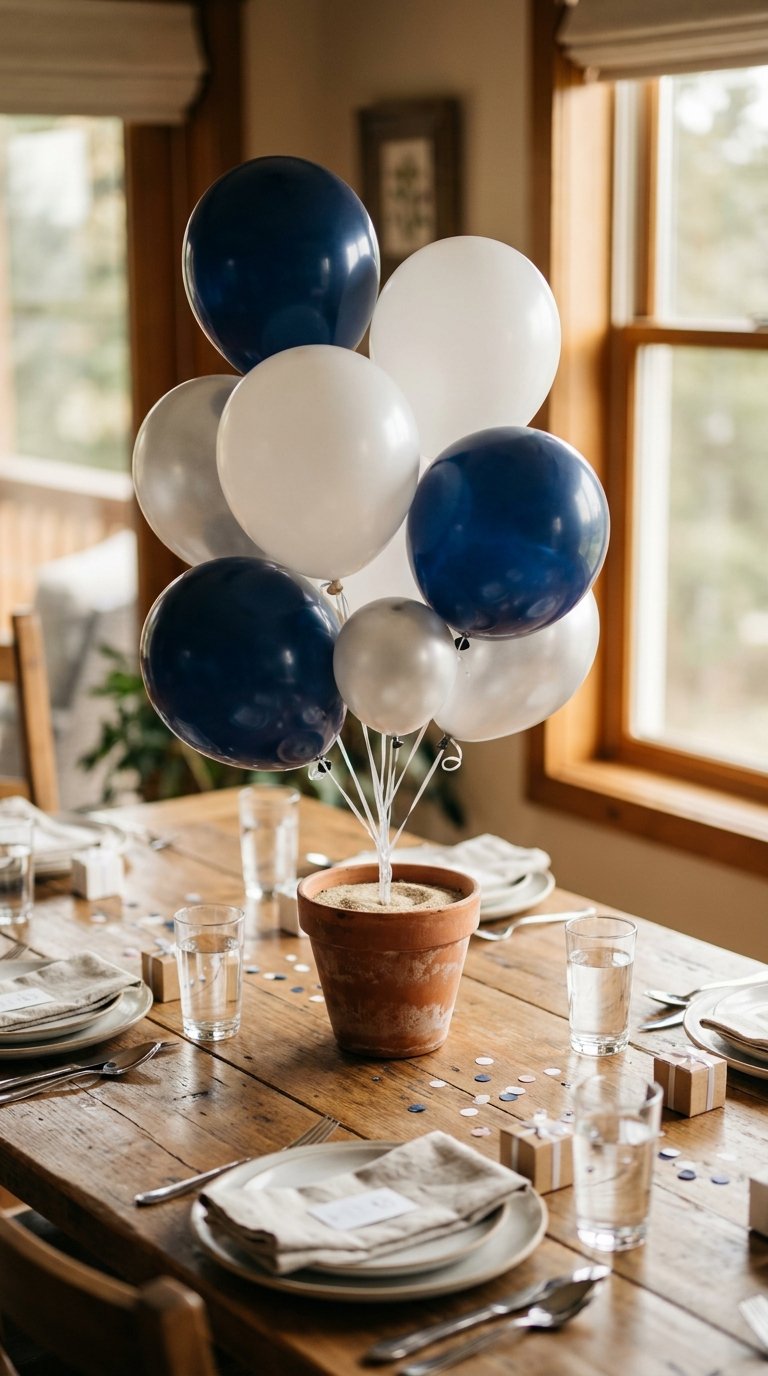
A small balloon centerpiece sits on the birthday table without requiring helium. Tie five to seven balloons on strings to a small weight or a flower pot filled with sand or rice. Vary the balloon sizes and colors within a consistent palette. The balloon centerpiece sits at table level and adds color and height to the table without obstructing sightlines across it.
Keep the centerpiece strings short enough that balloons sit no more than 30 centimeters above the table surface. Taller centerpieces block conversation and sightlines across the table during the meal.
12. Create a Photo Memory Display
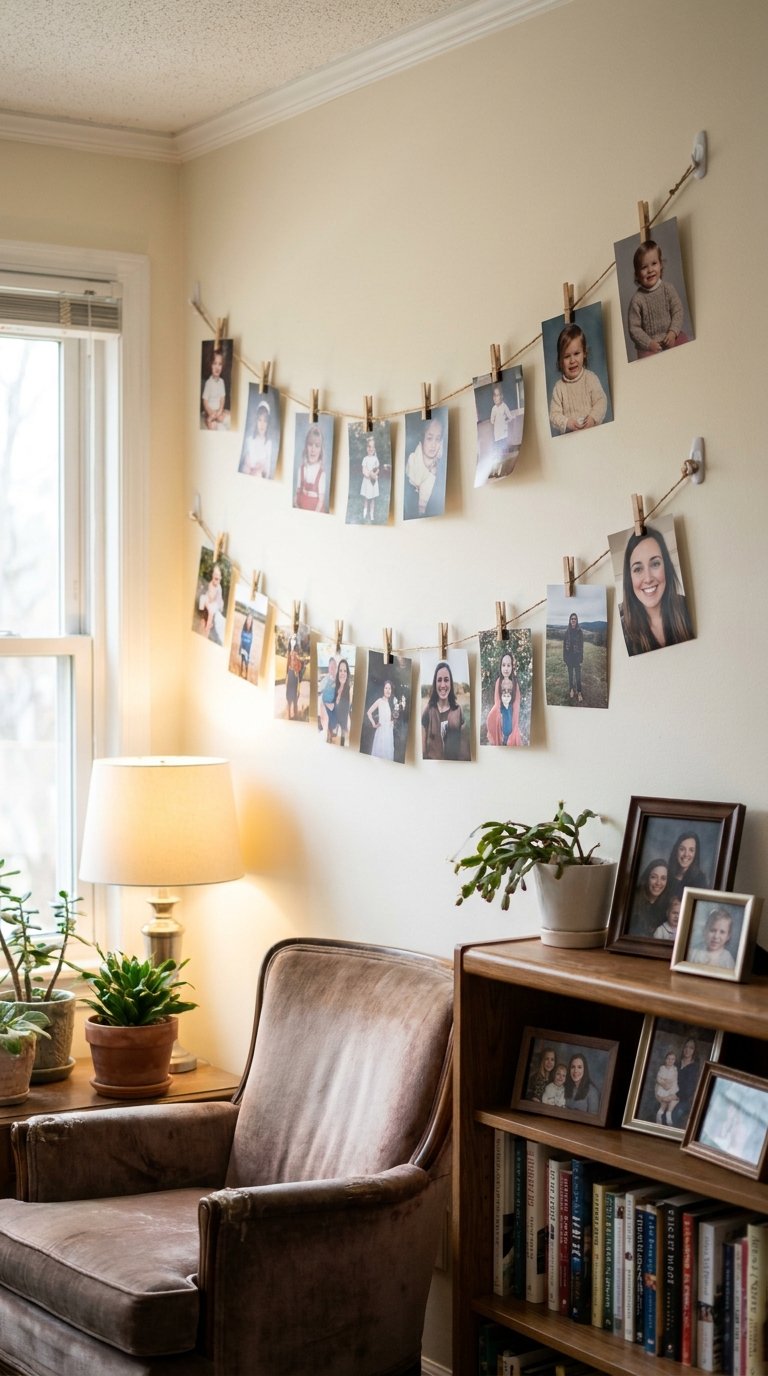
String twine between two command hooks on a wall and clip photos of the birthday person across the string using small wooden pegs or binder clips. A photo memory display spanning ten to fifteen photos tells the birthday person’s story and gives guests a talking point throughout the party.
Print photos at home on standard printer paper for a low-cost option. The informal look of home-printed photos suits the DIY aesthetic and costs pennies per image. Arrange photos chronologically from left to right for a timeline effect, or mix ages randomly for a more casual display.
Photo display variations:
- Timeline arrangement: chronological left to right
- Random mix: casual, suits informal parties
- One era only: baby photos for a milestone birthday
- Black and white filter applied to all photos for a cohesive look
13. Make Paper Star Decorations
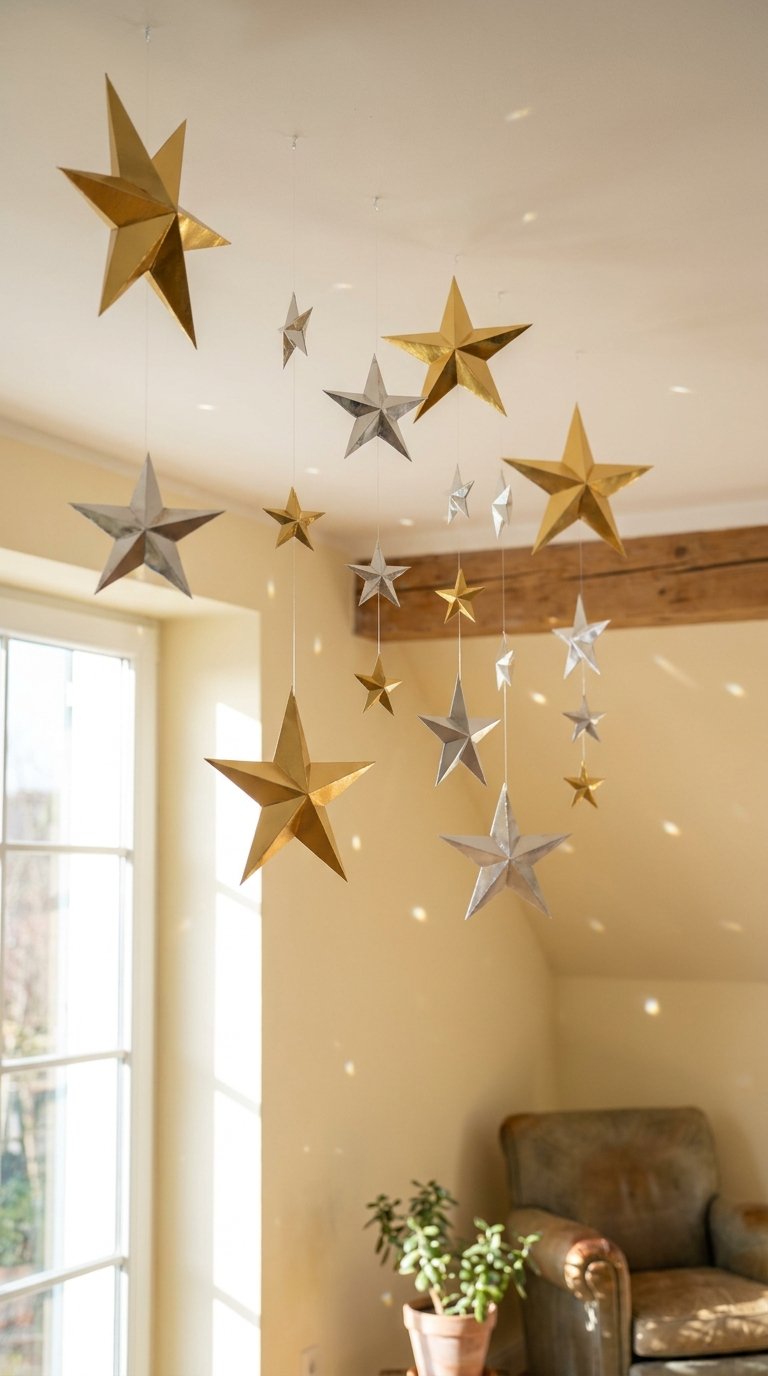
Paper stars cut from cardstock and hung from the ceiling or strung on thread create a celestial birthday atmosphere that suits both children’s parties and adult celebrations. A five-pointed paper star requires one square of cardstock and three folds to construct.
Hang stars at varying heights from the ceiling using removable hooks and clear thread. Vary the star sizes from large to small. Gold and silver cardstock stars catch light and add a metallic shimmer that plain paper does not. A ceiling covered in hanging stars at different heights transforms any room dramatically.
Paper star sizing:
- Large: 30cm diameter, hang at ceiling as focal points
- Medium: 15cm diameter, group in clusters of three to five
- Small: 8cm diameter, string into a garland or scatter across a table
14. Use Fabric Bunting Instead of Paper

Fabric bunting in coordinating cotton prints lasts indefinitely, unlike paper decorations that deteriorate after one use. Cut triangles from fabric scraps, fold the top edge over a length of ribbon or twine, and stitch or glue the fold closed. A bunting of twenty fabric triangles spans approximately three meters.
IMO, fabric bunting is the most worthwhile DIY birthday decoration investment because you use it repeatedly for years. Store it in a bag after each use and it comes out ready for the next celebration with no additional cost.
Fabric combinations that work for bunting:
- Mixed floral prints in coordinating colors
- Alternating solid colors in the party palette
- One print and one solid color alternating for a clean look
- Vintage or retro fabric prints for a nostalgic birthday theme
15. Create a Flower Arrangement from Garden Flowers
Cut flowers from your garden or purchase inexpensive bunches from a supermarket and arrange them in glass jars, bottles, and vases of different heights for a natural birthday centerpiece. Three to five vessels in varying heights grouped together read as a deliberate floral arrangement rather than a single vase of flowers.
Use whatever is blooming in your garden. Mixed informal arrangements of different flower types look more generous and abundant than single-species arrangements in formal vases. Wrap the jar bases with twine or a strip of kraft paper for a more finished look.
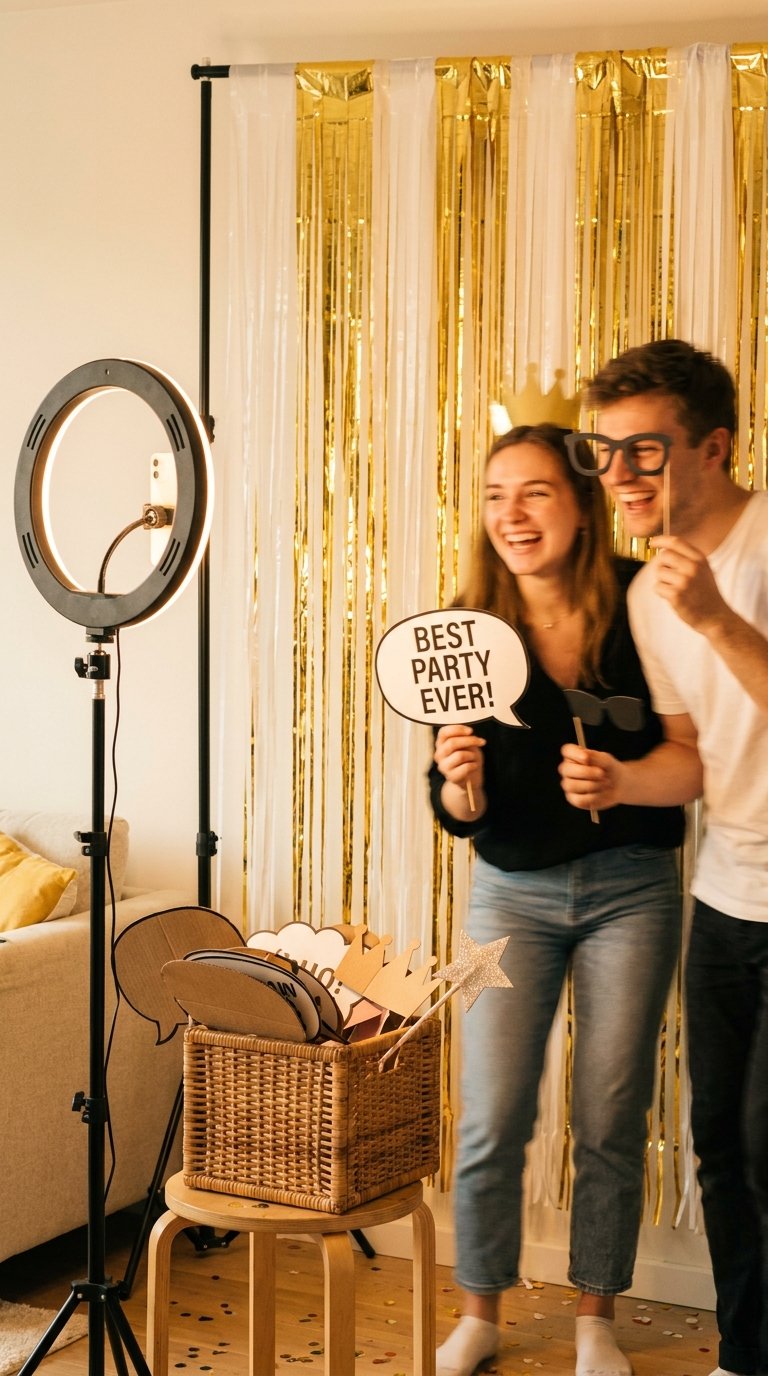
16. Make a DIY Photo Booth Corner
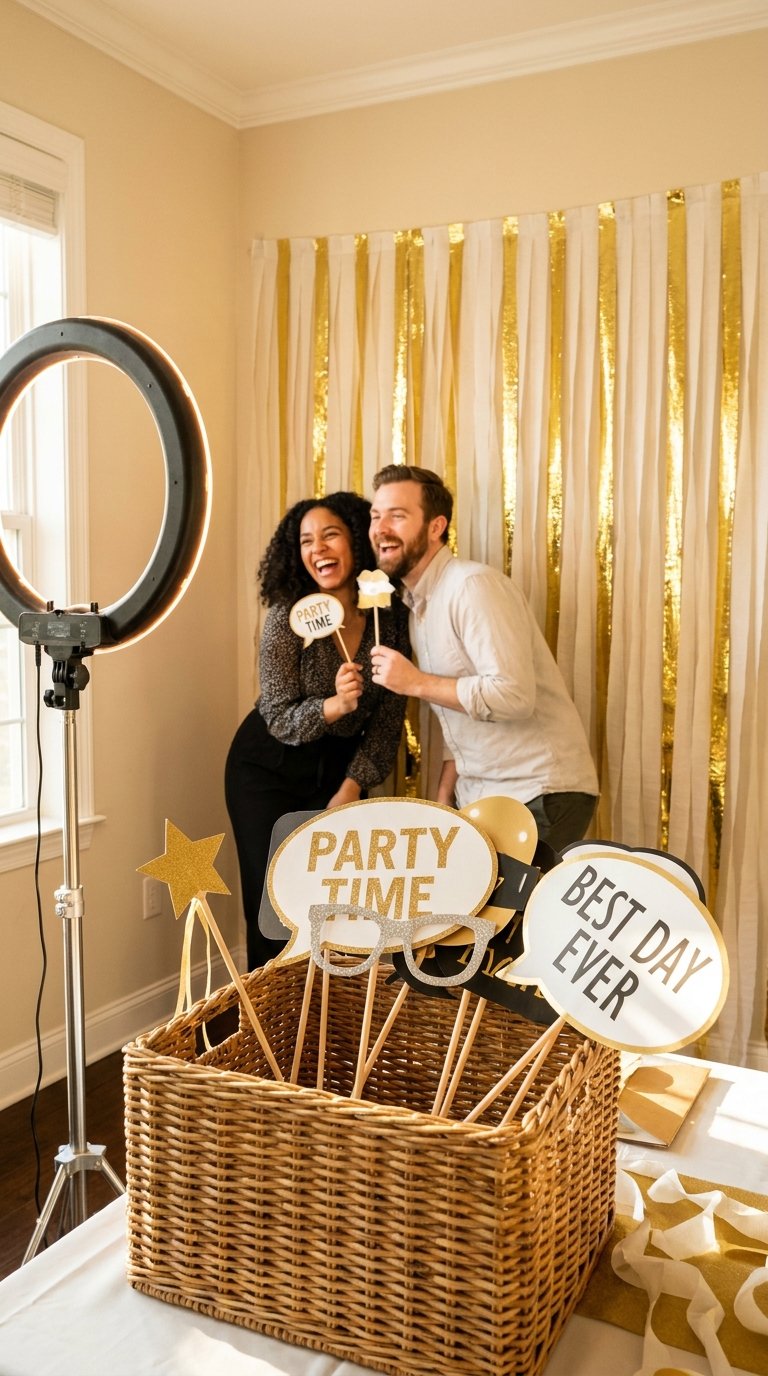
A photo booth corner uses a decorated wall section, a small prop collection, and good lighting to create a fun, interactive party feature. Guests photograph themselves throughout the party and the birthday person ends up with a collection of candid images that no professional photographer would capture.
Props to make at home:
- Speech bubble signs on wooden sticks cut from cardstock
- Oversized glasses frames cut from black cardstock
- Star wands made from cardstock stars on wooden dowels
- A simple sign reading “Birthday Squad” or the person’s age
17. Make Tissue Pom-Poms for the Ceiling
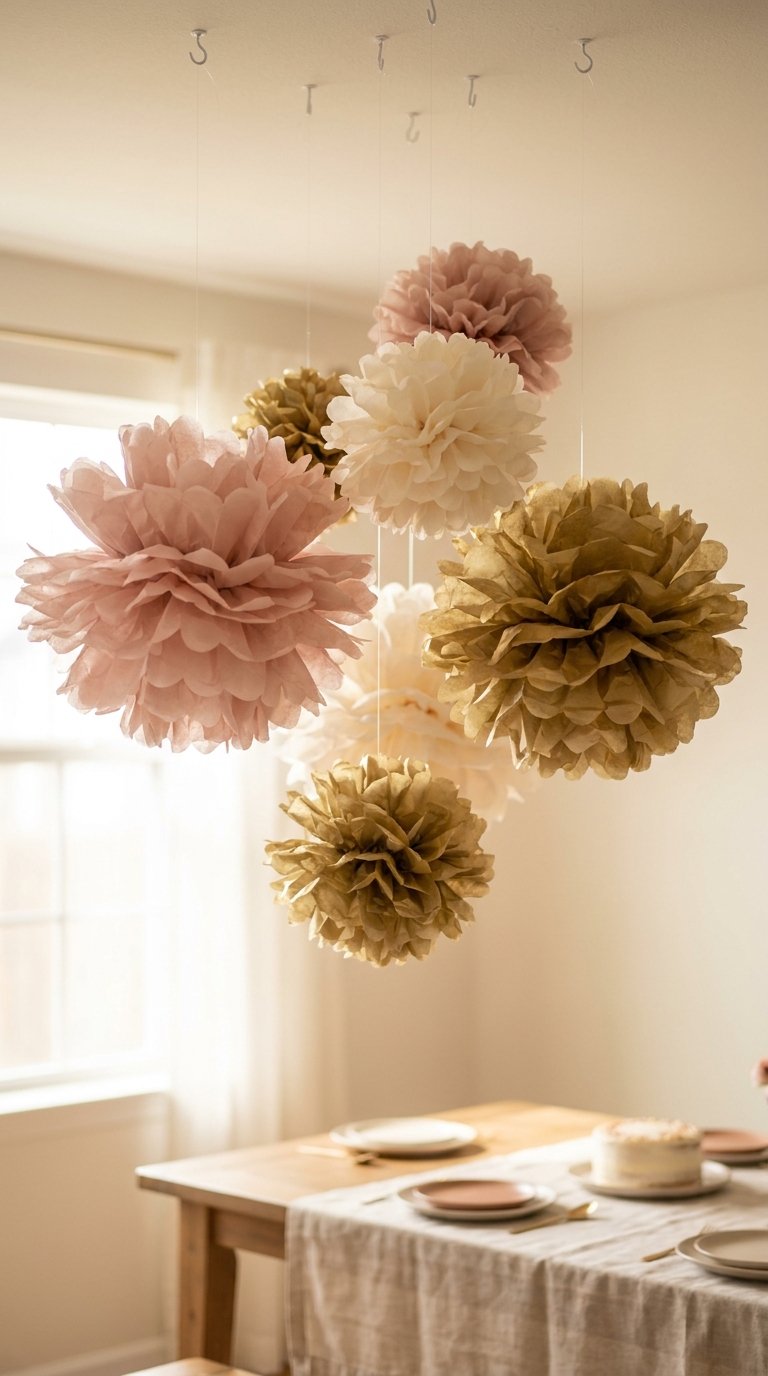
Tissue pom-poms hang from the ceiling on thread and fill empty ceiling space with color and texture. They use the same tissue paper accordion fold technique as paper flowers but finish as a full sphere rather than a flat flower.
Fold eight sheets of tissue paper accordion-style, tie the center with wire, and fan out both sides to form a sphere. Hang the pom-pom from its wire on a clear thread attached to a ceiling hook. A group of five pom-poms in varying sizes clustered above the party table creates a dramatic overhead display.
Pom-pom sizing guide:
- Large: 40cm diameter, use as anchor points in the ceiling arrangement
- Medium: 25cm diameter, fill the space between large pom-poms
- Small: 15cm diameter, hang in clusters for a denser arrangement
18. Create a Balloon Wall with Tape
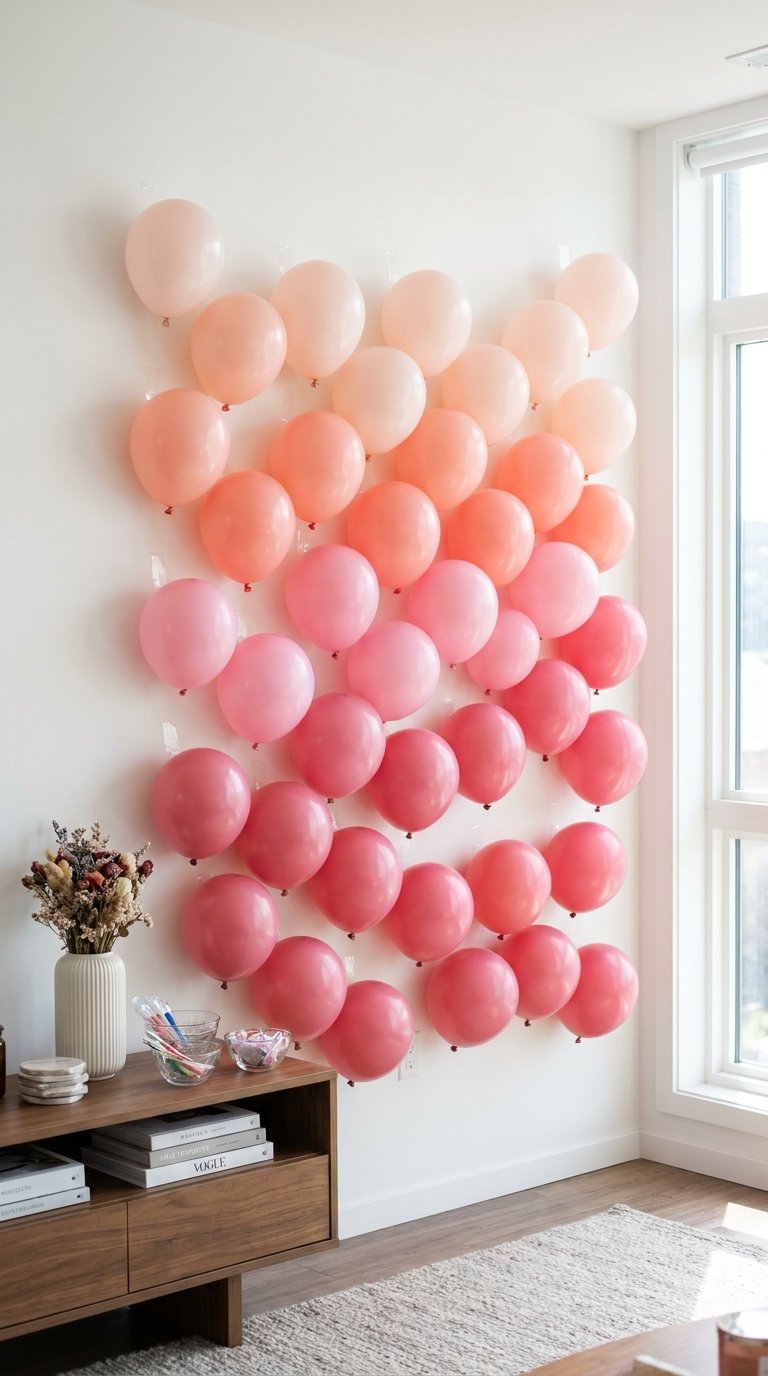
A balloon wall using clear removable tape sticks individual inflated balloons directly to a wall in a grid or organic pattern. No fishing line, no frame, no specific arrangement skill required. Tape one balloon at a time and step back regularly to assess the density and coverage.
Use low-tack removable tape on the balloon knot, not on the balloon surface itself. Tape applied to the balloon surface leaves residue and risks popping the balloon when removed. The knot holds the tape cleanly and releases from the wall without damage.
Balloon wall color arrangements:
- Gradient: one color family transitioning from light to dark across the wall
- Ombre: single color going from pale at the top to saturated at the bottom
- Random mix: three colors distributed evenly across the wall
- Solid color: one consistent color for a minimal, modern look
19. Make a Personalized Birthday Sign
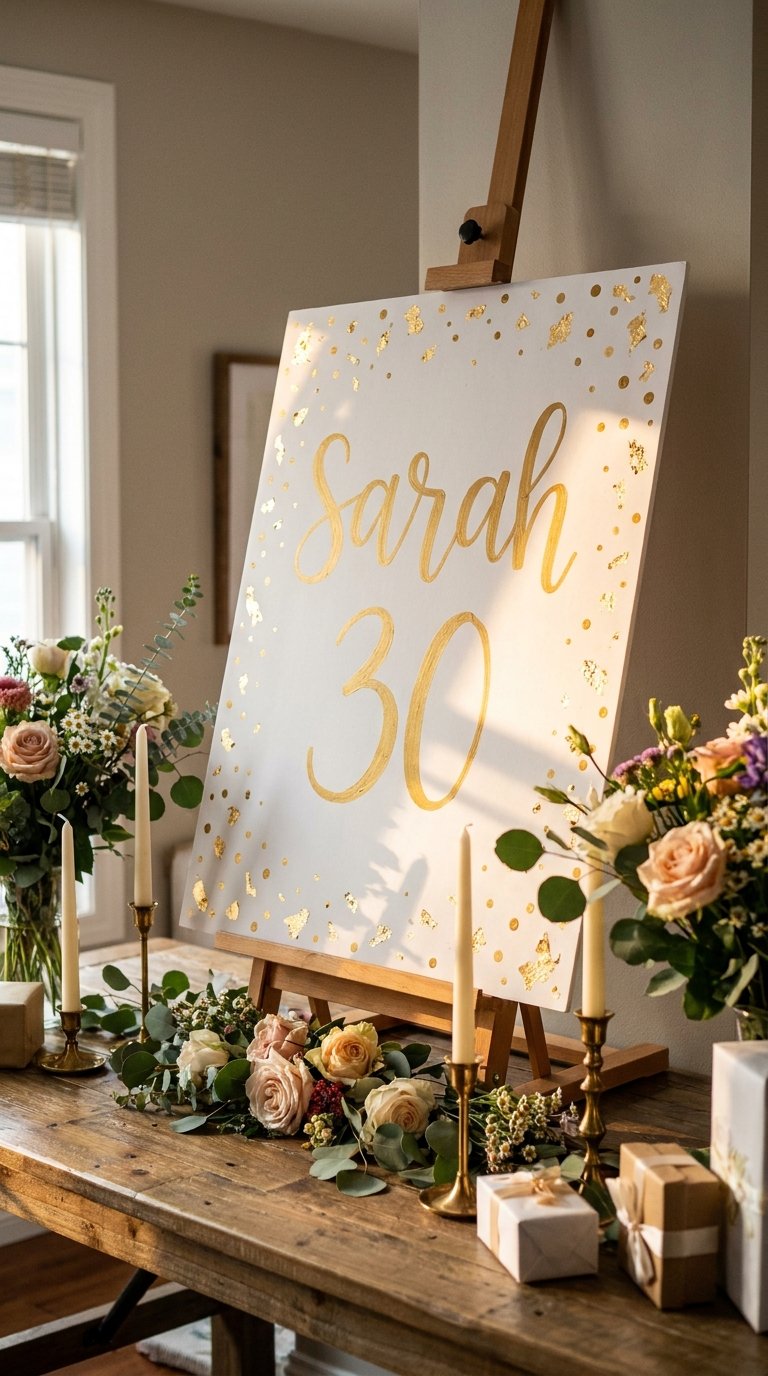
A large personalized birthday sign on a piece of foam board, a canvas, or a large sheet of card stock adds a focal point to the party space that standard banners cannot match. Write the birthday person’s name in large letters, add their age, and decorate around the text with simple drawings, patterns, or painted shapes.
Use a projector app on your phone to project the lettering onto the board and trace it if freehand lettering is not your strength. Paint inside the traced letters with acrylic paint. Add gold leaf flakes, glitter, or colored dots around the letters for extra decoration.
20. Style a Gift Table Display
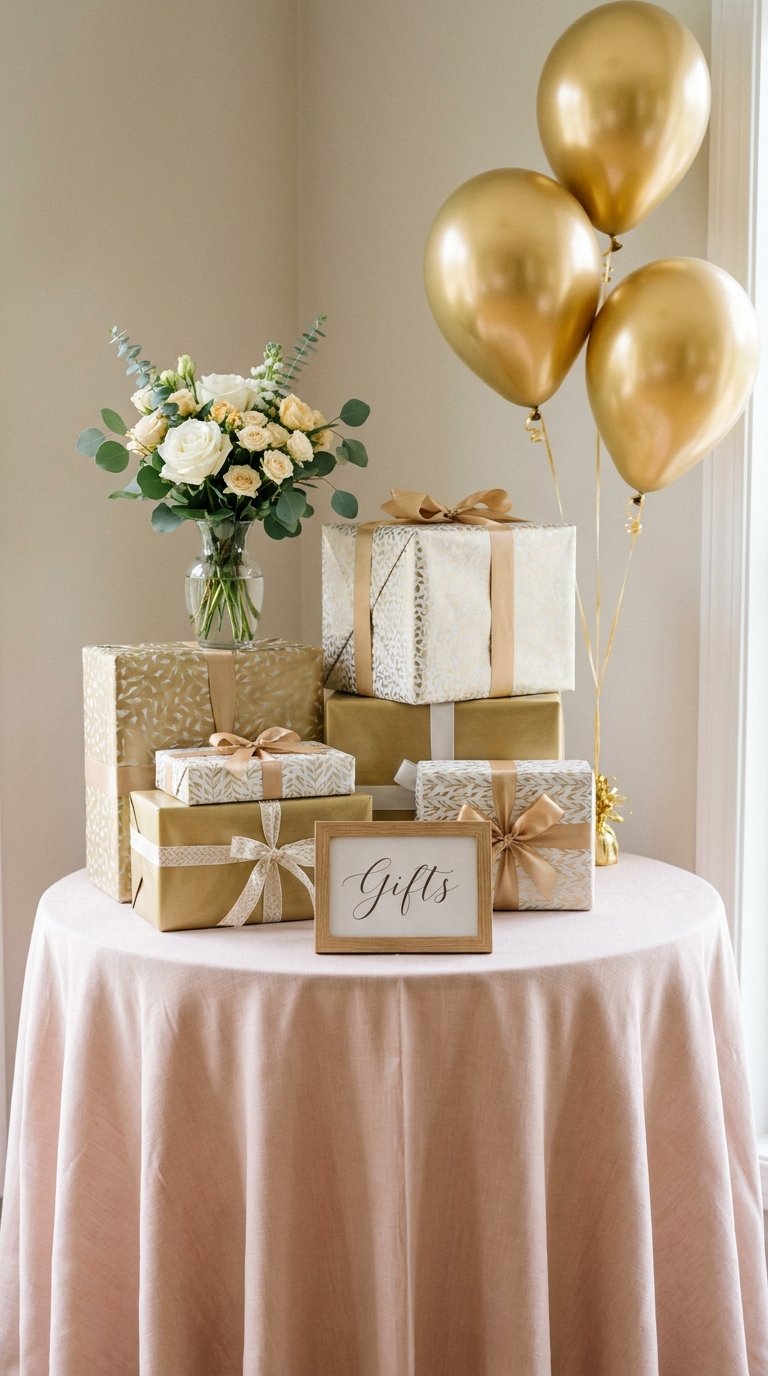
A gift table uses a plain table covered with fabric or a paper tablecloth as its base. Arrange gifts at different heights using boxes hidden under fabric to create levels. Add a small floral arrangement, a balloon cluster, and a sign reading Gifts or Presents to define the table’s purpose.
A well-styled gift table prevents the pile of gifts from looking like a random heap in the corner. It gives guests a clear place to put presents and creates a photographic moment that most birthday hosts overlook entirely.
21. Make Edible Decorations for the Table
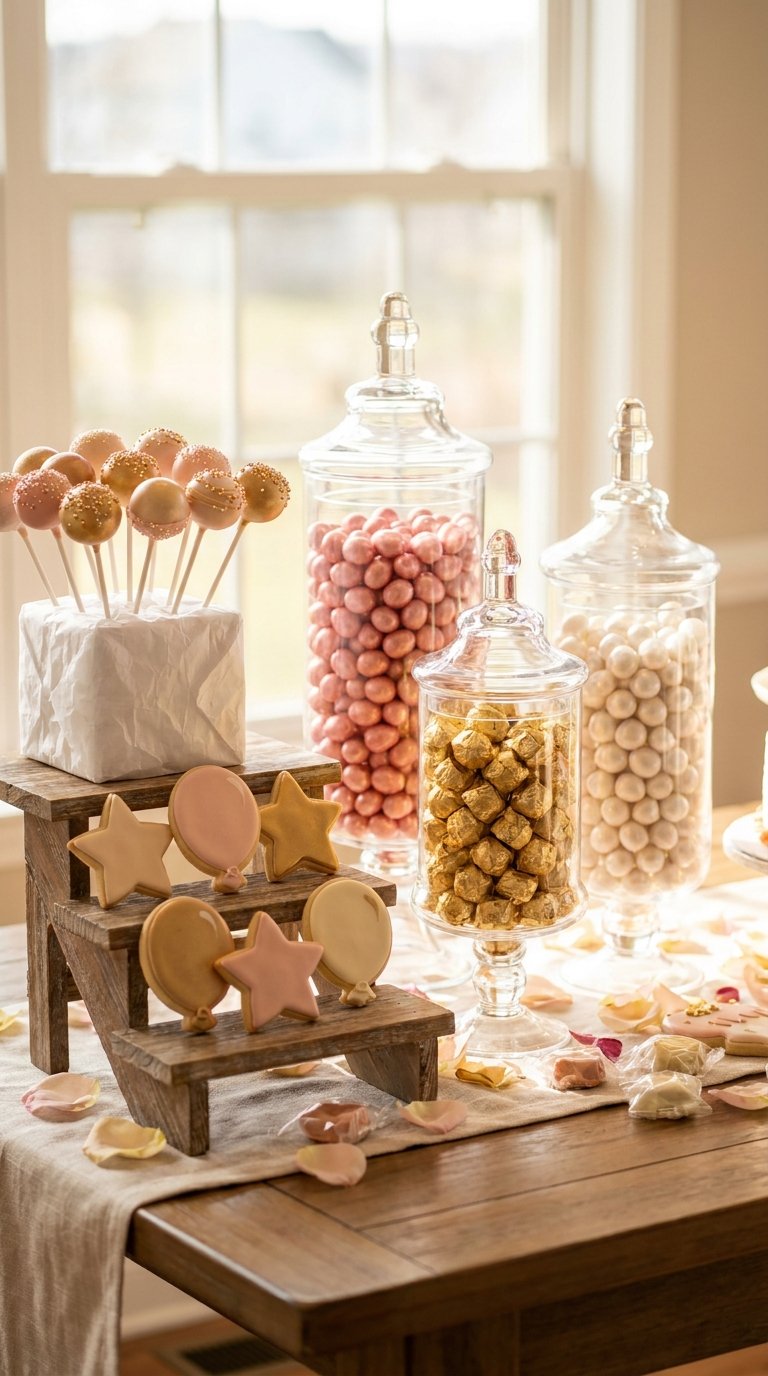
Edible decorations double as both decoration and food, which makes them the most efficient party decoration category. A bowl of colorful candy in the party colors, a stack of macarons arranged on a tiered stand, or a cluster of cake pops in coordinating colors add decoration to the dessert table that guests eat by the end of the party.
FYI, edible decorations require zero cleanup because they disappear during the celebration. That alone makes them worth including in any DIY birthday decoration plan.
Edible decoration ideas:
- Colorful candy in glass jars grouped by color
- Chocolate bark in party colors broken into irregular pieces
- Decorated sugar cookies in shapes relevant to the party theme
- Cake pops in two coordinating colors arranged in a styrofoam block
Conclusion
DIY birthday decorations work best when you choose five to six ideas from this list and execute them well rather than attempting all twenty-one at once. Pick a color palette first. Then choose your backdrop, your ceiling decoration, your table display, and one or two accent pieces. Everything else fills in naturally.
The difference between a party that looks considered and one that looks thrown together is almost never budget. It is almost always a consistent color palette applied across three to four well-executed decoration elements.
Start with the balloon arch or the streamer backdrop. Add a dessert table display. Hang some string lights. That combination alone transforms any room into a party space worth celebrating in.